Linux from Zero – Online Appendix
This is the online appendix to *Linux from Zero*. It holds everything that would go stale too quickly in print: install lines, versions, model names, provider lists. Address: **https://linuxfromzero.com/appendix**.Every section starts with the date it was checked and its sources. The rule is the same as in the book: if this page and the official documentation disagree, the documentation wins. Copy commands only from here or from the official source, never from a random blog.
The book’s examples use the desktop user john, the server user admin, the server address 203.0.113.10, and the domain john-site.com. Always substitute your own values.
Contents
- Versions table
- Installing Docker on an Ubuntu 26.04 server
- Installing Ollama
- A small model to start with
- Open WebUI behind nginx
- Path B: provider API settings, models, and prices
- Choosing a VPS provider
- Domains and registrars
- Let’s Encrypt and certbot
- The “elsewhere” backup: cloud and encryption
- Disk space: logs and Docker
- App formats: .deb, .AppImage, Flatpak
- Links (Appendix E updates)
- Color figures
- Copy the commands
- Errata
Versions table
Checked 2026-09-24. Sources: https://linuxmint.com/download_all.php · https://documentation.ubuntu.com/release-notes/26.04/ · https://www.debian.org/releases/ · https://docs.docker.com/engine/release-notes/29/ · https://git-scm.com/ · https://packages.ubuntu.com/resolute/git · https://packages.ubuntu.com/noble-updates/git · https://nginx.org/en/download.html · https://launchpad.net/ubuntu/+source/nginx| Component | In the book (tested) | Now (2026-09-24) |
|---|---|---|
| Desktop system | Linux Mint 22.3 “Zena” | Linux Mint 22.3 “Zena” is the latest, recommended release; based on Ubuntu 24.04, supported until April 2029. Linux Mint 23 has not been released yet. |
| Server system | Ubuntu Server 26.04 LTS | Ubuntu 26.04 LTS “Resolute Raccoon”, released 2026-04-23; point release 26.04.1 is out. Standard support until May 2031 (Ubuntu release cycle). |
| Debian | Debian 13 “trixie” | Debian 13 “trixie” is stable; latest point release 13.7 (2026-09-12). |
| Docker Engine | 29.x | 29.8.1 (2026-09-15) |
| Git | 2.43 (Mint 22.3), 2.53 (Ubuntu 26.04); latest 2.55 | Mint 22.3 repositories: 2.43.0; Ubuntu 26.04 repositories: 2.53.0; latest Git release: 2.55.0 (2026-06-29). |
| nginx | 1.30.x | nginx.org: stable branch 1.30.5, mainline 1.31.6. Ubuntu 26.04 repositories: 1.28.3 (package 1.28.3-2ubuntu1.11). |
To check your own versions:
cat /etc/os-release
docker --version
git --version
nginx -v
A note on nginx. If you installed nginx from the Ubuntu 26.04 repositories (
sudo apt install nginx, as in the book),nginx -vshows 1.28.3, not 1.30.x. The directives the book uses (server,listen,server_name,location,proxy_pass,client_max_body_size) are core directives and work the same way in both branches.
Installing Docker on an Ubuntu 26.04 server
Checked 2026-09-24. Sources: https://docs.docker.com/engine/install/ubuntu/ · https://docs.docker.com/engine/install/linux-postinstall/ · https://docs.docker.com/engine/network/packet-filtering-firewalls/These are the lines Chapter 22 deliberately leaves out. They mirror the official page “Install Docker Engine on Ubuntu.” Ubuntu 26.04 LTS (Resolute) is on the officially supported list, along with 24.04 and 22.04. You are working on the server, logged in over SSH as admin.
0. (Optional on a fresh server) Remove conflicting packages. If anything was already installed from the Ubuntu repositories (docker.io, podman-docker, and so on), the official guide says to remove it first:
sudo apt remove $(dpkg --get-selections docker.io docker-compose docker-compose-v2 docker-doc docker-buildx podman-docker containerd runc | cut -f1)If none of these packages is installed, apt simply reports that there is nothing to remove.
1. The repository key.
sudo apt update
sudo apt install ca-certificates curl
sudo install -m 0755 -d /etc/apt/keyrings
sudo curl -fsSL https://download.docker.com/linux/ubuntu/gpg -o /etc/apt/keyrings/docker.asc
sudo chmod a+r /etc/apt/keyrings/docker.asc
Here curl only downloads the key file to /etc/apt/keyrings/docker.asc. It runs nothing.
2. The repository definition (deb822 format, file docker.sources).
sudo tee /etc/apt/sources.list.d/docker.sources <<EOF
Types: deb
URIs: https://download.docker.com/linux/ubuntu
Suites: $(. /etc/os-release && echo "${UBUNTU_CODENAME:-$VERSION_CODENAME}")
Components: stable
Architectures: $(dpkg --print-architecture)
Signed-By: /etc/apt/keyrings/docker.asc
EOF
Copy the whole block, up to and including the final EOF line. Check it with cat /etc/apt/sources.list.d/docker.sources: the Suites: line should say resolute, and the Architectures: line amd64 (or arm64).
3. Install the packages.
sudo apt update
sudo apt install docker-ce docker-ce-cli containerd.io docker-buildx-plugin docker-compose-plugin
4. Check.
docker --version
systemctl status docker
sudo docker run hello-world
docker --version shows a number starting with 29; systemctl status docker shows active (running) (press q to leave); the hello-world container prints a greeting that starts with Hello from Docker!.
5. Working without sudo. As in the book:
sudo usermod -aG docker adminThen log out (exit) and connect over SSH again. Check: docker ps without sudo answers with an empty table.
Important. The official Docker documentation says it plainly: the
dockergroup grants root-level privileges. Add only a user you would also givesudo.
Important. Ports that Docker publishes bypass ufw rules; this is officially documented. That is why the book writes ports with
127.0.0.1:in front, for example"127.0.0.1:3000:8080".
Installing Ollama
Checked 2026-09-24. Sources: https://docs.ollama.com/linux · https://docs.ollama.com/faqOption A: the official install script (as in the book)
curl -fsSL https://ollama.com/install.sh | shImportant. This line downloads someone else’s script and runs it immediately. The book’s rule: only from a source you trust (here, the official Ollama website), and preferably after reading it. Want to see what it would do first? Download it without running it, read it, and only then run it:
curl -fsSL https://ollama.com/install.sh -o /tmp/ollama-install.sh
less /tmp/ollama-install.sh
sh /tmp/ollama-install.sh
Check: systemctl status ollama shows active (running). To update Ollama later, run the same script again.
Option B: manual install with systemd (no script)
If you would rather not run the script, the official documentation describes a manual path. The example is for a regular amd64 server (on an ARM server, replace amd64 with arm64 in the address).
1. Download the program and unpack it into /usr:
curl -fsSL https://ollama.com/download/ollama-linux-amd64.tar.zst | sudo tar x -C /usrHere curl hands the archive to tar, not to a shell: nothing is executed, only unpacked. The archive is compressed with zstd; if tar complains that it cannot unpack it, install sudo apt install zstd first and repeat. Check: ollama -v.
2. Create the ollama system user:
sudo useradd -r -s /bin/false -U -m -d /usr/share/ollama ollama
sudo usermod -a -G ollama $(whoami)
3. Create the service file with sudo nano /etc/systemd/system/ollama.service:
[Unit]
Description=Ollama Service
After=network-online.target

[Service]
ExecStart=/usr/bin/ollama serve
User=ollama
Group=ollama
Restart=always
RestartSec=3

[Install]
WantedBy=multi-user.target
(The official example also has the line Environment="PATH=$PATH"; the install script fills in your PATH at install time. In a hand-written file you can leave it out, because ExecStart gives the full path /usr/bin/ollama.)
4. Enable and start it:
sudo systemctl daemon-reload
sudo systemctl enable ollama
sudo systemctl start ollama
Check: systemctl status ollama shows active (running).
OLLAMA_HOST: where Ollama listens
By default, Ollama listens only on 127.0.0.1, port 11434, so it cannot be reached from the network. That is exactly what the book’s project needs: nothing to change.
If you ever need to change the address or another setting, it goes into an override, not into the service file itself:
sudo systemctl edit ollama.serviceIn the editor that opens, under [Service], add for example:
[Service]
Environment="OLLAMA_HOST=127.0.0.1:11434"
Then:
sudo systemctl daemon-reload
sudo systemctl restart ollama
Dangerous command.
OLLAMA_HOST=0.0.0.0:11434opens Ollama to the whole network, with no password. Do not do this on a VPS. If Ollama has to be reachable from outside, put it behind nginx with HTTPS and access control.
On Linux, models are stored in /usr/share/ollama/.ollama/models. The OLLAMA_MODELS variable points to a different directory (set it the same systemctl edit way); the ollama user needs read and write access to it.
A small model to start with
Checked 2026-09-24. Sources: https://ollama.com/library/llama3.2/tags · https://ollama.com/library/qwen3/tags · https://ollama.com/library/gemma3/tagsThe book writes <model> in place of a model name. To start, we suggest:
llama3.2:1b
ollama run llama3.2:1bInside the container (the Chapter 24 compose file):
docker compose exec ollama ollama pull llama3.2:1bOther small models from the Ollama library, if you want to compare:
| Model | Download size (Ollama library, 2026-09-24) |
|---|---|
gemma3:270m |
292 MB |
qwen3:0.6b |
523 MB |
gemma3:1b |
815 MB |
llama3.2:1b |
1.3 GB |
qwen3:1.7b |
1.4 GB |
llama3.2:3b |
2.0 GB |
qwen3:4b |
2.5 GB |
gemma3:4b |
3.3 GB |
How much RAM do you need? The Ollama library does not state exact RAM requirements, so we do not print any here. A cautious rule: a model needs at least as much free RAM as its file size, plus some room to work. Check on your own server:
free -h
ollama ps
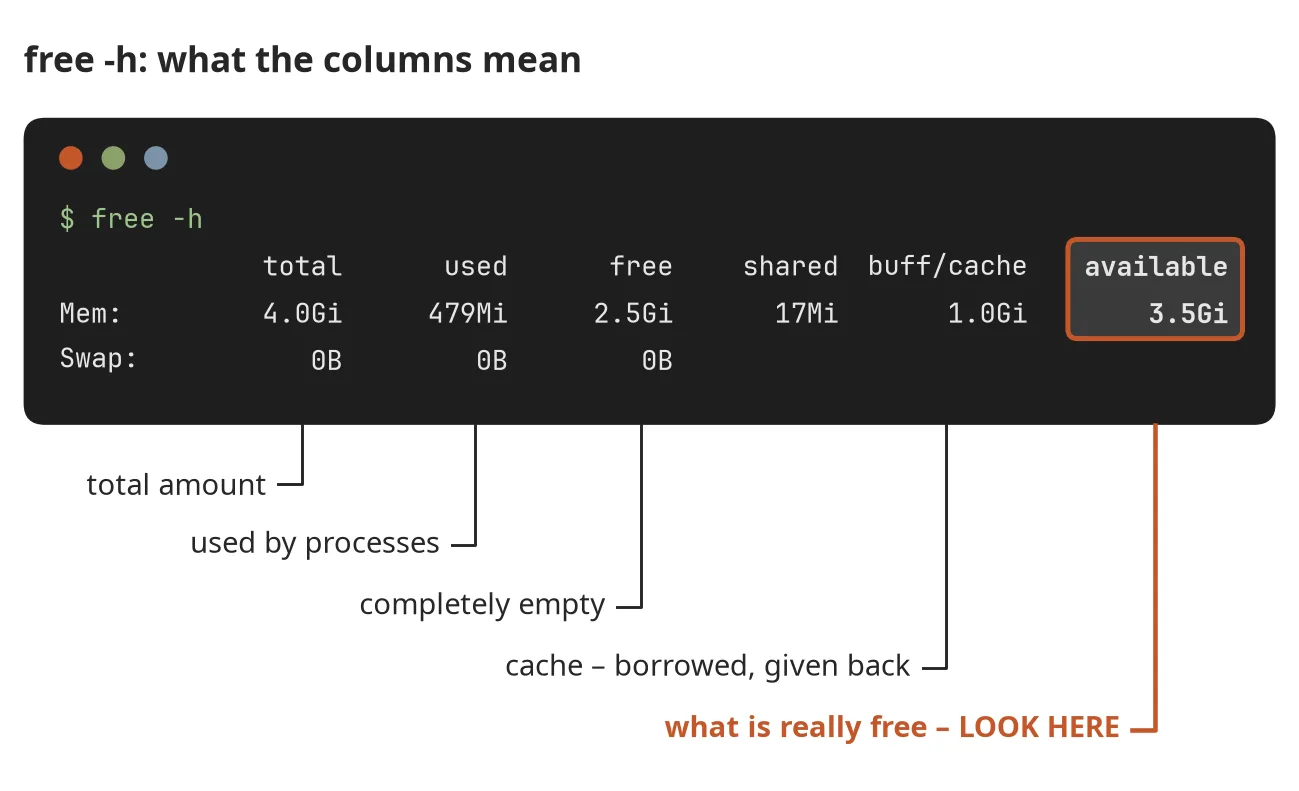
The available column of free -h shows how much memory is free; ollama ps (while a model is loaded) shows in its SIZE column how much the model actually takes. If available is smaller than the model, pick a smaller model or take path B.
Updated. Sizes and tags in the Ollama library change. Before you download, look at the model’s page at
https://ollama.com/library/<name>/tags. The smallest models answer quickly but simply; that is normal at this size.
Open WebUI behind nginx
Checked 2026-09-24. Sources: https://docs.openwebui.com/getting-started/quick-start/ · https://docs.openwebui.com/reference/https/nginx/ · https://docs.openwebui.com/reference/env-configuration/The book’s interface is still Open WebUI; we do not currently recommend a replacement. The official image is unchanged: ghcr.io/open-webui/open-webui:main, data in /app/backend/data, and the interface listens on 8080 inside the container.
Two additions to the book’s nginx block, recommended by the official Open WebUI documentation:
proxy_buffering off;andproxy_cache off;. Without them, nginx can re-chunk the live-streamed answer, and you will see broken formatting in the chat (visible##and**, missing words).- The
CORS_ALLOW_ORIGINvariable in the interface container. Behind a reverse proxy, the WebSocket connection can fail without it.
The full block for /etc/nginx/sites-available/ai:
server {
    listen 80;
    listen [::]:80;
    server_name ai.john-site.com;

    client_max_body_size 50M;

    location / {
        proxy_pass http://127.0.0.1:3000;
        proxy_http_version 1.1;
        proxy_set_header Upgrade $http_upgrade;
        proxy_set_header Connection "upgrade";
        proxy_set_header Host $host;
        proxy_set_header X-Real-IP $remote_addr;
        proxy_set_header X-Forwarded-For $proxy_add_x_forwarded_for;
        proxy_set_header X-Forwarded-Proto $scheme;

        proxy_buffering off;
        proxy_cache off;
    }
}
In the compose file, under the interface’s environment:, add a line with your address:
    environment:
      - OLLAMA_BASE_URL=http://ollama:11434
      - CORS_ALLOW_ORIGIN=https://ai.john-site.com
The rest is as in the book: docker compose up -d, sudo nginx -t, sudo systemctl reload nginx, sudo certbot --nginx -d ai.john-site.com.
If very long answers get cut off, the official documentation suggests raising the timeouts in the same location block: proxy_read_timeout and proxy_send_timeout (its example uses 1800 seconds for long tasks). A small model usually does not need this.
Important. The ports line stays
"127.0.0.1:3000:8080". Without127.0.0.1, the interface would open to the whole internet, bypassing ufw.
Path B: provider API settings, models, and prices
Checked 2026-09-24. Sources: https://docs.openwebui.com/reference/env-configuration/ · https://developers.openai.com/api/docs/models · https://developers.openai.com/api/docs/pricing · https://platform.claude.com/docs/en/about-claude/models/overview · https://platform.claude.com/docs/en/about-claude/pricing · https://platform.claude.com/docs/en/api/openai-sdkModel name and prices (Chapter 23)
gpt-6-luna, used in the book’s example, is still on OpenAI’s model list as of 2026-09-24, described as its most efficient model for high-volume tasks. The Chapter 23 command works unchanged.- Token prices change, so we do not copy them here. Use the official pricing pages:
- OpenAI: https://developers.openai.com/api/docs/pricing
- Anthropic (Claude): https://platform.claude.com/docs/en/about-claude/pricing
- Current model names:
Open WebUI with a provider API (Chapter 24, path B)
Open WebUI connects to any OpenAI-compatible API through two variables: OPENAI_API_BASE_URL (the API address) and OPENAI_API_KEY (the key).
1. The file ~/ai-service/.env (permissions chmod 600, as in the book), with one line:
OPENAI_API_KEY=sk-...Replace sk-... with your real key from the provider’s keys page. Never put this file in Git or send it to anyone.
2. ~/ai-service/compose.yaml for path B, without the ollama container and without depends_on:
services:
  ui:
    image: ghcr.io/open-webui/open-webui:main
    restart: unless-stopped
    environment:
      - ENABLE_OLLAMA_API=false
      - OPENAI_API_BASE_URL=https://api.openai.com/v1
      - OPENAI_API_KEY=${OPENAI_API_KEY}
      - CORS_ALLOW_ORIGIN=https://ai.john-site.com
    volumes:
      - ui-data:/app/backend/data
    ports:
      - "127.0.0.1:3000:8080"

volumes:
  ui-data:
${OPENAI_API_KEY} is only the variable’s name: docker compose takes the value from the .env file in the same directory by itself. The key itself never appears in the compose file.
3. docker compose up -d, then check: docker compose ps shows Up.
Important. Open WebUI reads
OPENAI_API_BASE_URLandOPENAI_API_KEYonly on its first start and then stores them in its data volume. If you later change the key in.env, the interface will not notice. Enter a new key or address in the interface’s admin settings instead: Settings → Admin → Connections.
Another provider. Any provider that offers an OpenAI-compatible API connects the same way: change only OPENAI_API_BASE_URL to the address given in its documentation, and the key in .env.
Anthropic (Claude). Anthropic offers an OpenAI SDK compatibility layer at https://api.anthropic.com/v1/, used with a Claude API key. However, Anthropic’s own documentation says the layer is meant for testing and comparing models, not as a long-term or production-ready solution, and some parameters are ignored. We have not checked whether every Open WebUI feature works through it: unknown. For the full feature set, Anthropic recommends its native Claude API.
Choosing a VPS provider
Checked 2026-09-24. Sources: https://docs.hetzner.cloud/changelog · https://docs.hetzner.com/cloud/servers/backups-snapshots/overview/ · https://docs.hetzner.com/cloud/servers/getting-started/vnc-console/ · https://docs.digitalocean.com/release-notes/ · https://docs.digitalocean.com/platform/regional-availability/ · https://docs.digitalocean.com/products/backups/ · https://docs.digitalocean.com/products/droplets/how-to/connect-with-console/Criteria (the same five as in Chapter 16): a data center near you; price; backups; a web console (required!); an Ubuntu 26.04 LTS image.
Prices. We deliberately print no prices: providers set them, they change, and they depend on the plan, region, and taxes. Compare providers’ pricing pages on the same day for the same plan (1–2 GB RAM, 1 core), and always check what backups cost.
Comparison. Only what we could verify in the provider’s official documentation. “Not verified” means: check it yourself on the provider’s site.
| Provider | Ubuntu 26.04 LTS | Data centers | Backups | Web console |
|---|---|---|---|---|
| Hetzner Cloud | Yes (since 2026-05-18, image ubuntu-26.04) |
Falkenstein and Nuremberg (Germany), Helsinki (Finland), Ashburn and Hillsboro (USA), Singapore | Automatic daily, 7 slots; price on the provider’s site | Yes (console in the Cloud Console) |
| DigitalOcean | Yes (since 2026-07-01, ubuntu-26-04-x64) |
In Europe: Amsterdam, Frankfurt, London; more regions worldwide | Paid add-on; frequency from every 4 hours to weekly | Yes (Droplet Console and Recovery Console) |
| OVHcloud | Not verified | Not verified | Not verified | Not verified |
| Scaleway | Not verified | Not verified | Not verified | Not verified |
The list is short, incomplete, and not an endorsement: nobody pays for these links. The first two are listed first only because we could verify their details in official documentation. For a local or regional provider, apply the same five criteria and ask directly: “Do you offer an Ubuntu 26.04 LTS image and a web console?”
Domains and registrars
Checked 2026-09-24. Sources: https://www.icann.org/en/accredited-registrars · https://www.iana.org/domains/root/db · https://developers.cloudflare.com/registrar/Generic endings (.com, .net, .org, and so on) are sold by registrars accredited by ICANN. The official list: https://www.icann.org/en/accredited-registrars
Country-code endings (.us, .uk, .de, .lt, and so on) are run by each country’s registry under its own rules. The IANA root zone database shows who manages each ending: https://www.iana.org/domains/root/db
Why prices differ. The registry for each ending sets the wholesale price and the rules. For generic endings, the registries operate under contracts with ICANN, which also adds its own fee to generic-domain registrations; country-code endings follow their national registry’s policy. The registrar adds its margin on top. So the same ending costs different amounts at different registrars, and different endings cost different amounts even at the same registrar. We print no prices here, because they change.
How to choose a registrar:
- Compare the renewal price, not just the first year; the first year is often cheaper.
- The control panel must let you manage DNS records yourself (A, AAAA, CNAME); you need that in Chapter 17.
- Check that transferring the domain to another registrar is straightforward.
- Turn on two-factor sign-in for the account: losing a domain hurts more than losing a server.
One example of how registrars differ in their model: Cloudflare Registrar’s documentation says it charges only the registry and ICANN fees, with no markup. Which endings it supports is listed in its documentation.
Let's Encrypt and certbot
Checked 2026-09-24. Sources: https://letsencrypt.org/2025/12/02/from-90-to-45 · https://letsencrypt.org/2025/06/26/expiration-notification-service-has-ended · https://certbot.eff.org/instructions?ws=nginx&os=snap · https://packages.ubuntu.com/resolute/certbotCertificate lifetimes are changing:
| Date | Default (classic) profile |
|---|---|
| Now | 90 days |
| From 2027-02-10 | 64 days |
| From 2028-02-16 | 45 days |
Since 2026-05-13 you can opt in to the tlsserver profile with 45-day certificates; there is also a shortlived profile with 6-day certificates. Readers of this book do not need to choose anything: the default profile is fine.
What this means for you: nothing manual. certbot renews the certificate by itself when about a third of its lifetime is left. What matters is that automatic renewal works; check it with the book’s command:
sudo certbot renew --dry-run
systemctl list-timers | grep certbot
No emails. Let’s Encrypt stopped sending expiration warning emails on 2025-06-04. That makes a monthly renew --dry-run a good habit.
apt or snap? The book installs certbot from the Ubuntu repositories: sudo apt install certbot python3-certbot-nginx (Ubuntu 26.04 ships certbot 4.0.0). That works. The certbot developers’ (EFF) page recommends installing it through snap; if you choose that route, remove the apt version first and follow the official instructions. Do not mix both methods on one server.
The "elsewhere" backup: cloud and encryption
Checked 2026-09-24. Sources: https://restic.readthedocs.io/en/stable/020_installation.html · https://restic.readthedocs.io/en/stable/030_preparing_a_new_repo.html · https://restic.readthedocs.io/en/stable/050_restore.html · https://www.borgbackup.org/Where the “elsewhere” copy can go
- Your home computer: the Chapter 18 route (rsync over SSH). Free, but it depends on your own disk.
- A second server, or storage reachable over SFTP: the same SSH principle, but the copy lives in another provider’s data center.
- S3-compatible object storage: many cloud providers offer it; you pay for the gigabytes stored and sometimes for downloads.
We do not compare prices with numbers, because they change. Compare: the price per GB per month, the fee for downloading data (you need it to restore!), the country of the data center, and any minimum storage period.
A tool: restic (always encrypts)
The book deliberately named no tool. We suggest restic: it always encrypts its backups, copies only what changed, and works with SFTP, S3-compatible storage, and more. An alternative is BorgBackup (https://www.borgbackup.org/).
Example on the server: the ~/backups directory travels to another server over SFTP (backup@198.51.100.20: replace with your own address and user; the SSH key must be set up as in Chapter 15).
sudo apt install restic
restic -r sftp:backup@198.51.100.20:/srv/restic-repo init
restic -r sftp:backup@198.51.100.20:/srv/restic-repo backup ~/backups
restic -r sftp:backup@198.51.100.20:/srv/restic-repo snapshots
restic -r sftp:backup@198.51.100.20:/srv/restic-repo restore latest --target /tmp/restoreinitcreates the repository once and asks for a password.backupmakes a copy;snapshotslists the copies.restore latest --target /tmp/restoreis a restore test into a temporary directory, as in the book; then compare withdiff -r.
Important. The restic documentation says it plainly: losing your password means your data is irrecoverably lost. Write the password on paper and keep it somewhere other than the server. As the book says: an encrypted backup without its key is not a backup.
Disk space: logs and Docker
Checked 2026-09-24. Sources: https://manpages.ubuntu.com/manpages/resolute/man1/journalctl.1.html · https://docs.docker.com/reference/cli/docker/system/df/ · https://docs.docker.com/reference/cli/docker/system/prune/ · https://docs.docker.com/engine/logging/configure/Appendices C and D mention two commands the chapters did not cover. Here is more.
The system journal
journalctl --disk-usageShows how much space all journal files take (read-only, safe). If it is too much, you can remove the oldest archived journal files:
sudo journalctl --vacuum-size=500Mor by age:
sudo journalctl --vacuum-time=4weeksOnly the archived part is cleaned, so after vacuuming --disk-usage may show a little more than the size you gave. Deleted journal entries cannot be recovered; if you are investigating a fault, read what you need first.
Docker
docker system dfSIZE shows how much space images, containers, volumes, and build cache take; RECLAIMABLE shows how much you could get back.
To clean up:
docker system pruneThis removes all stopped containers, unused networks, dangling (untagged) images, and unused build cache. It asks for confirmation first ([y/N]).
Dangerous command.
docker system prune -aalso deletes all unused images (you will have to download them again), and--volumesdeletes unused anonymous volumes, which means data. The volumes in the book’s compose files have names, but still: before using--volumes, checkdocker volume lsand make sure you have a backup.
Docker’s container logs also grow by default. The official documentation suggests enabling log rotation or using the local logging driver; see https://docs.docker.com/engine/logging/configure/
App formats: .deb, .AppImage, Flatpak
Checked 2026-09-24. Sources: https://docs.appimage.org/introduction/quickstart.html · https://flathub.org/ · https://linuxmint-user-guide.readthedocs.io/Chapter 3 promised more on file formats. The safest route is still the Software Manager.
-
Flatpak. Mint’s Software Manager also offers some applications as Flatpak packages from Flathub (https://flathub.org/). They are ordinary Linux packages that run separately from the system libraries. Installing them through the Software Manager needs no extra steps.
-
.deb. The Debian/Ubuntu/Mint package format. You can install a downloaded file by double-clicking it, or in the terminal, from the directory it is in:sudo apt install ./app.debThe
./is required: it tellsaptthis is a file, not a package name. Important: a.debfile installs withrootprivileges, so take it only from the application’s official website. Such a package often adds its own repository too (like Docker in Chapter 22). -
.AppImage. A single executable file that installs nothing into the system. Run it like this:chmod +x App.AppImage ./App.AppImageAgain, only from the application’s official website. If an AppImage will not start and complains about FUSE, look for the fix in the application developer’s documentation.
-
.exe,.msi: Windows programs; Mint does not run them.
Links (Appendix E updates)
Checked 2026-09-24 (every link opened).Every link printed in Appendix E worked on 2026-09-24:
- Linux Mint: https://linuxmint.com/download.php
- Ubuntu Server 26.04 release notes: https://documentation.ubuntu.com/release-notes/26.04/
- Debian: https://www.debian.org/releases/
- Docker Engine 29 release notes: https://docs.docker.com/engine/release-notes/29/
- nginx: https://nginx.org/news.html
- Let’s Encrypt: https://letsencrypt.org/
- Ollama: https://ollama.com/ (documentation: https://docs.ollama.com/)
- Git: https://git-scm.com/
- OpenSSH: https://www.openssh.com/
- William Shotts, The Linux Command Line: https://linuxcommand.org/
- Linux Mint Forums: https://forums.linuxmint.com/
- Ask Ubuntu: https://askubuntu.com/
- Unix & Linux Stack Exchange: https://unix.stackexchange.com/
If any address changes, the new one will appear here.
Color figures
Checked 2026-09-24.All of the book’s diagrams (FIG-xx-yy) are published here in color. The figure numbers match the numbers in the book: find the one you need and open the color version. The printed figures are designed to be clear in grayscale, so the color version is a convenience, not a necessity.
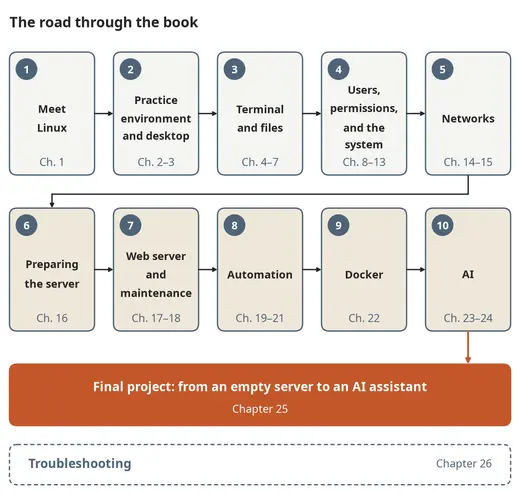
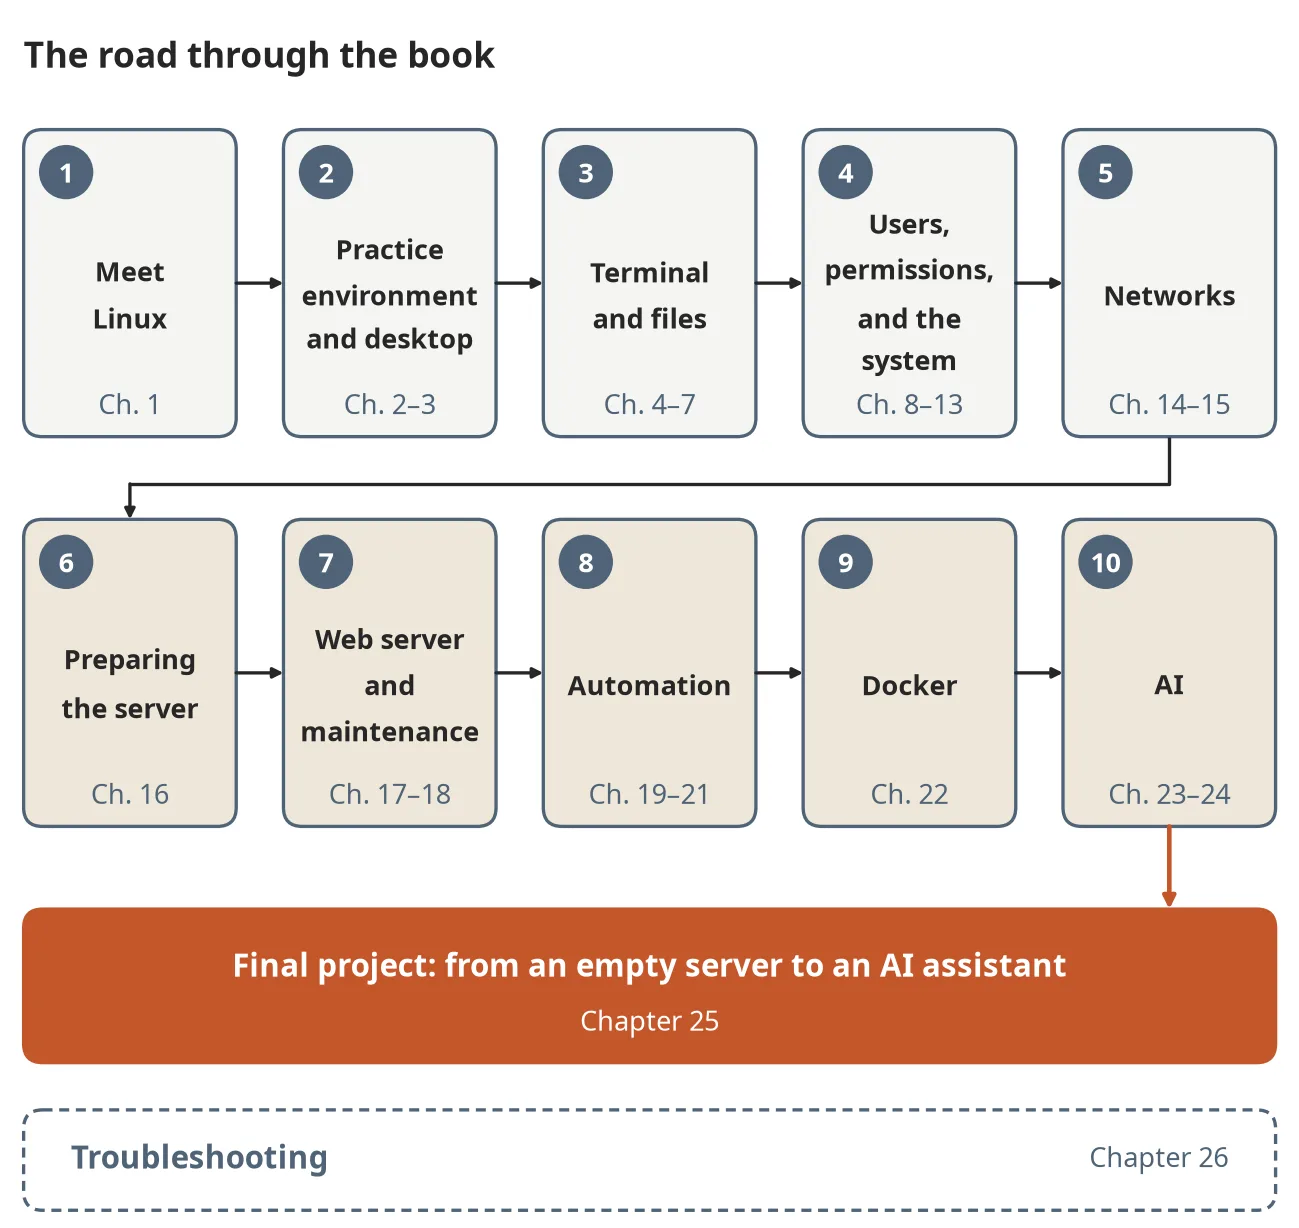
Figure 0.1 The road through this book: from meeting Linux to the final project
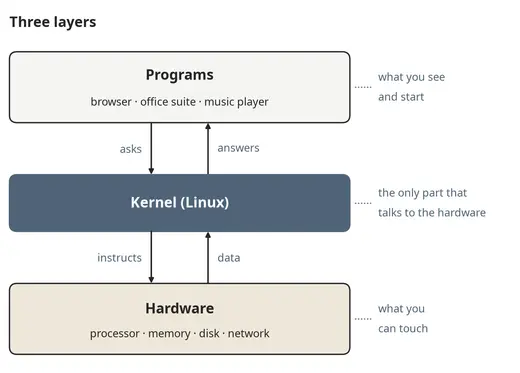
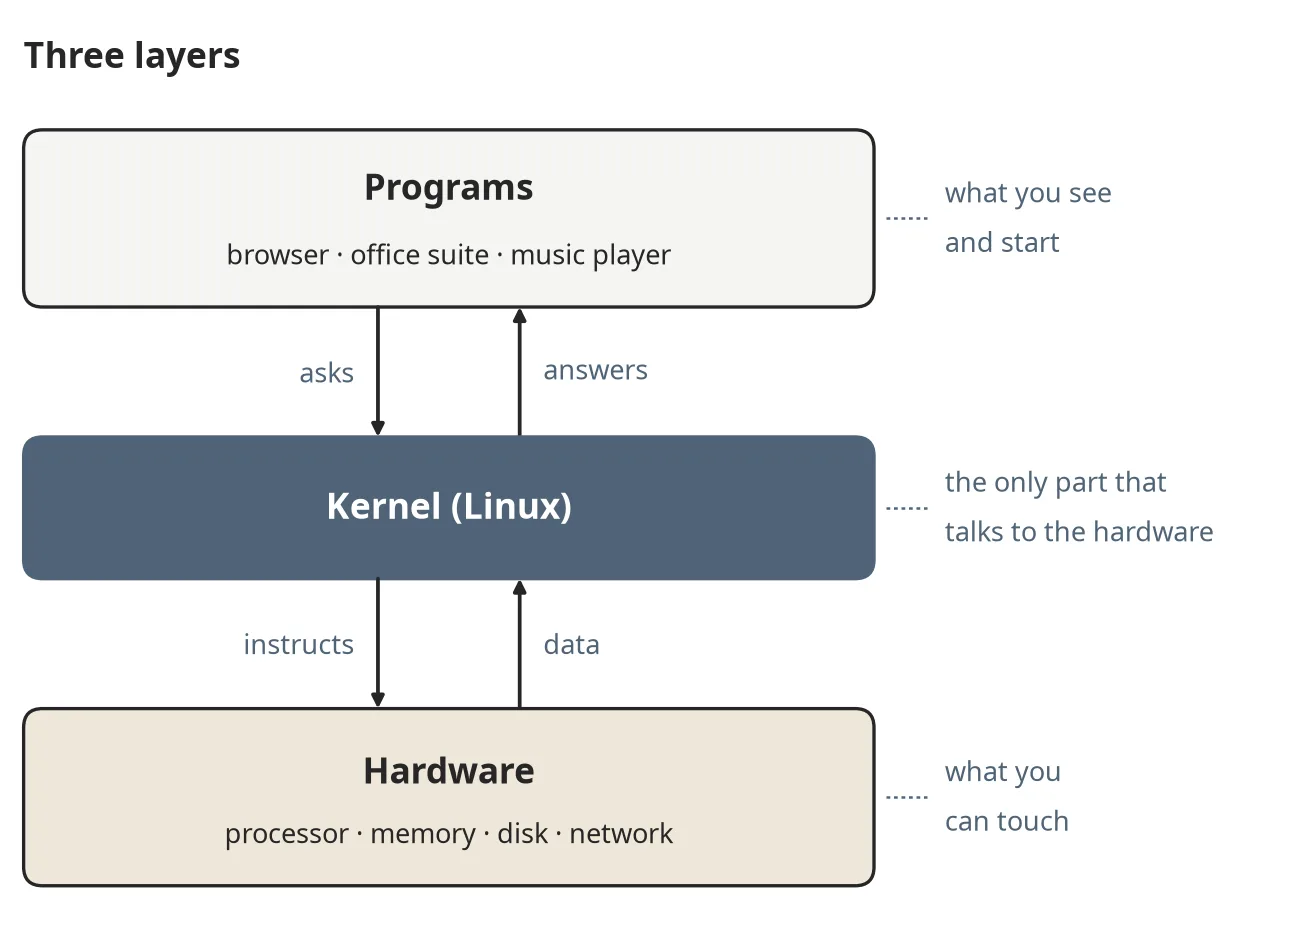
Figure 1.1 Three layers: programs, the kernel and the hardware
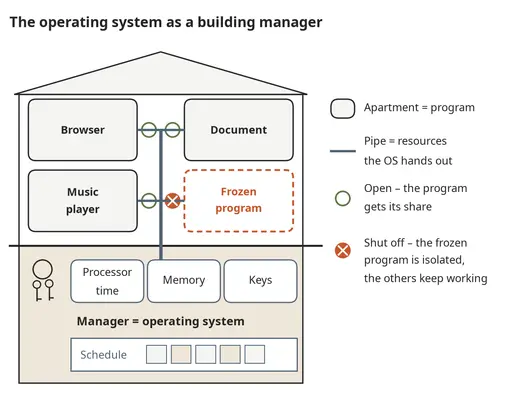
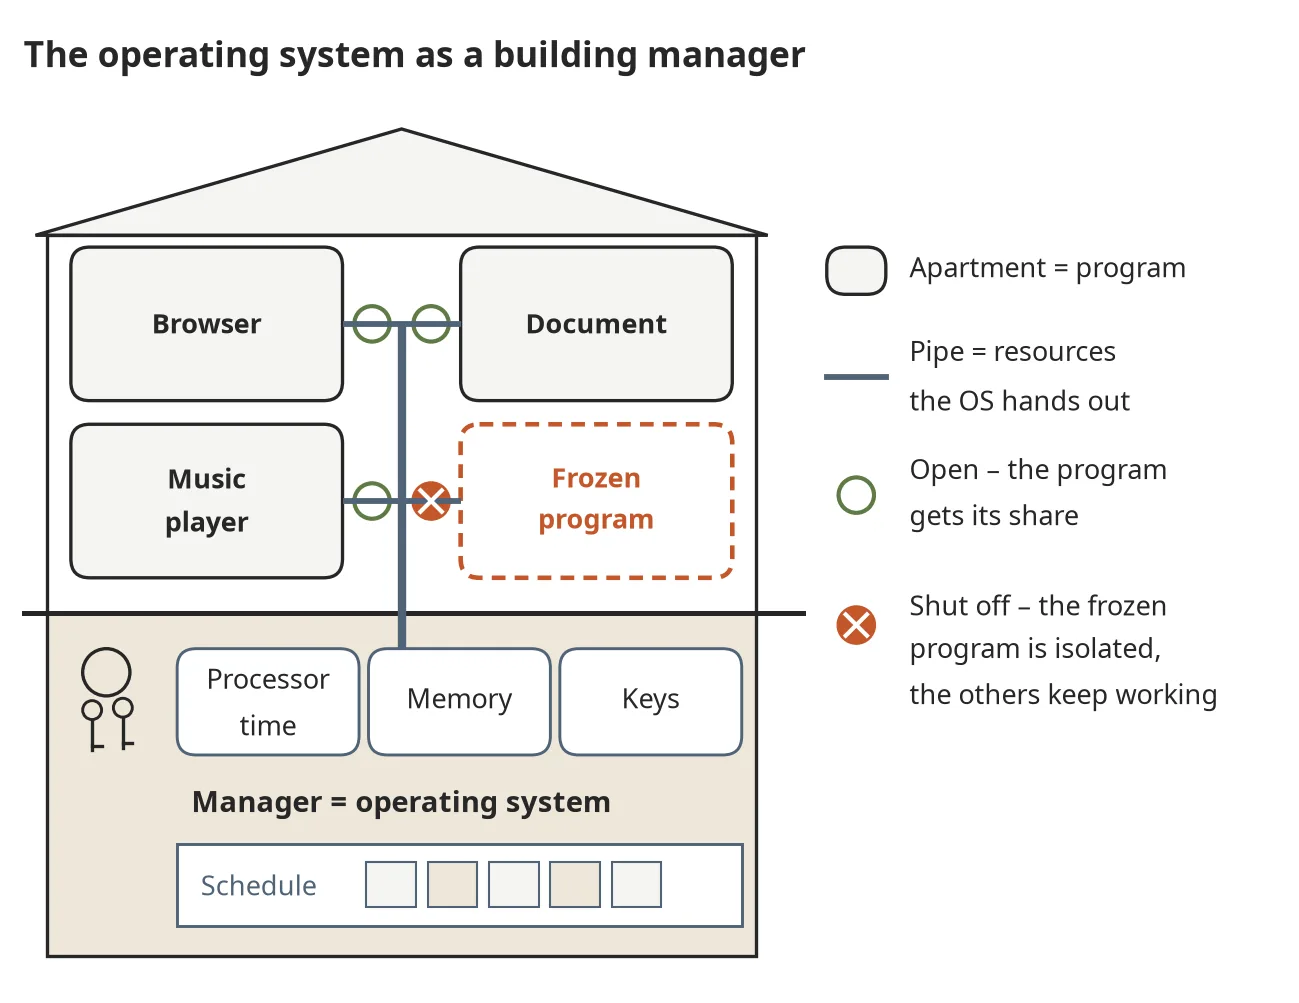
Figure 1.2 An operating system is like a building manager sharing resources among programs
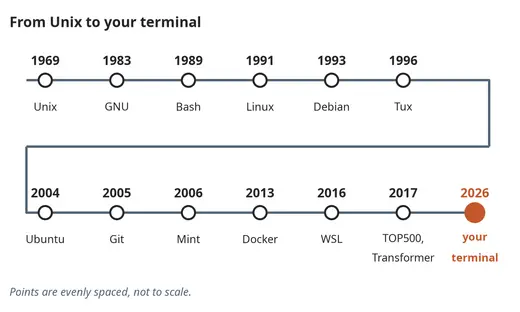
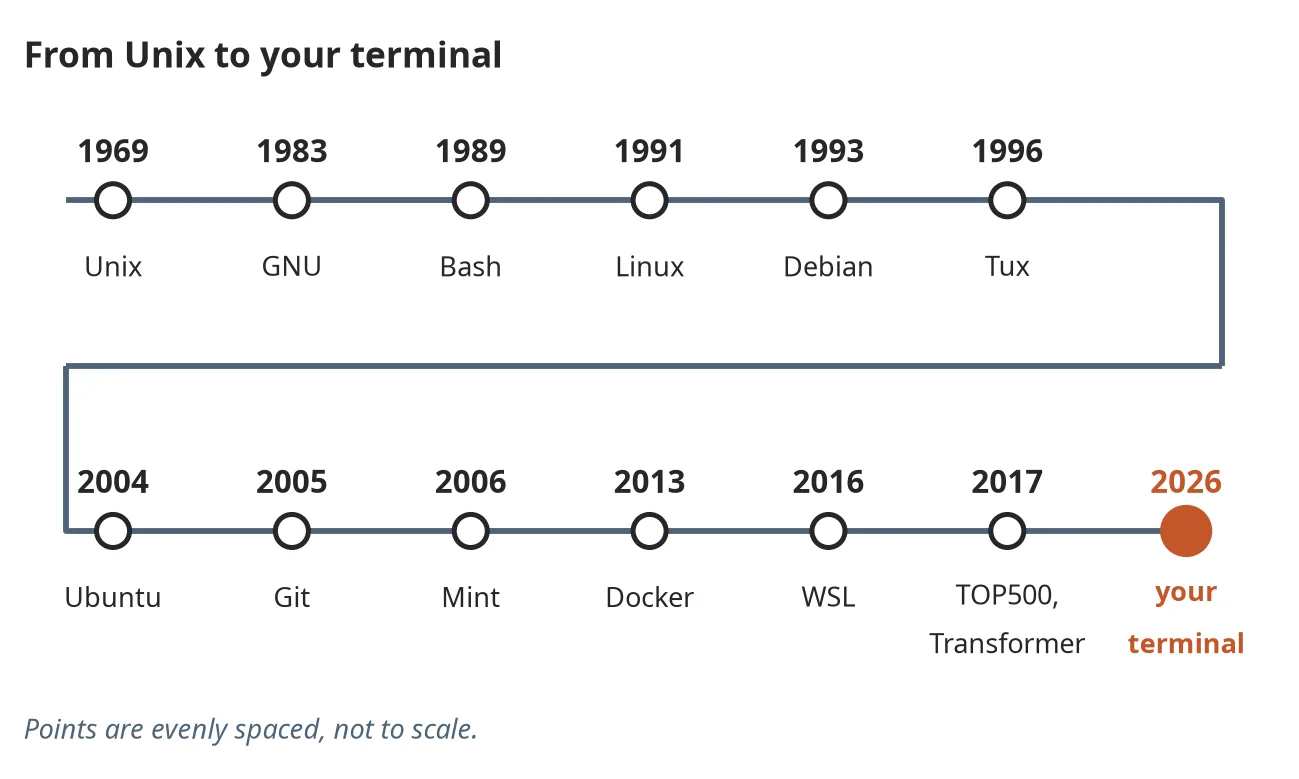
Figure 1.3 A Linux timeline: from Unix (1969) to today
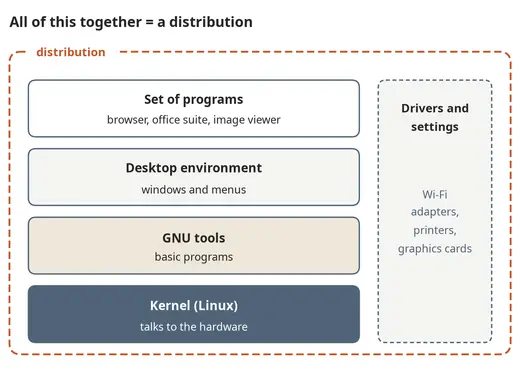
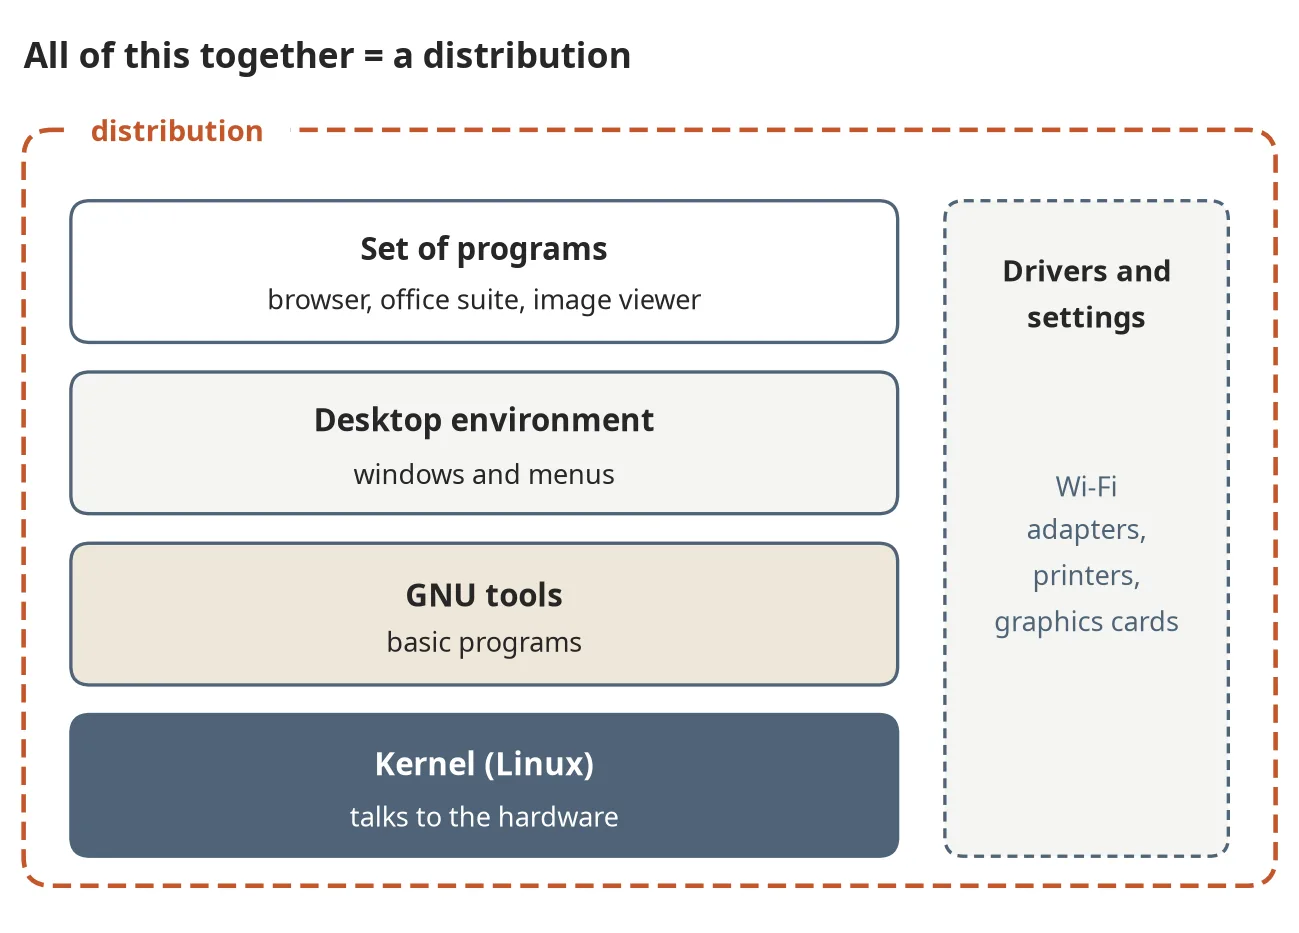
Figure 2.1 What a distribution is made of
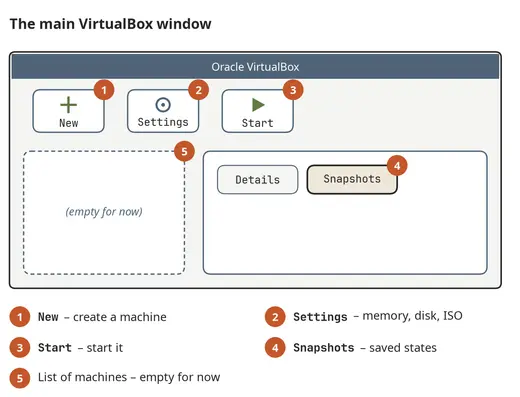
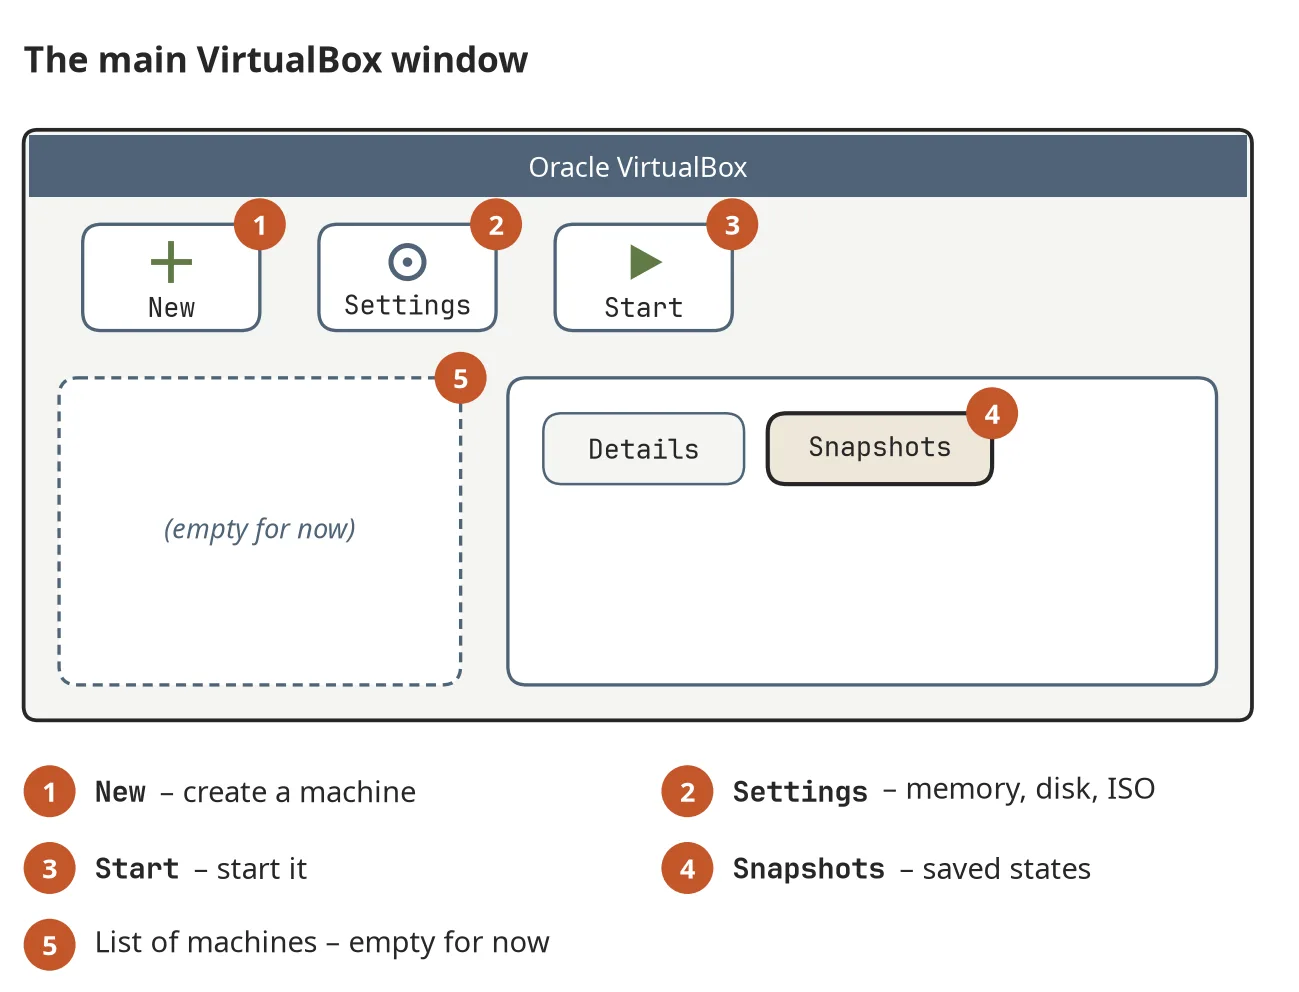
Figure 2.2 The VirtualBox main window
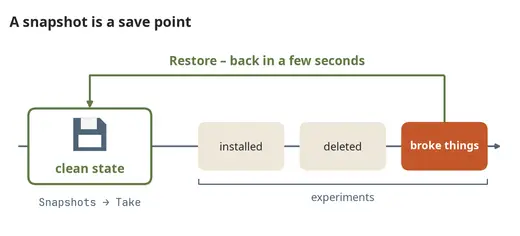
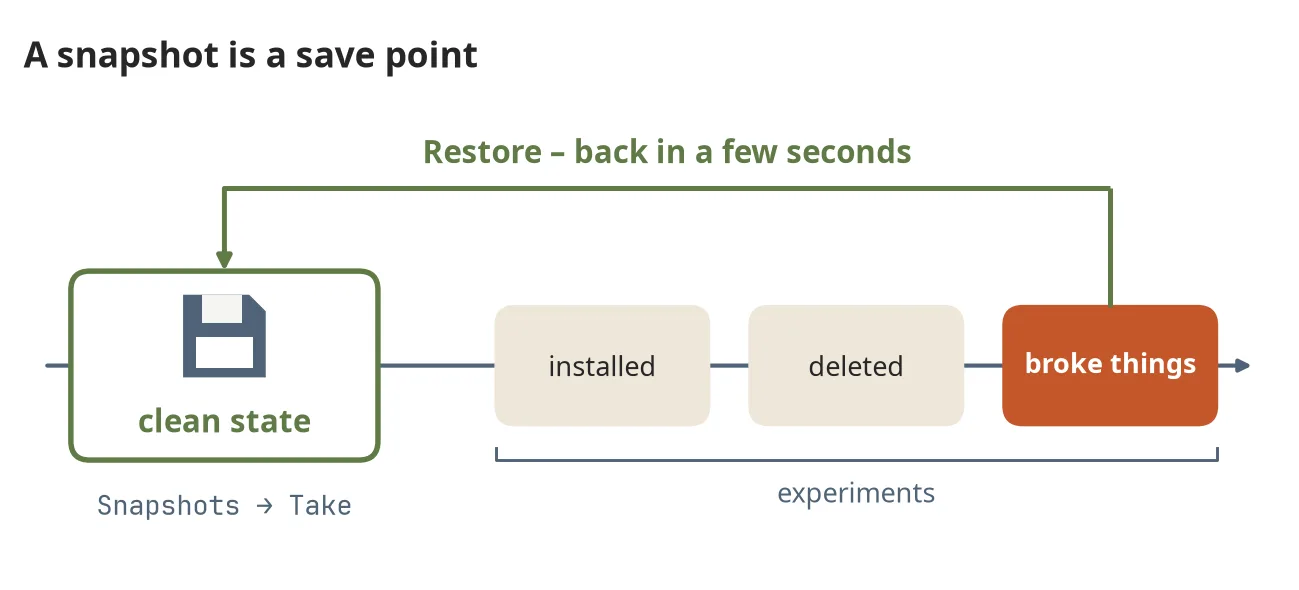
Figure 2.3 A snapshot is a point you can always return to
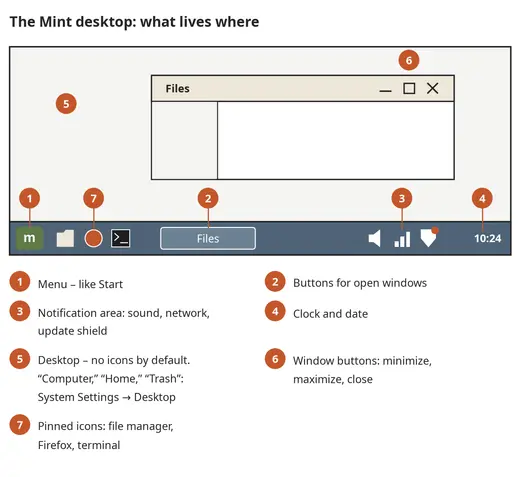
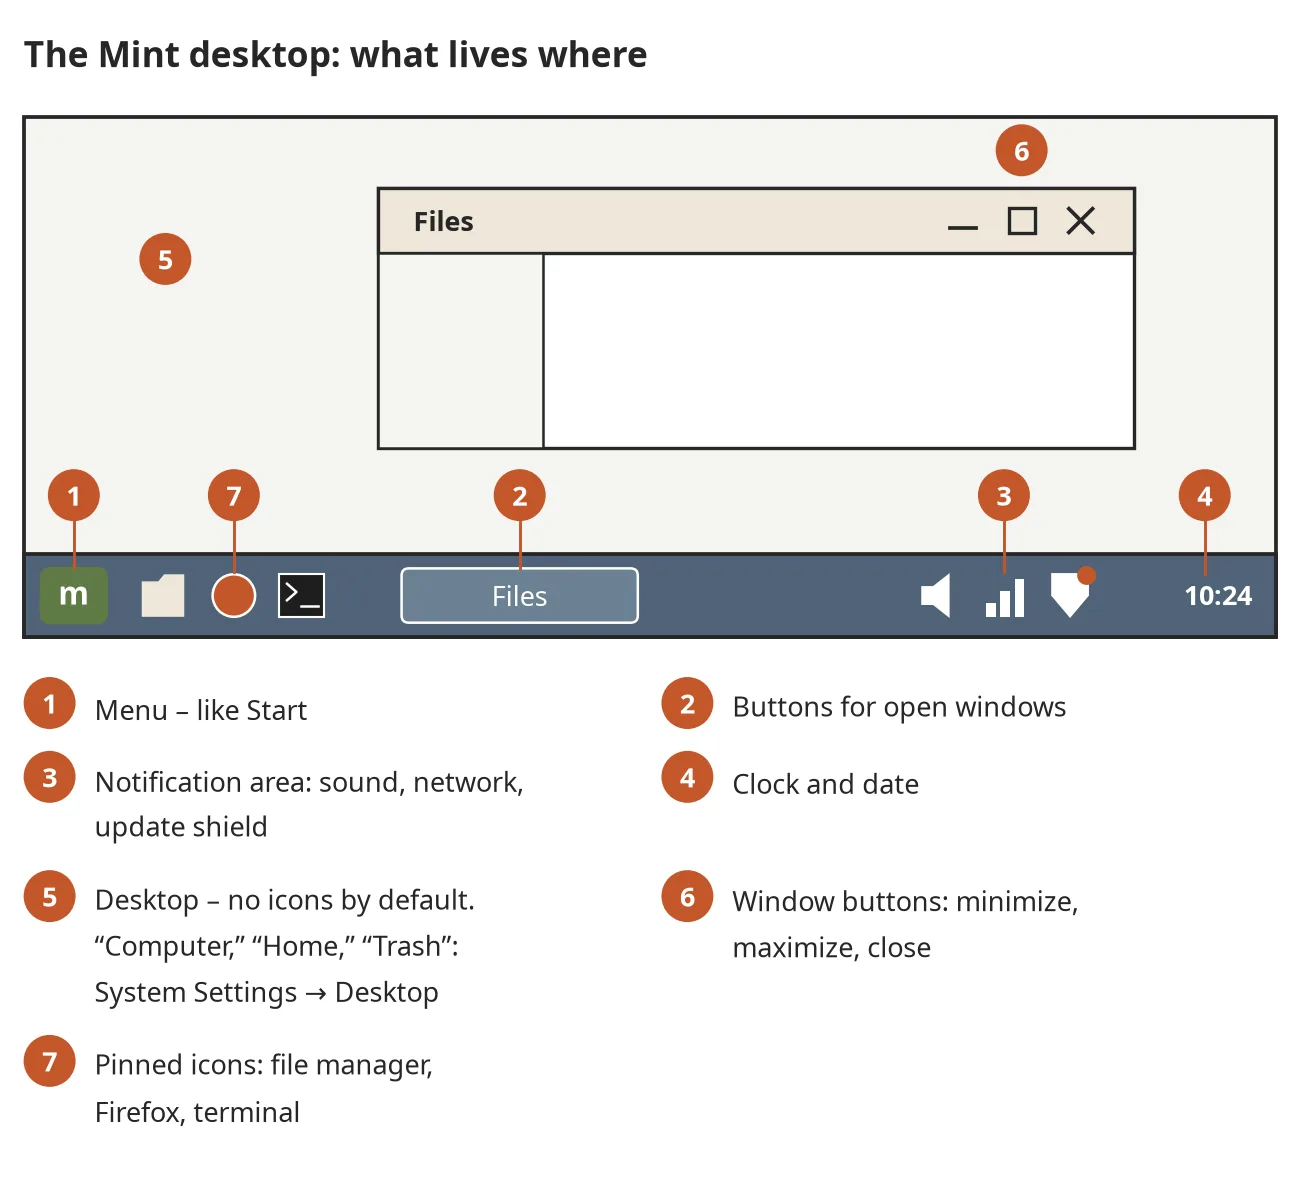
Figure 3.1 The Linux Mint (Cinnamon) desktop
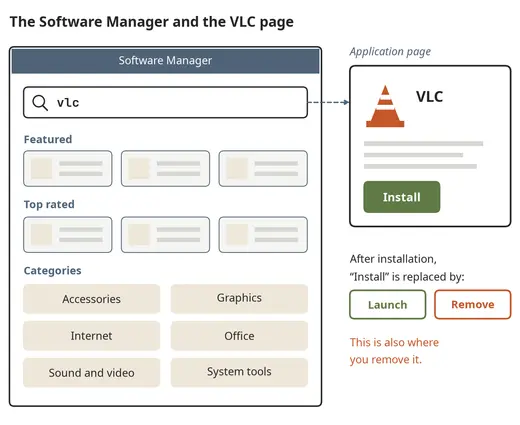
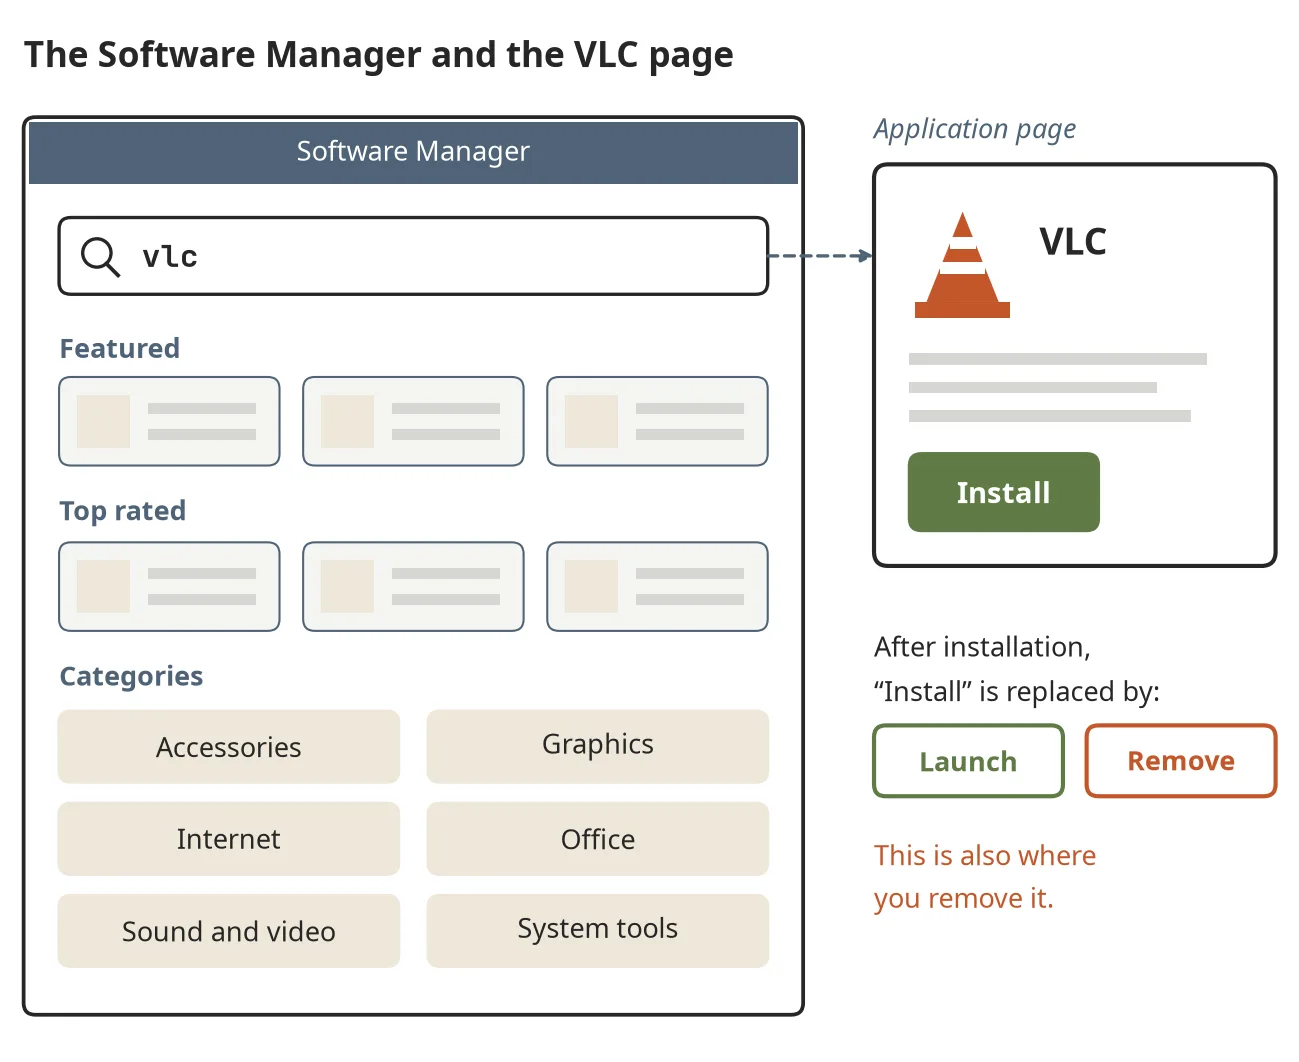
Figure 3.2 The Software Manager
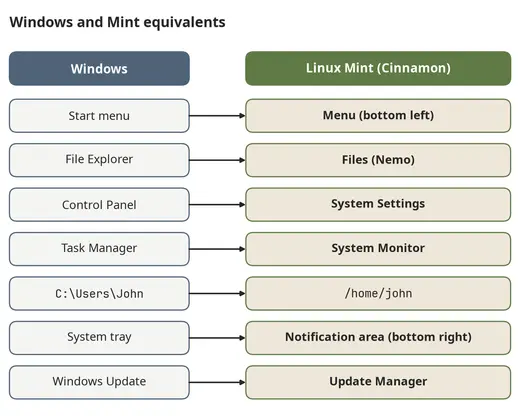
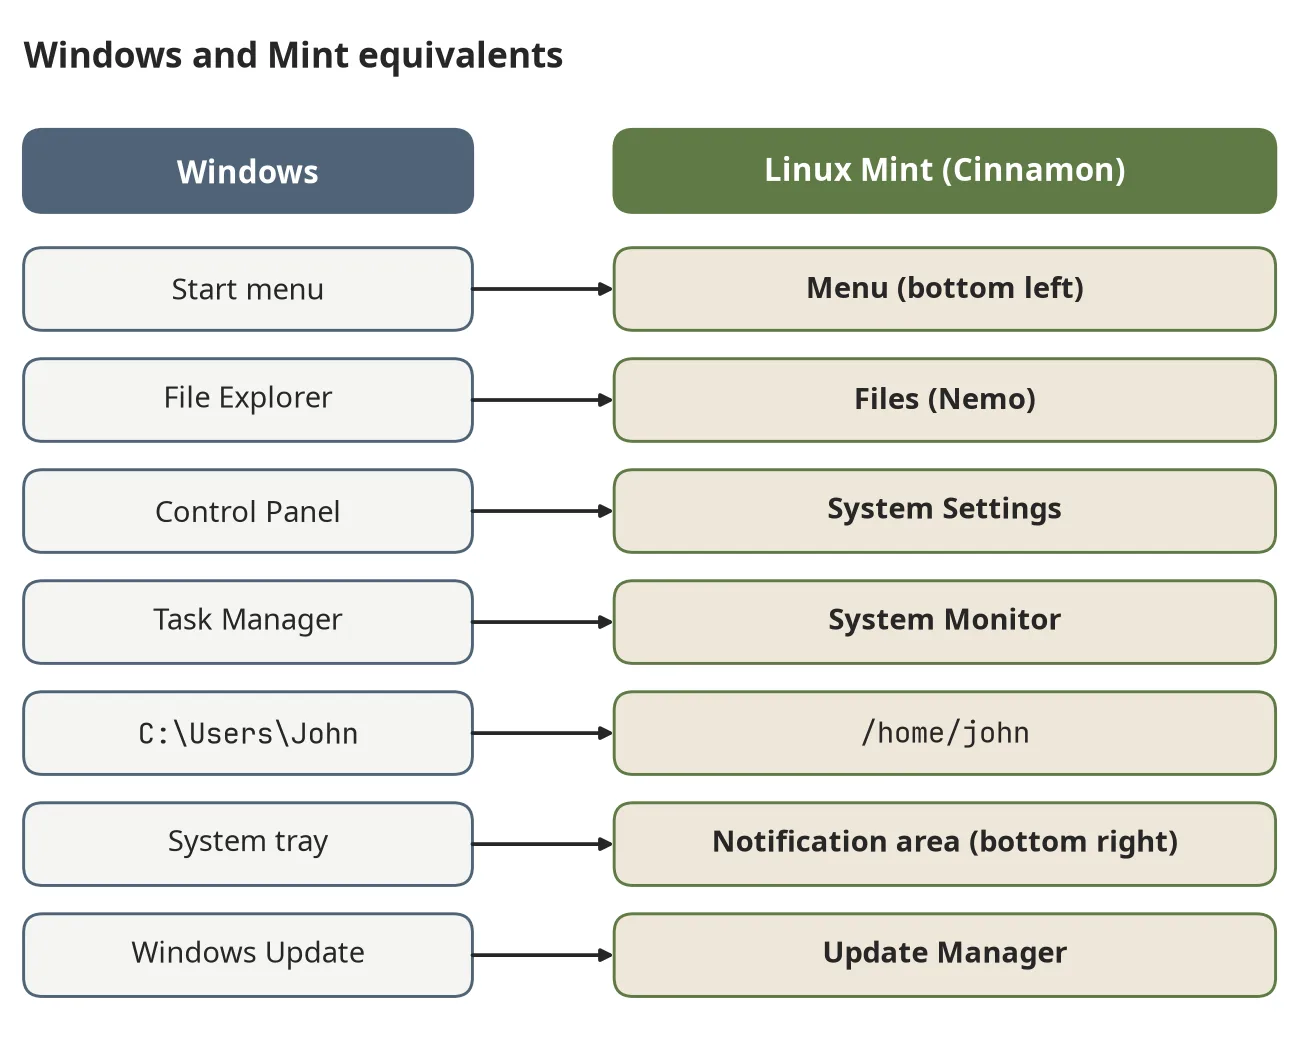
Figure 3.3 Familiar Windows tools and their Linux Mint counterparts
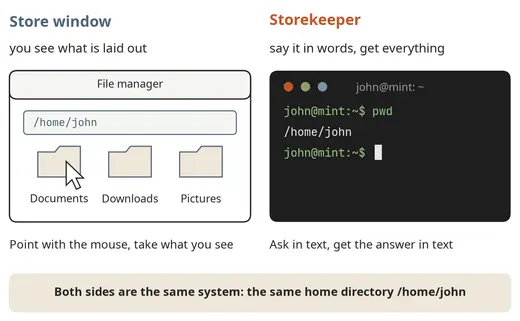
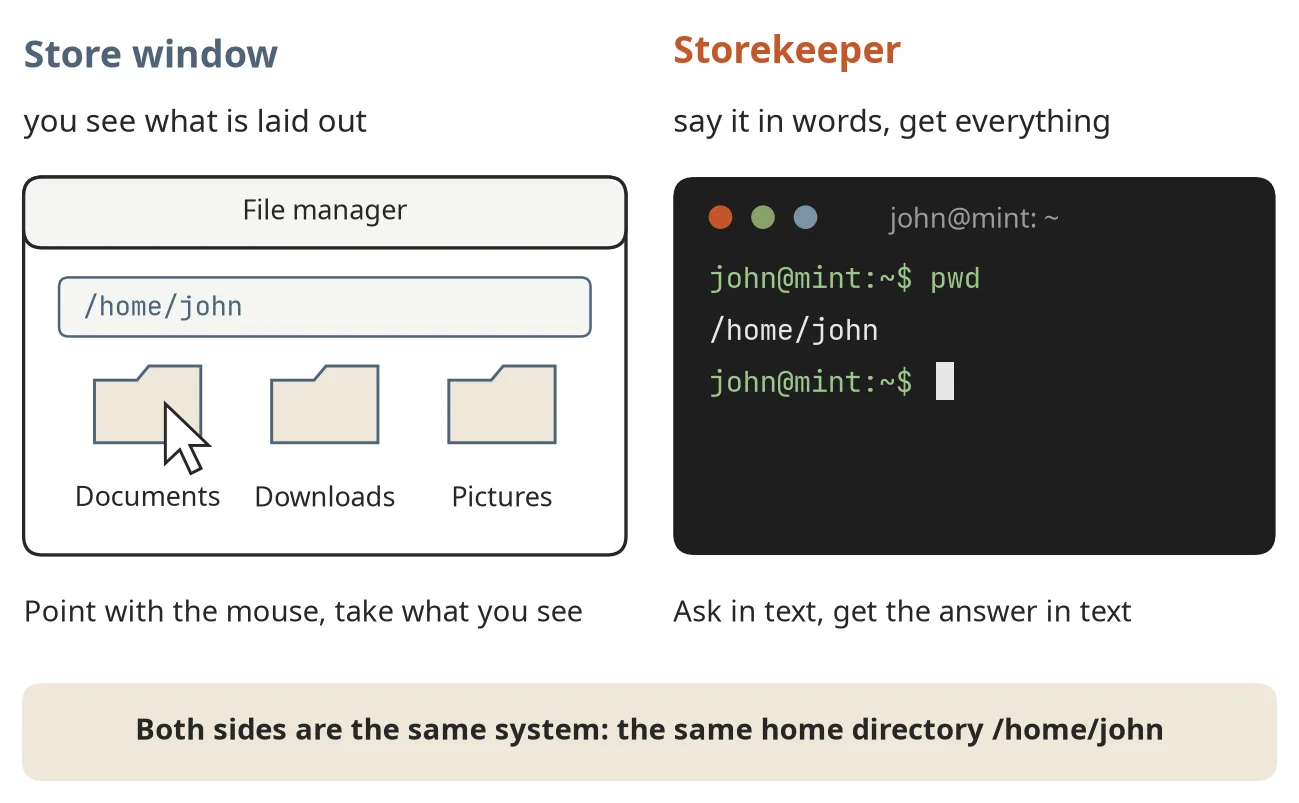
Figure 4.1 The store window and the storekeeper: the graphical interface and the terminal
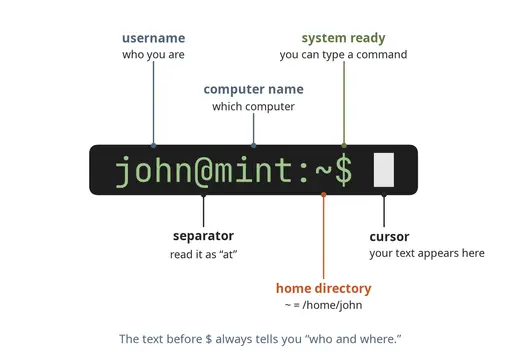
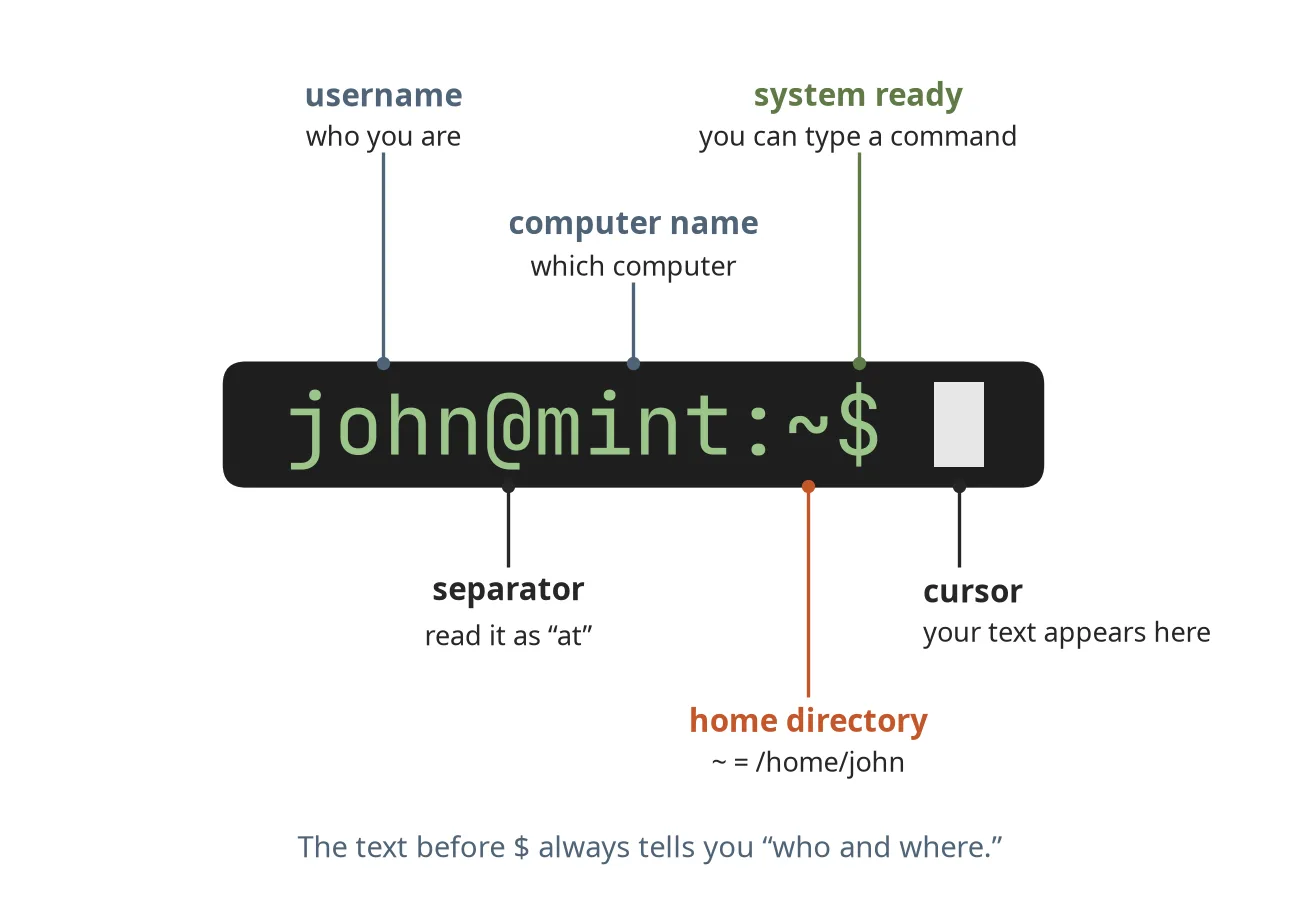
Figure 4.2 The parts of the prompt
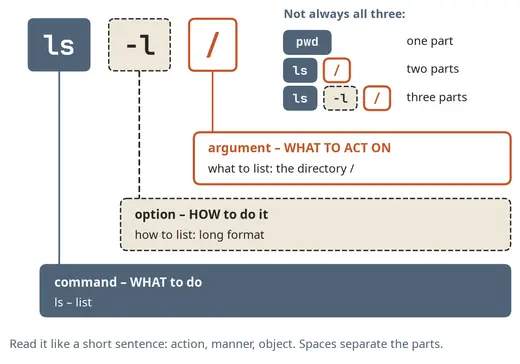
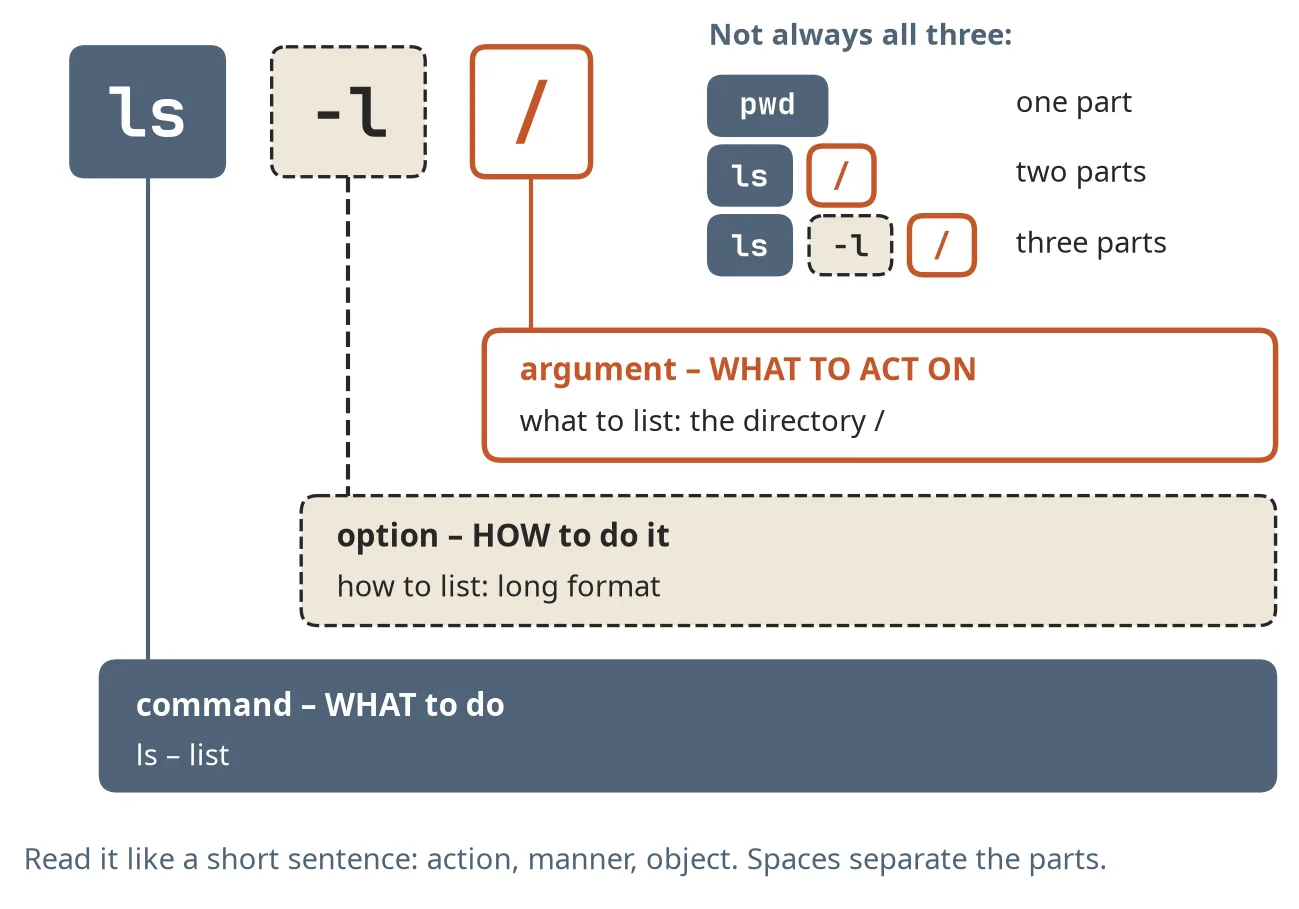
Figure 4.3 The parts of a command line: command, options, arguments
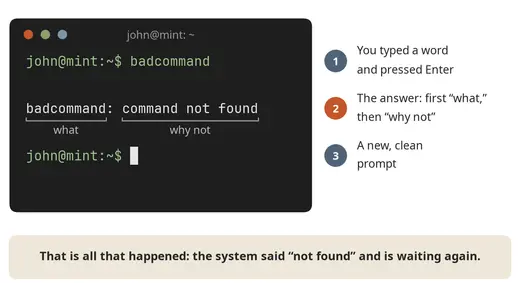
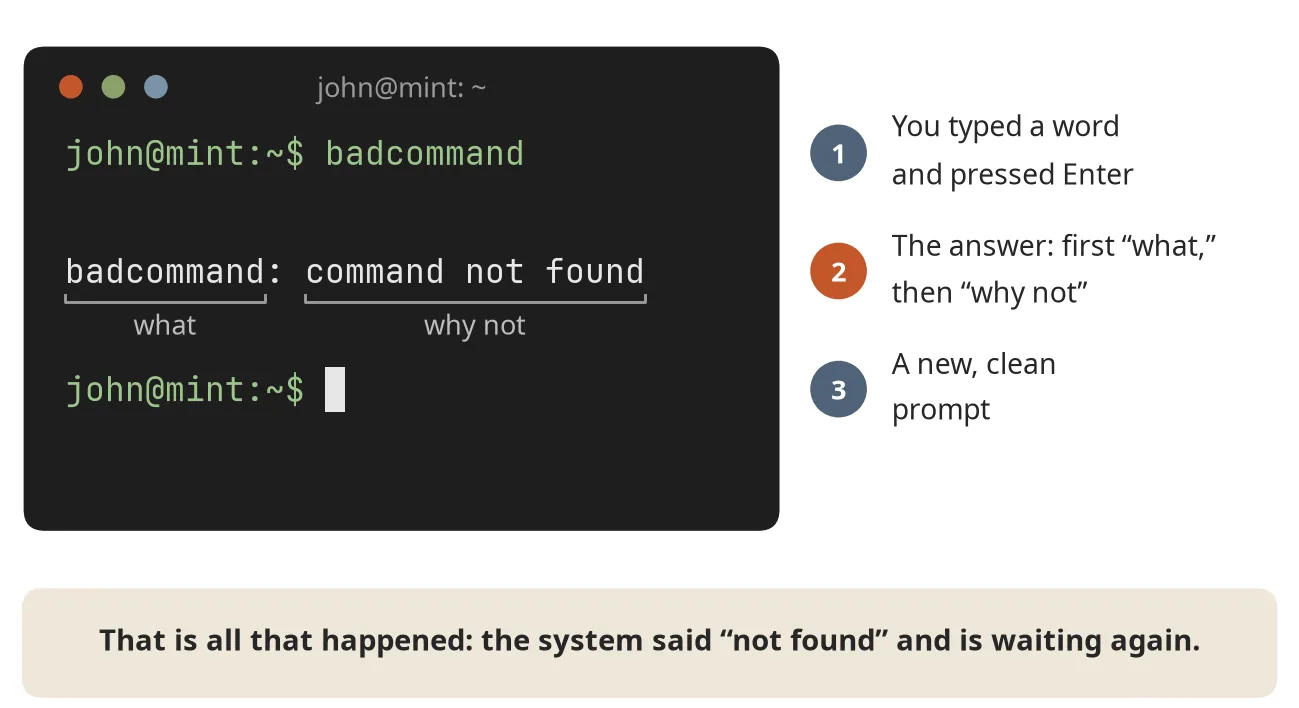
Figure 4.4 The terminal after an error: the system tells you what went wrong
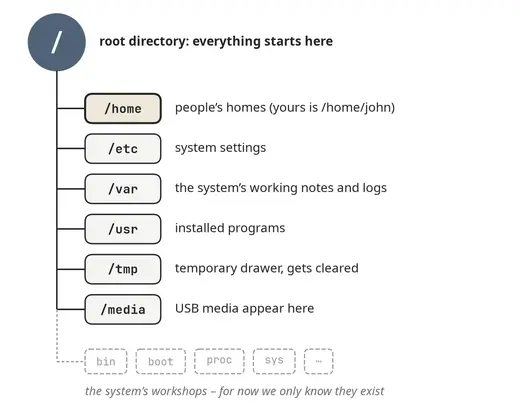
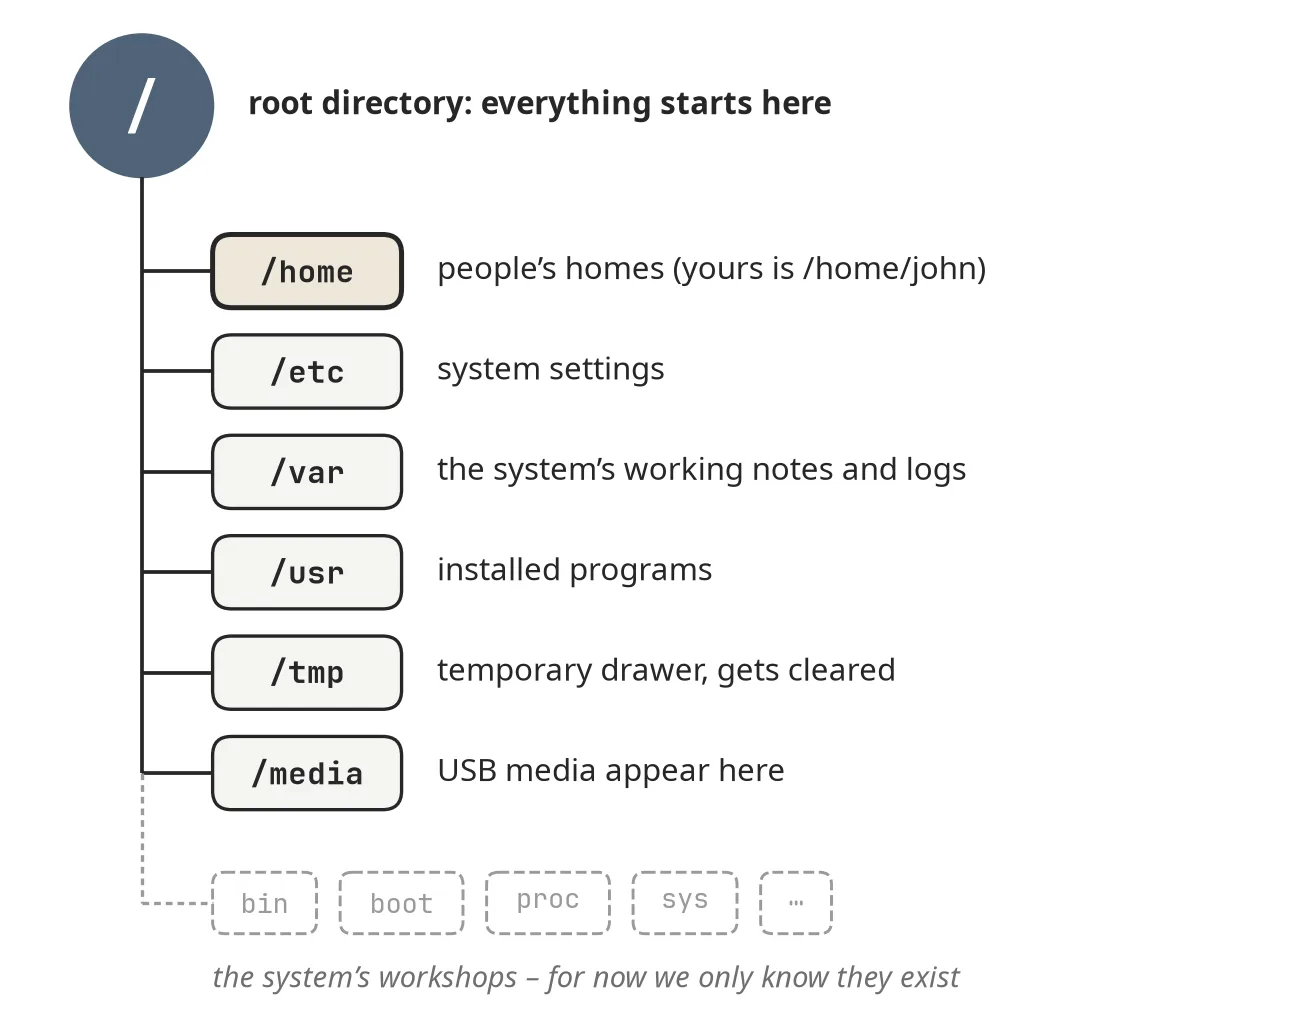
Figure 5.1 The file system tree and the main directories
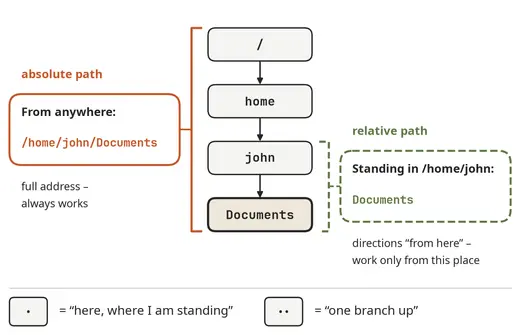
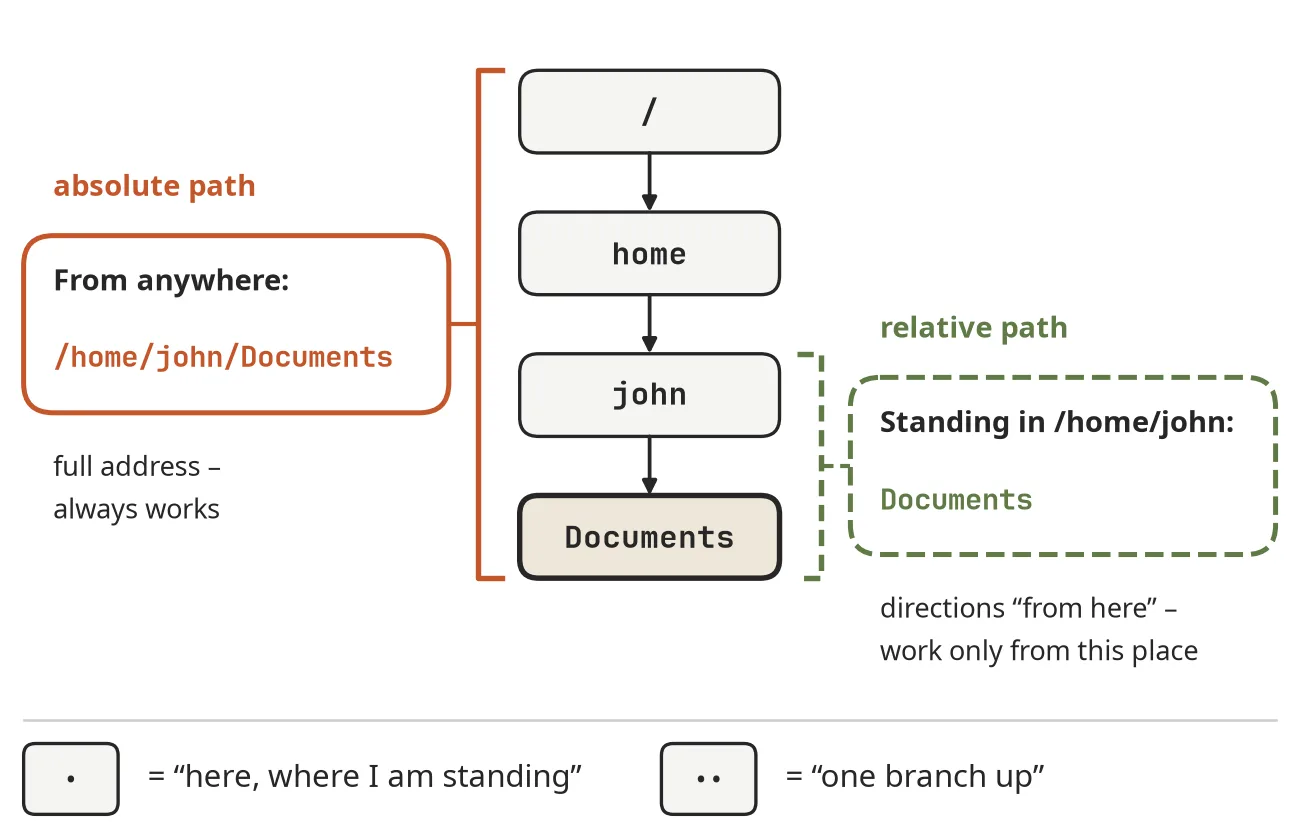
Figure 5.2 An absolute and a relative path to the same directory
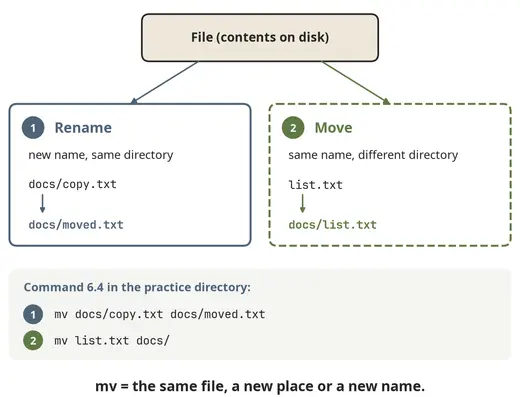
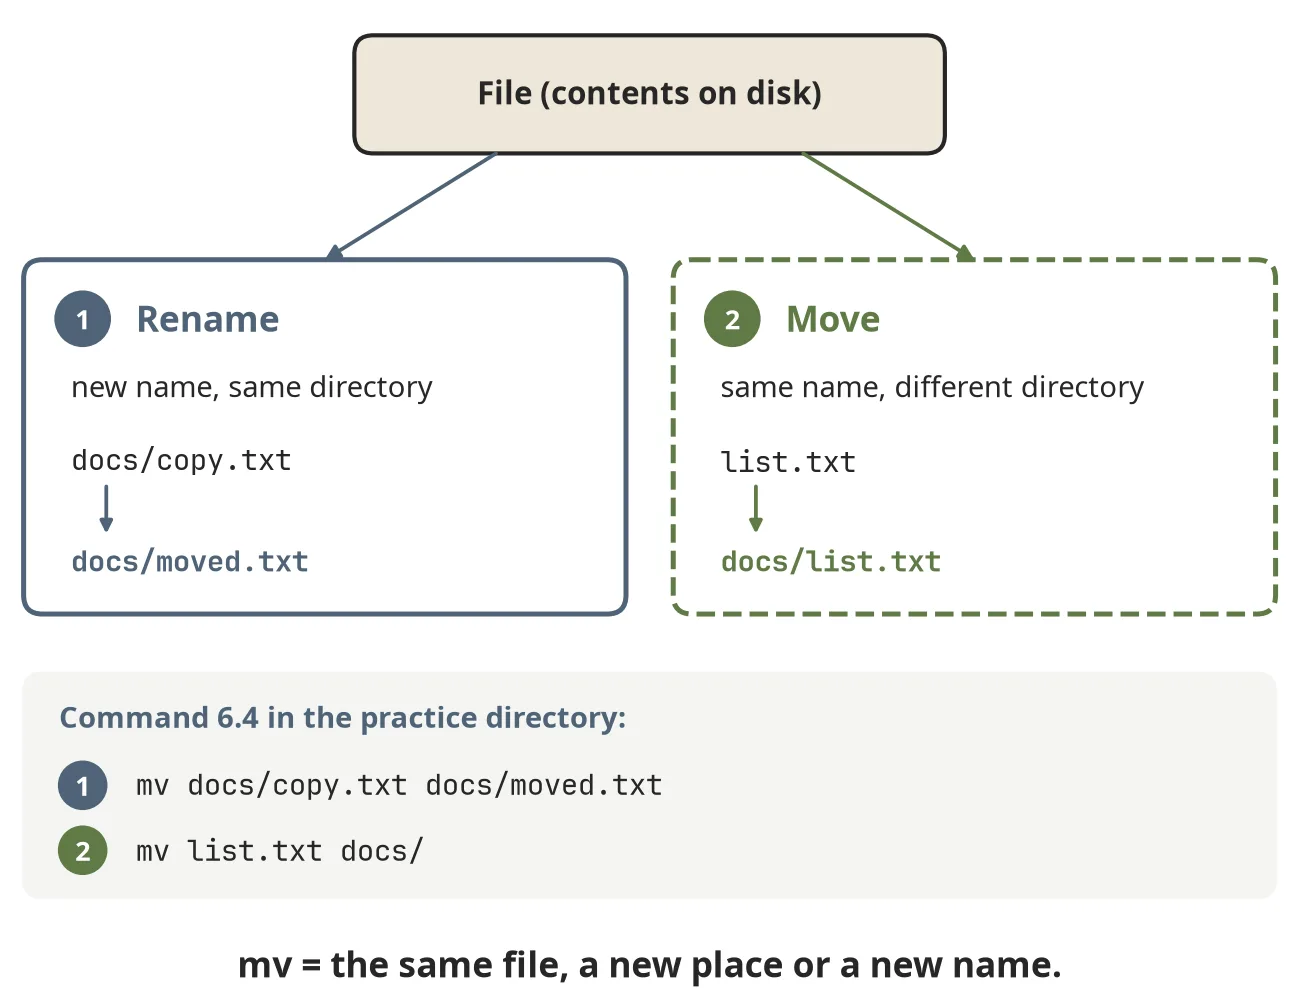
Figure 6.1 The mv command: renaming and moving
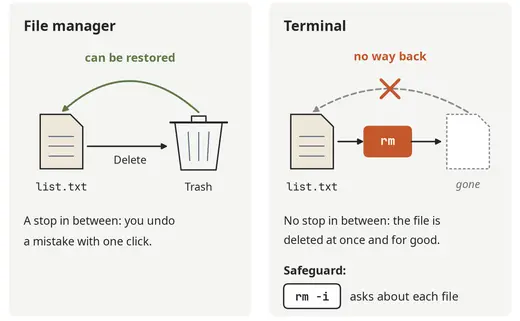
Figure 6.2 The Trash and rm: what comes back and what doesn't
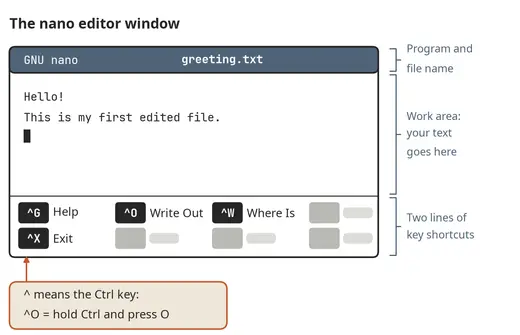
Figure 7.1 The nano text editor
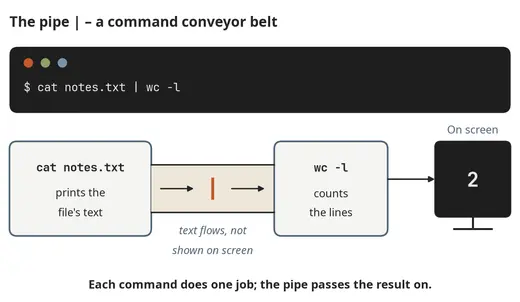
Figure 7.2 A pipe: cat passes text to wc
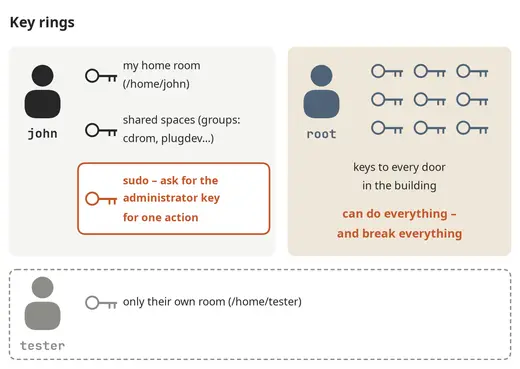
Figure 8.1 Key rings: users, groups and root
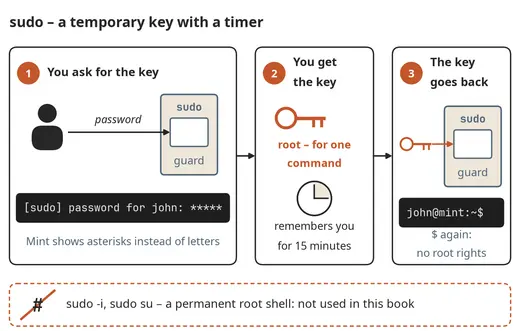
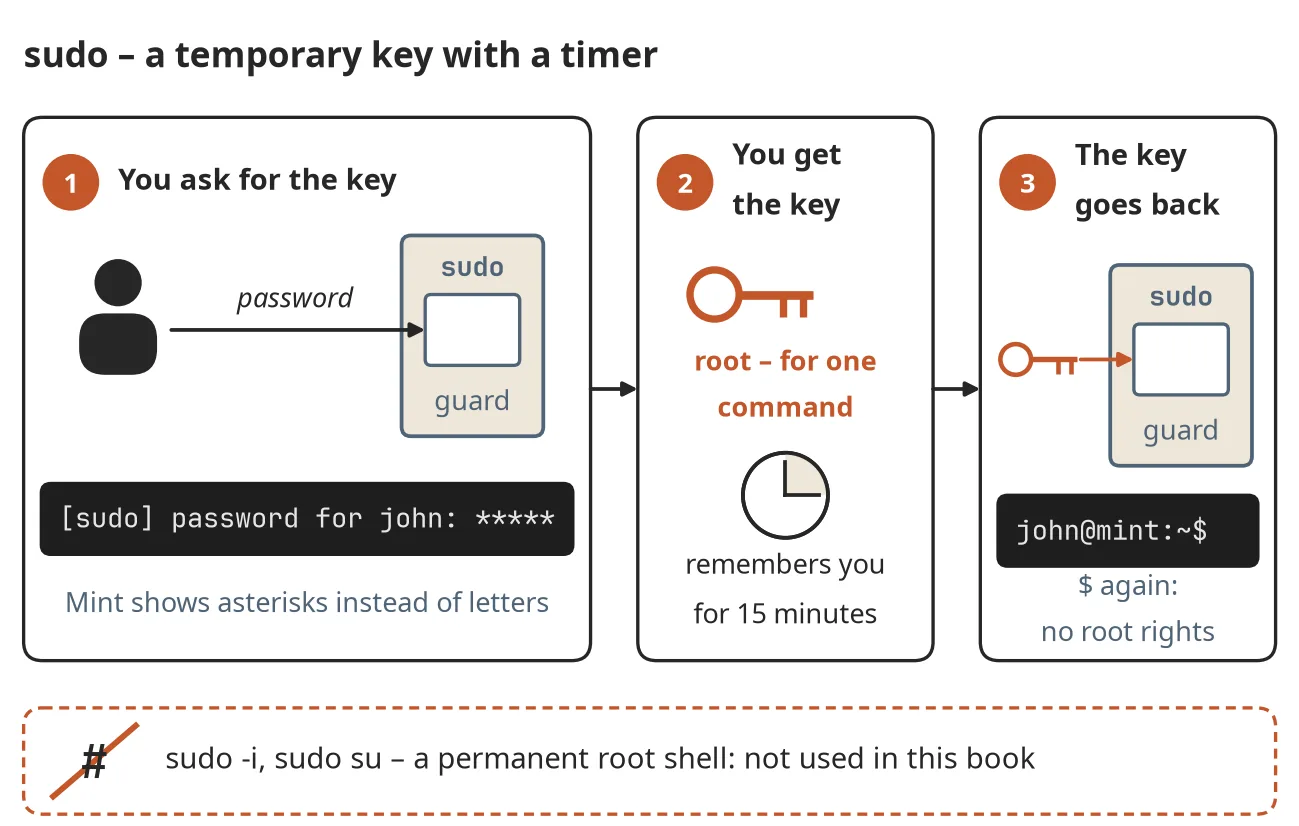
Figure 8.2 sudo – a temporary key with a timer
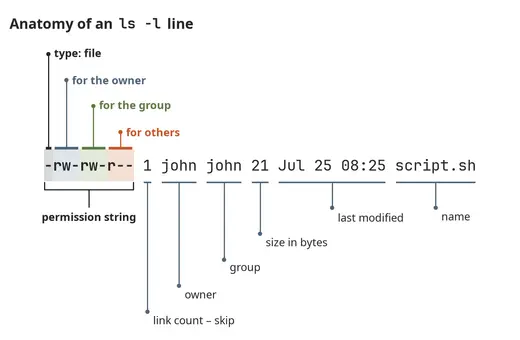
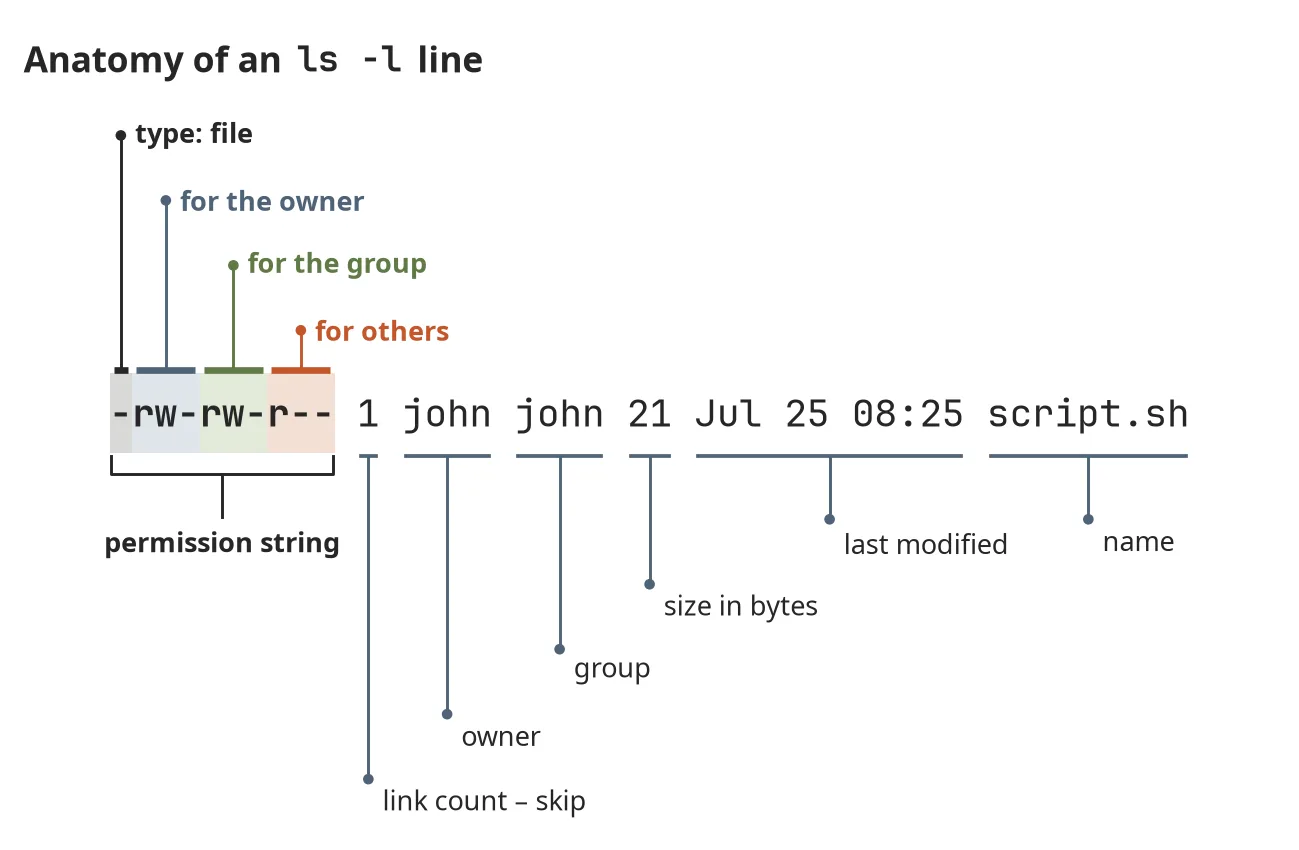
Figure 9.1 Taking apart a line of ls -l output
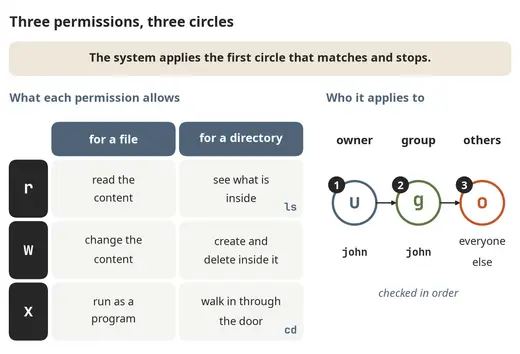
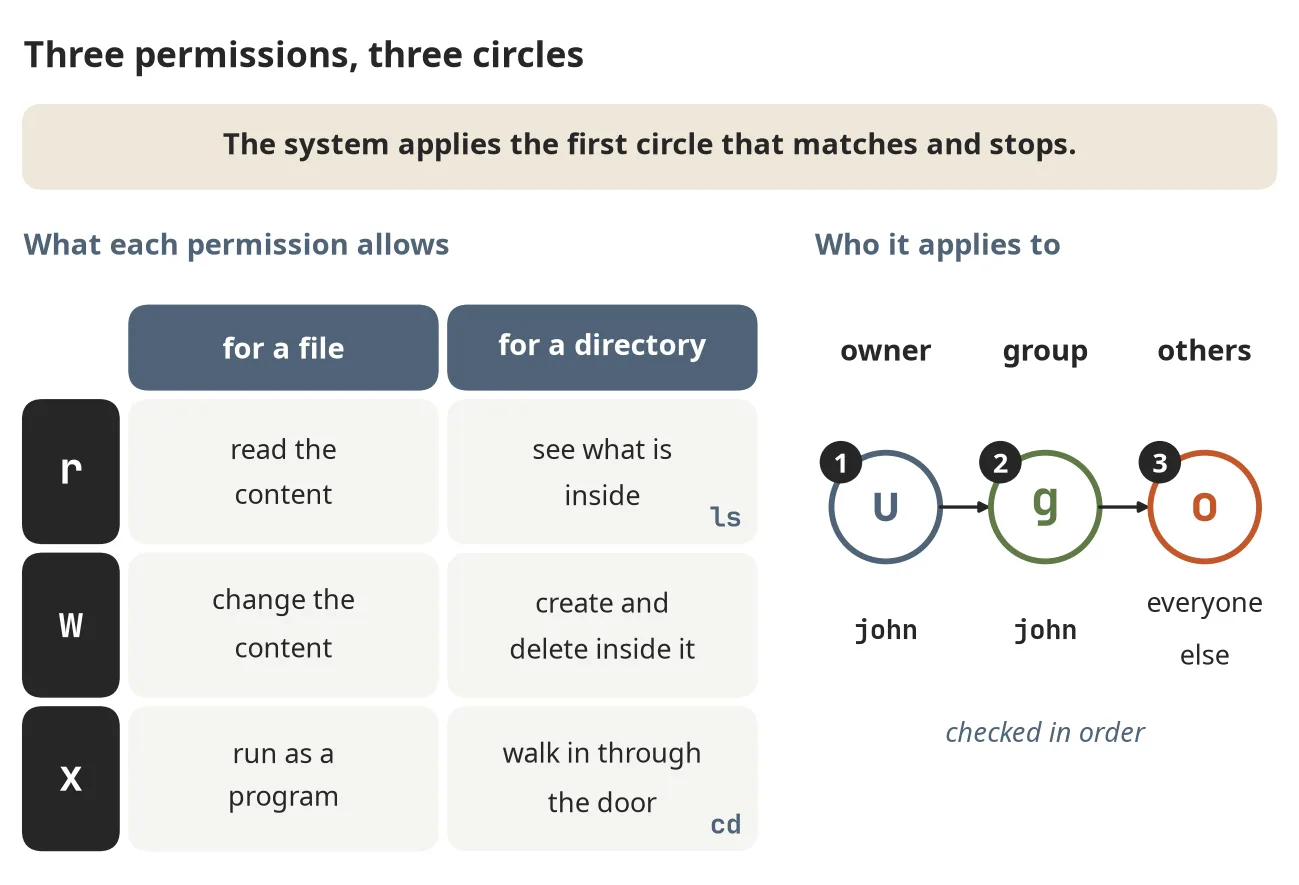
Figure 9.2 Three permissions for three circles of people
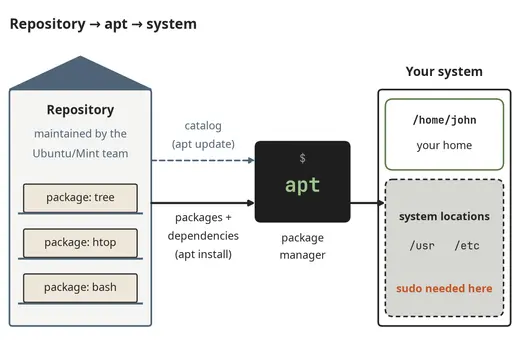
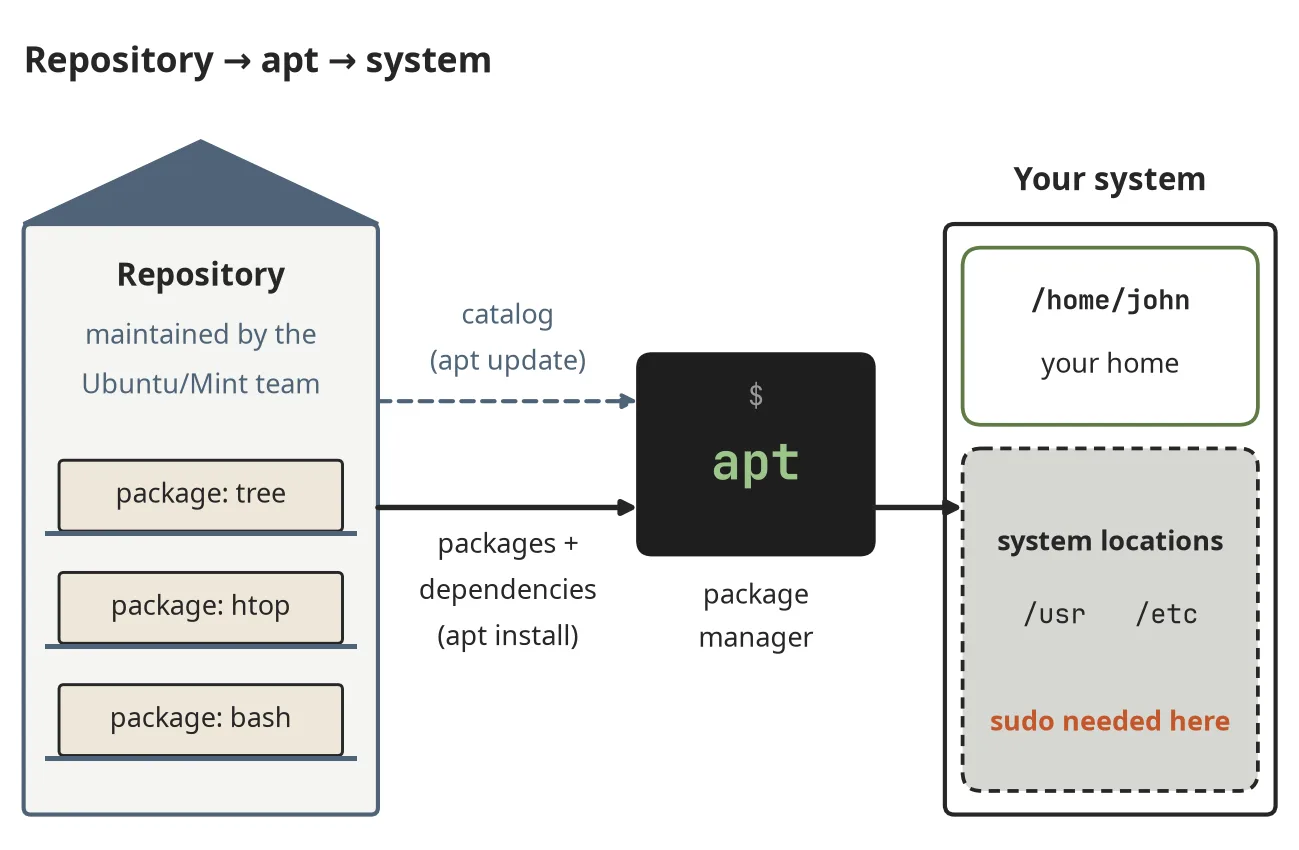
Figure 10.1 From the repository through apt into the system
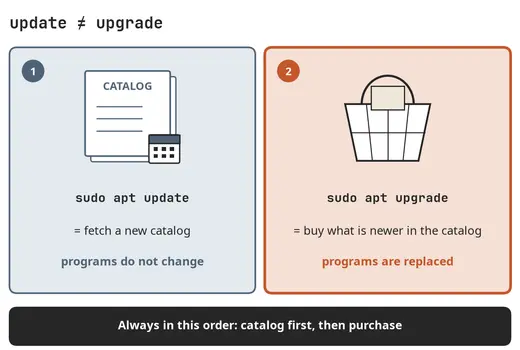
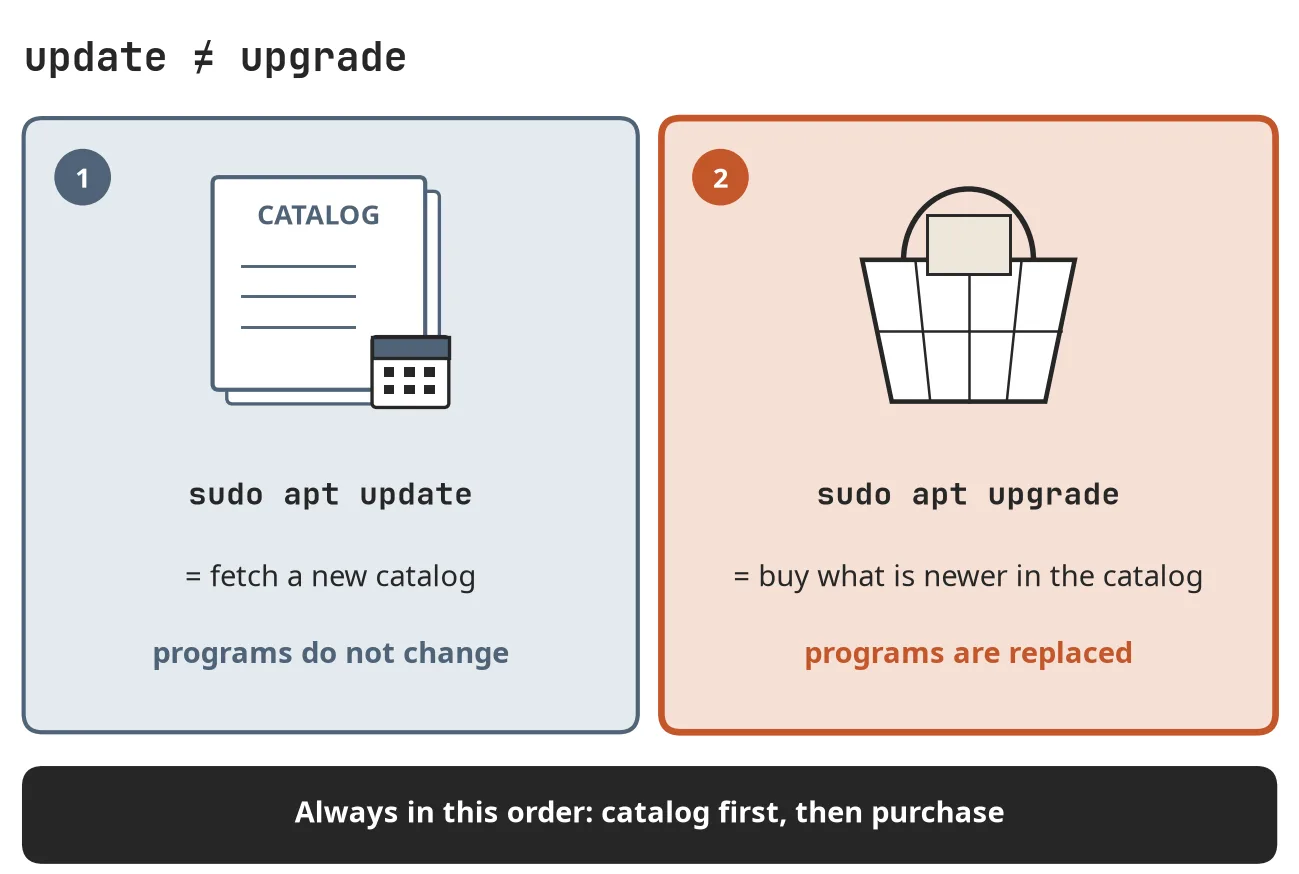
Figure 10.2 apt update and apt upgrade are not the same thing
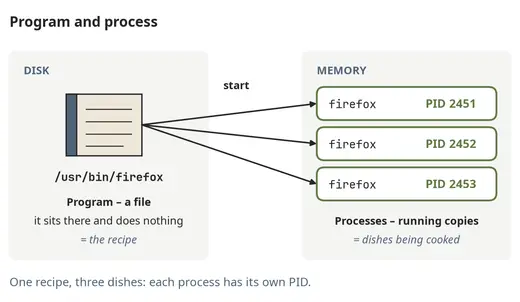
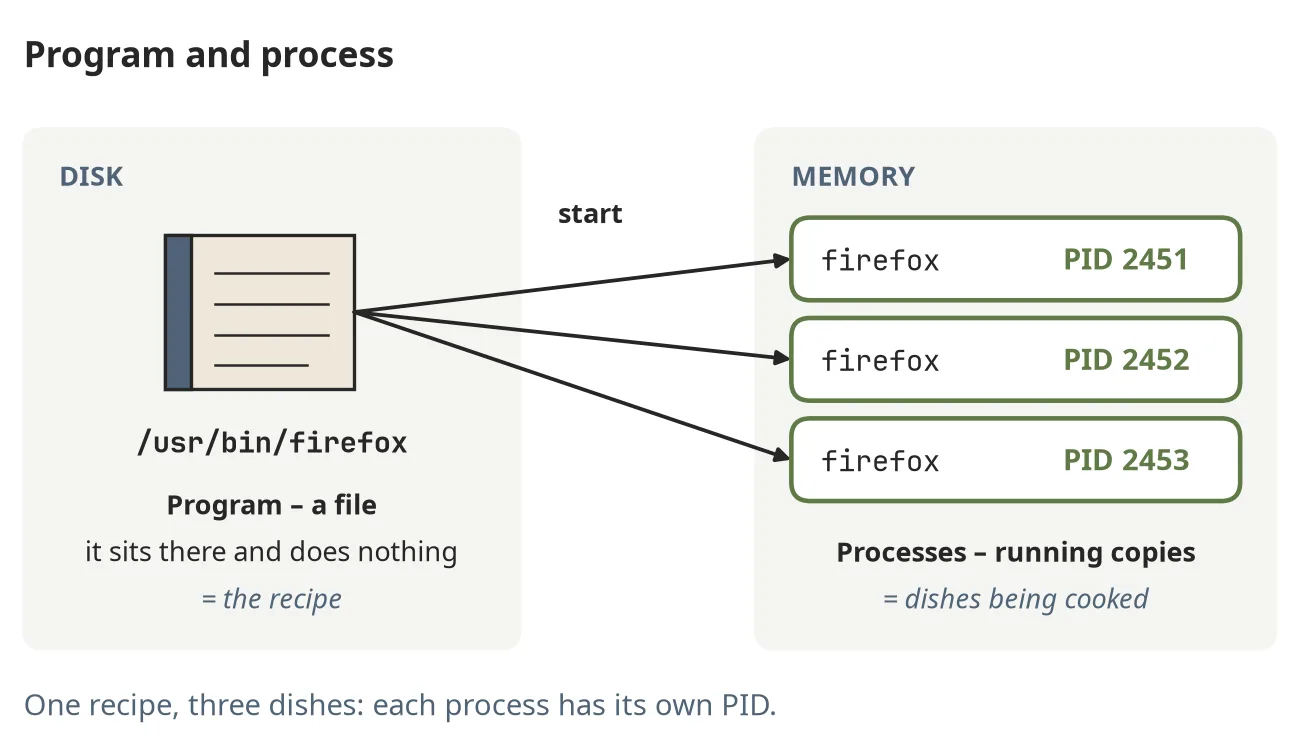
Figure 11.1 One program, several processes
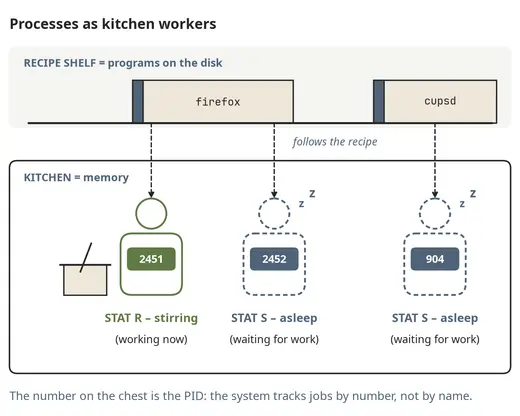
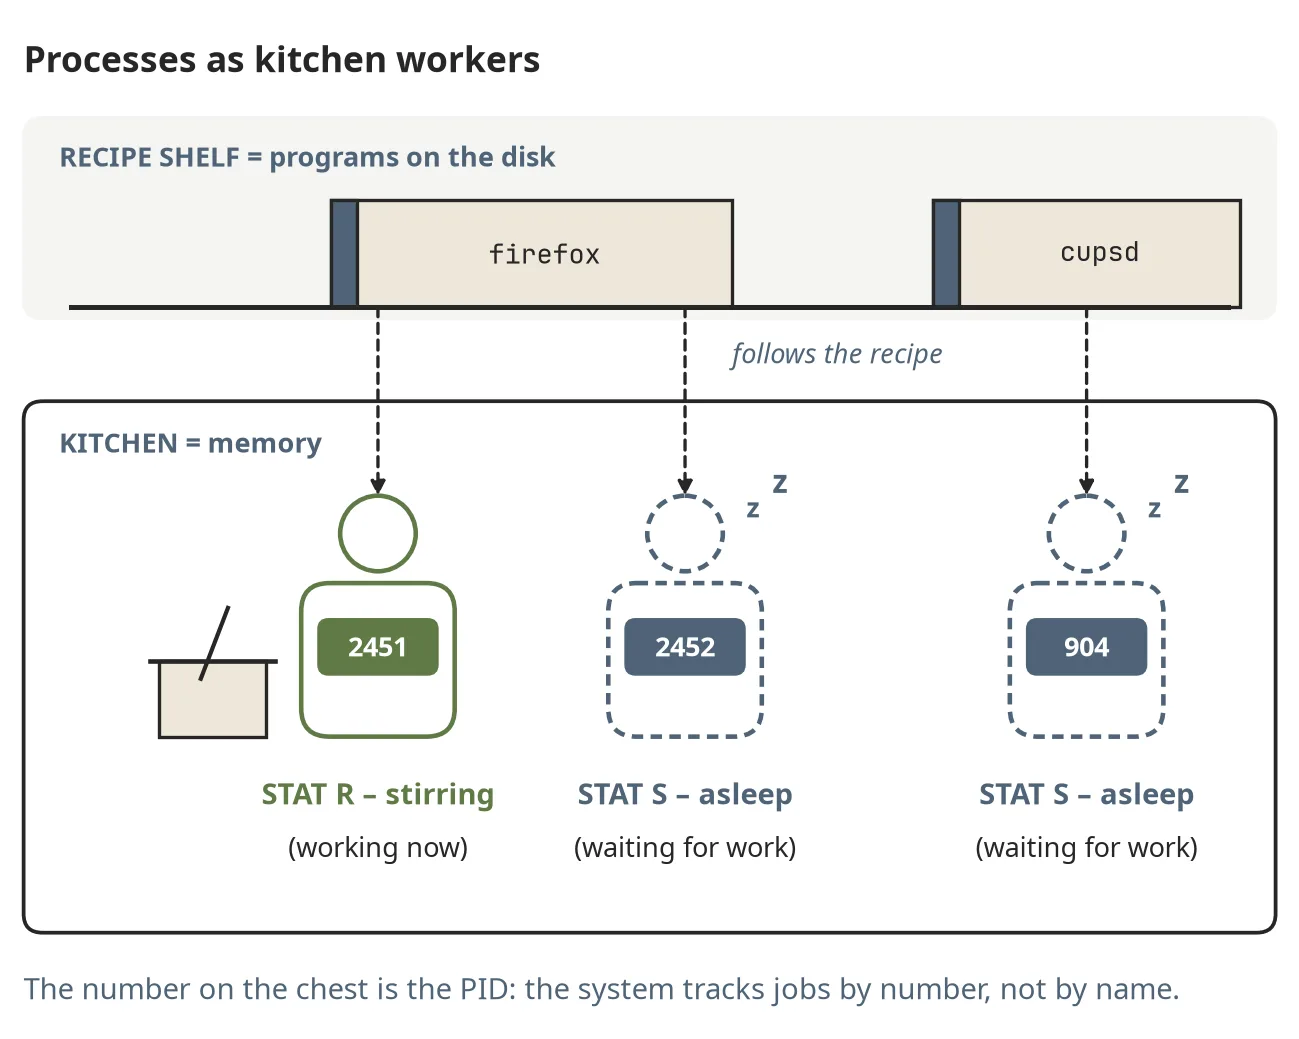
Figure 11.2 Processes as kitchen staff
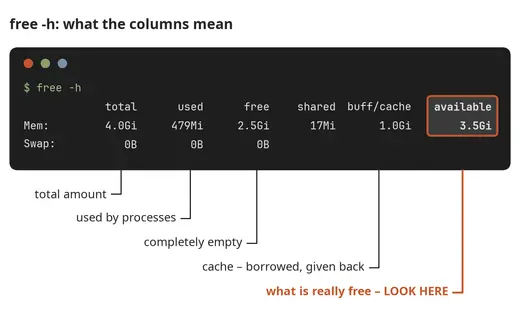
Figure 11.3 How to read the output of free -h
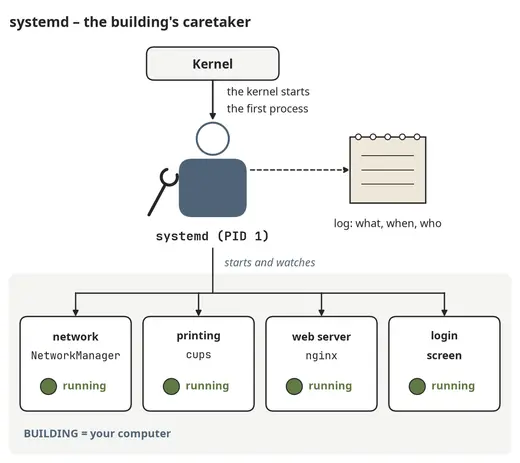
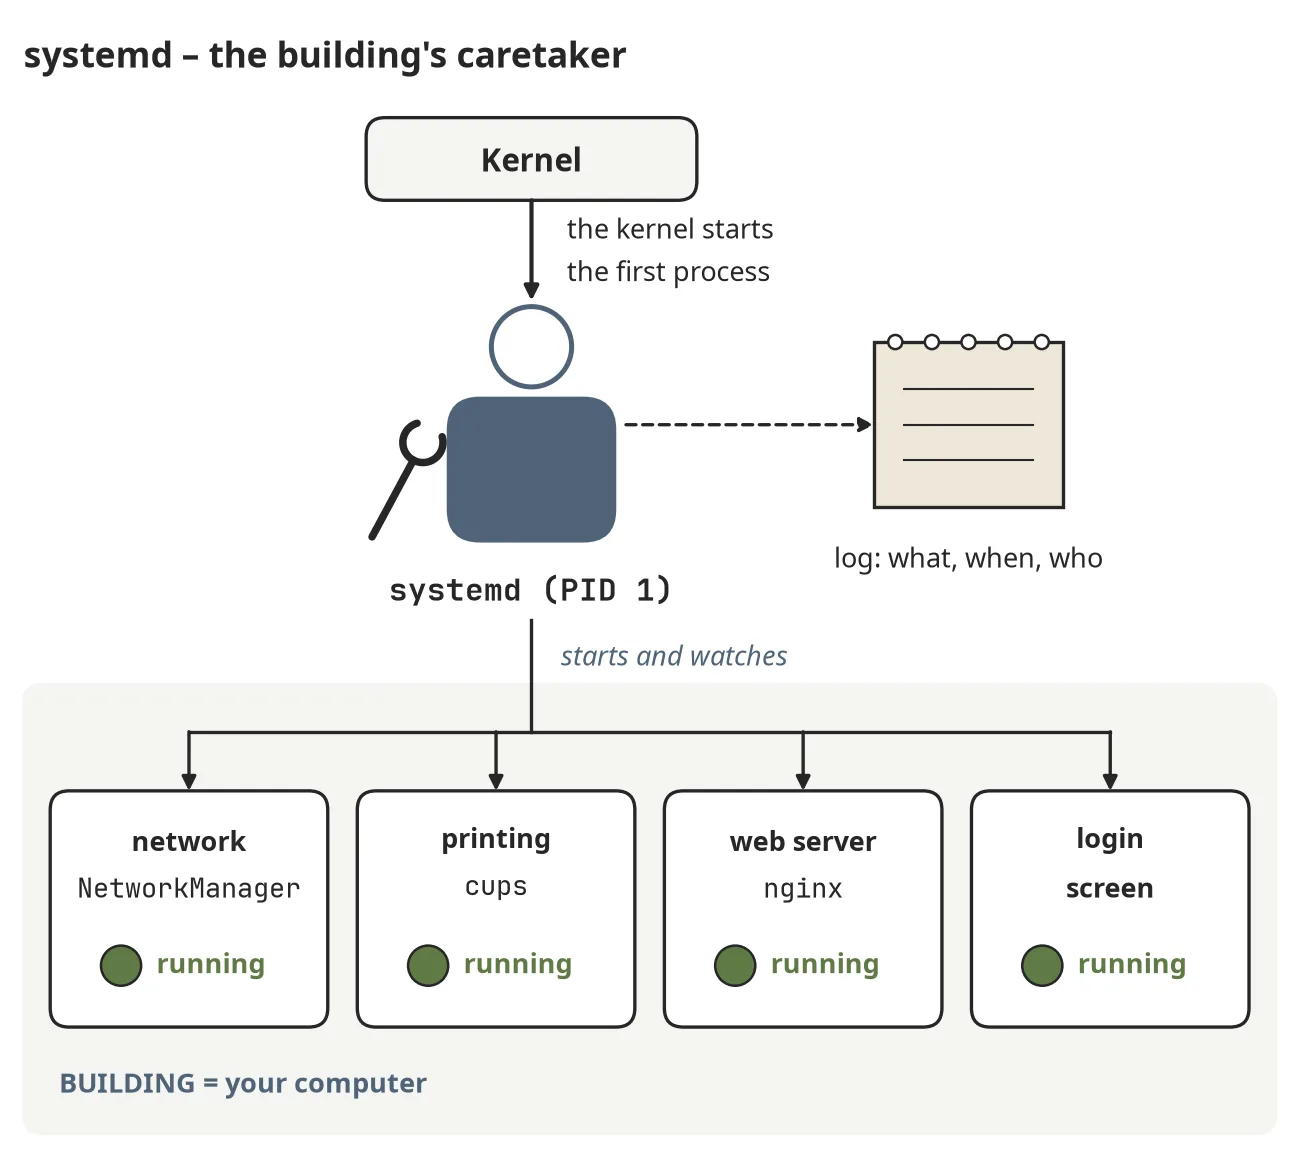
Figure 12.1 systemd – the system's building manager
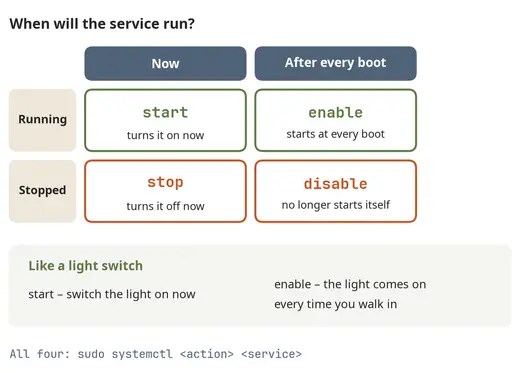
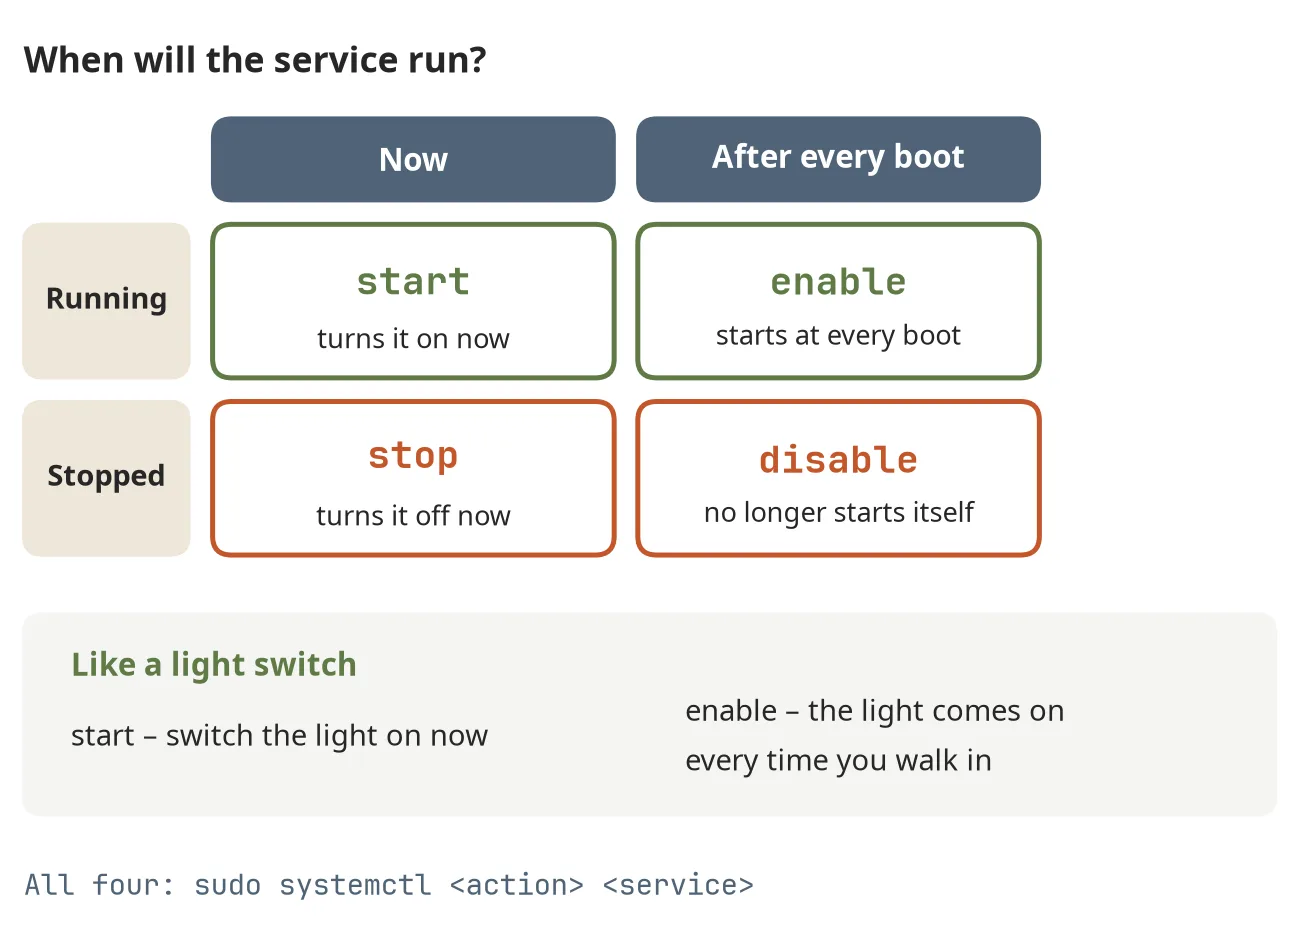
Figure 12.2 start, stop, enable and disable: when the service runs
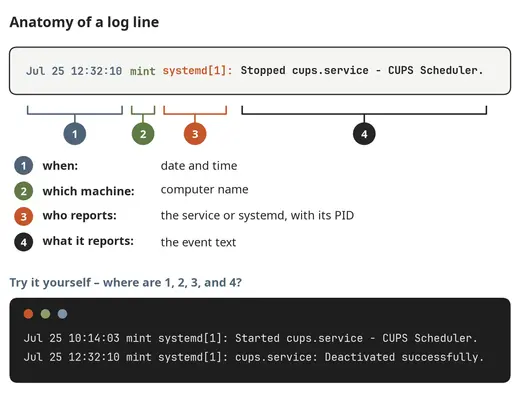
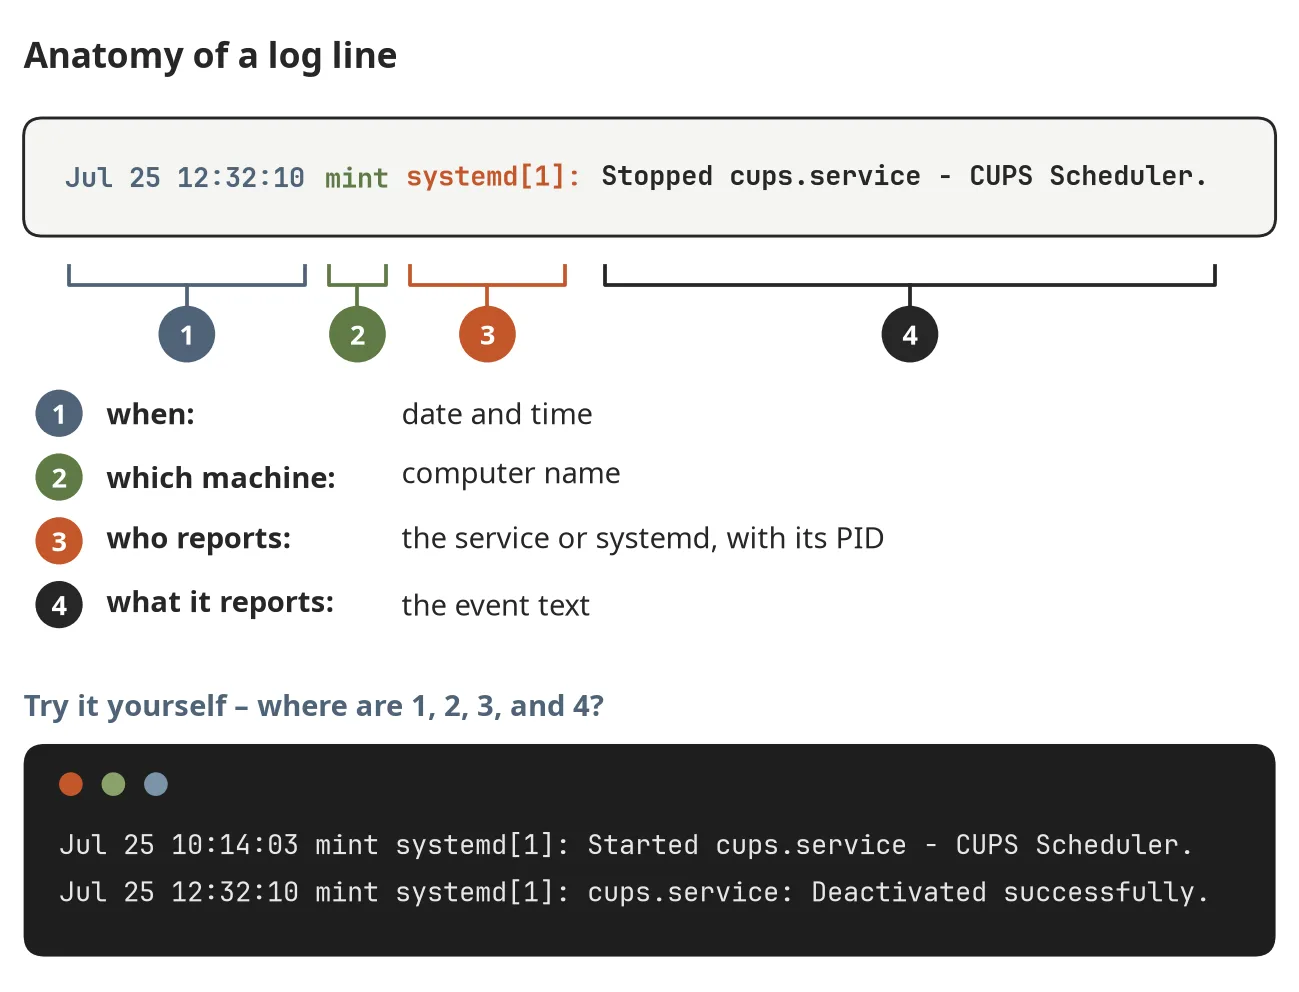
Figure 12.3 Anatomy of a log entry
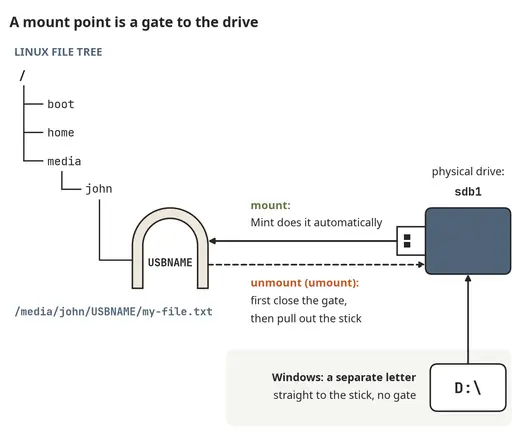
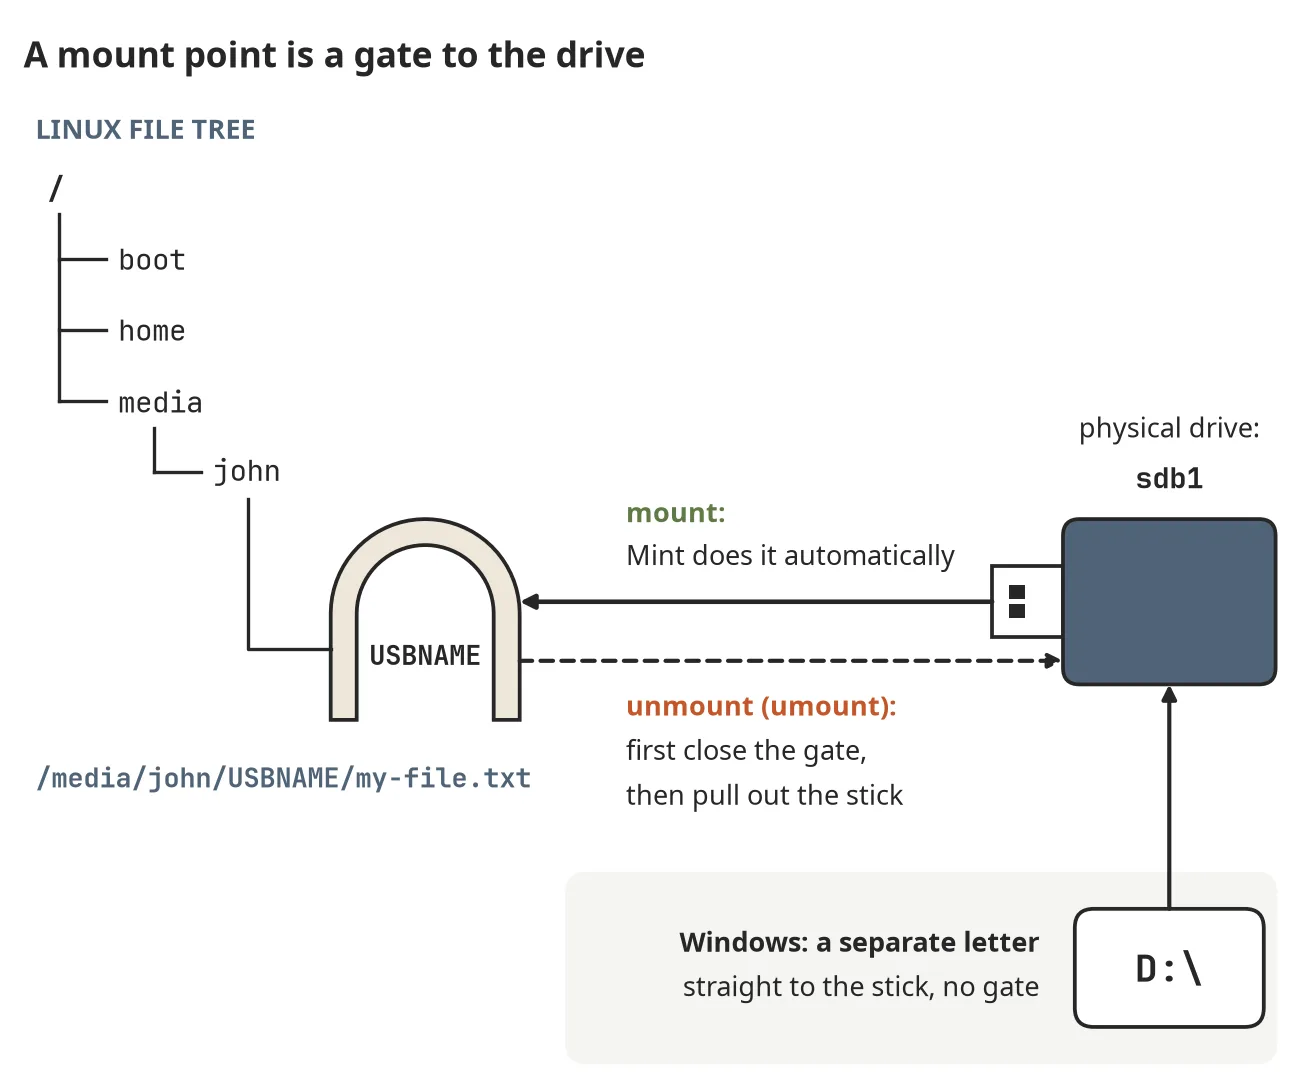
Figure 13.1 A mount point is a gateway to a drive
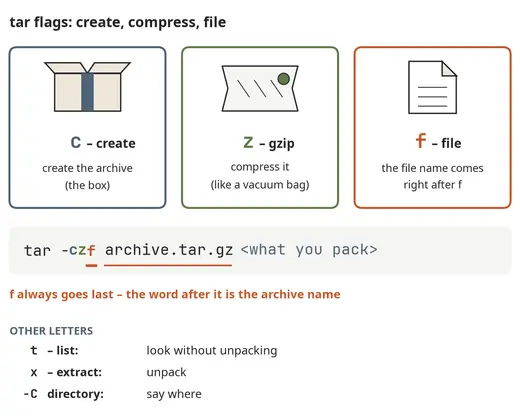
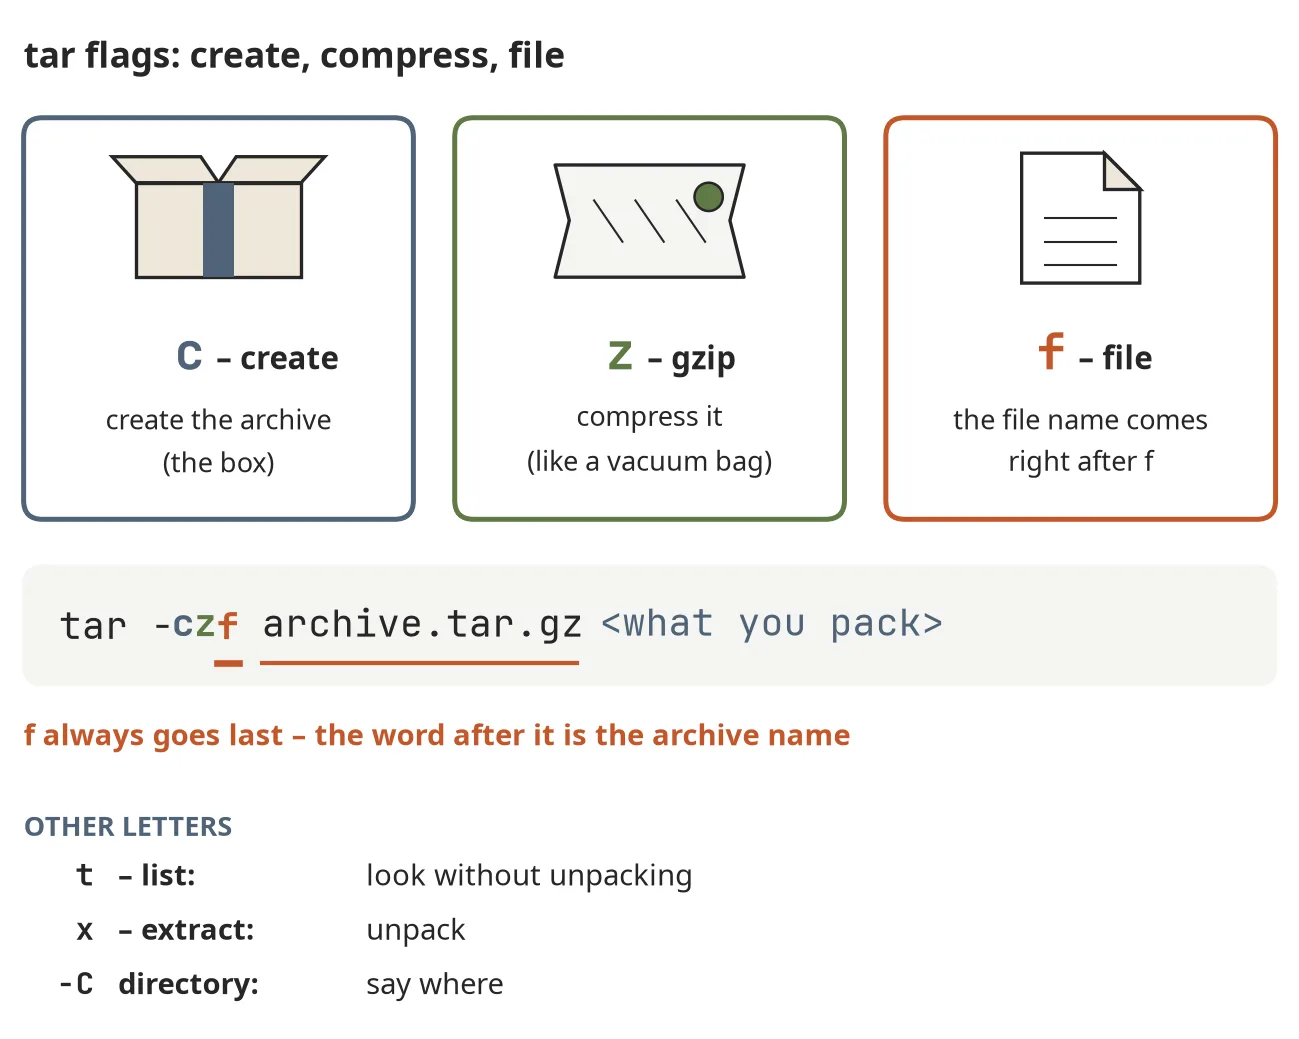
Figure 13.2 tar options at a glance
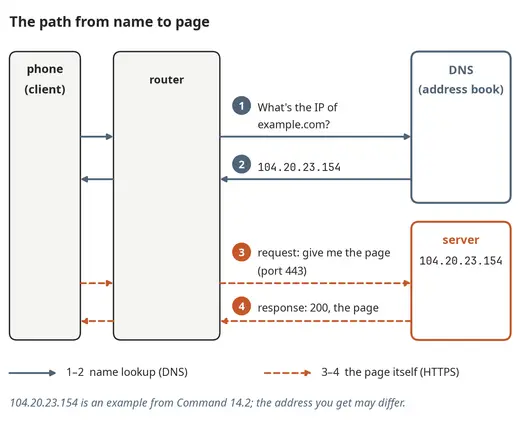
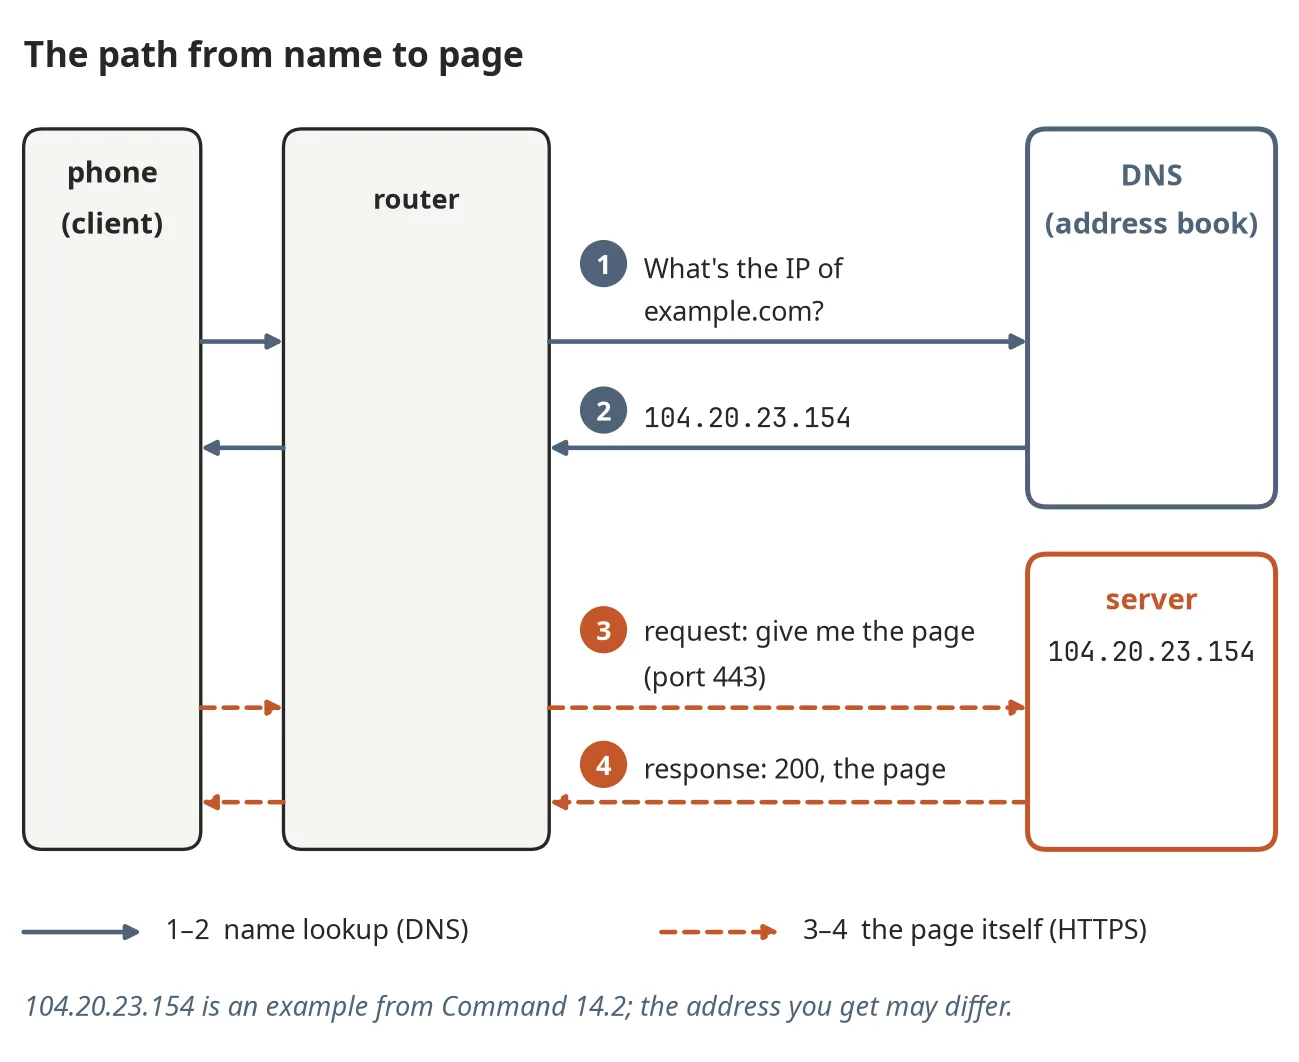
Figure 14.1 The DNS path from a name to a page
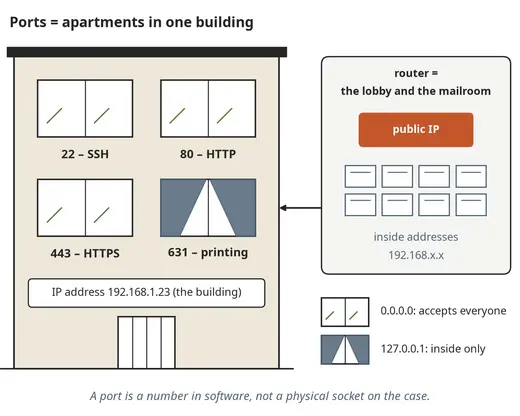
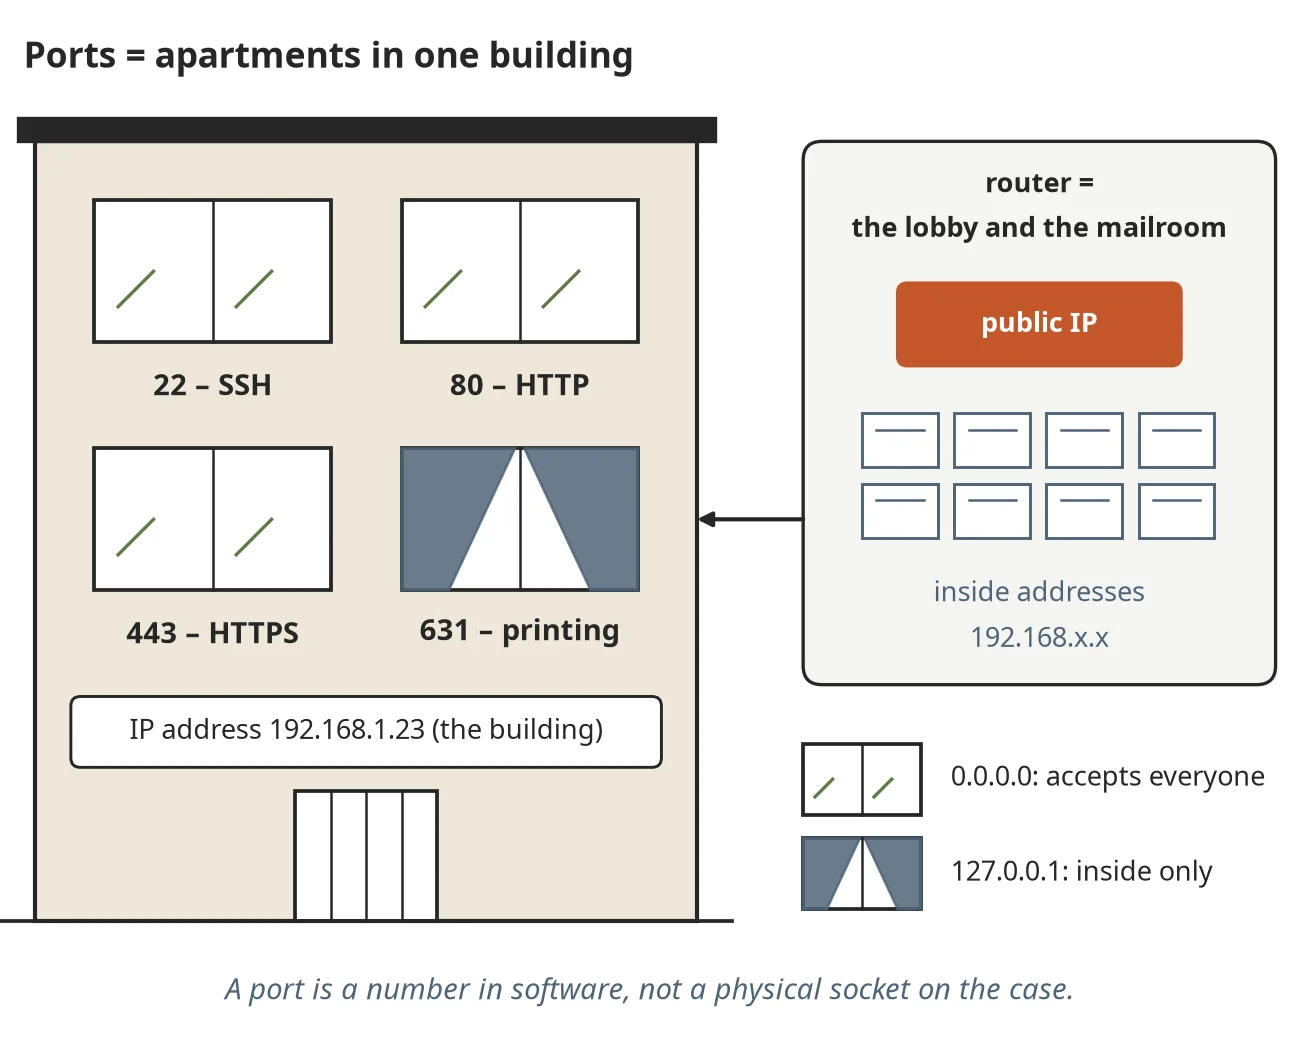
Figure 14.2 Ports are like flats in an apartment block
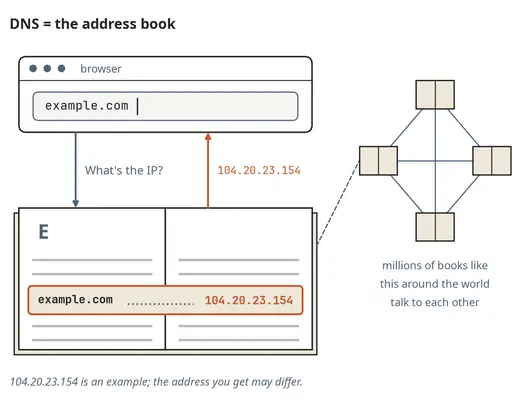
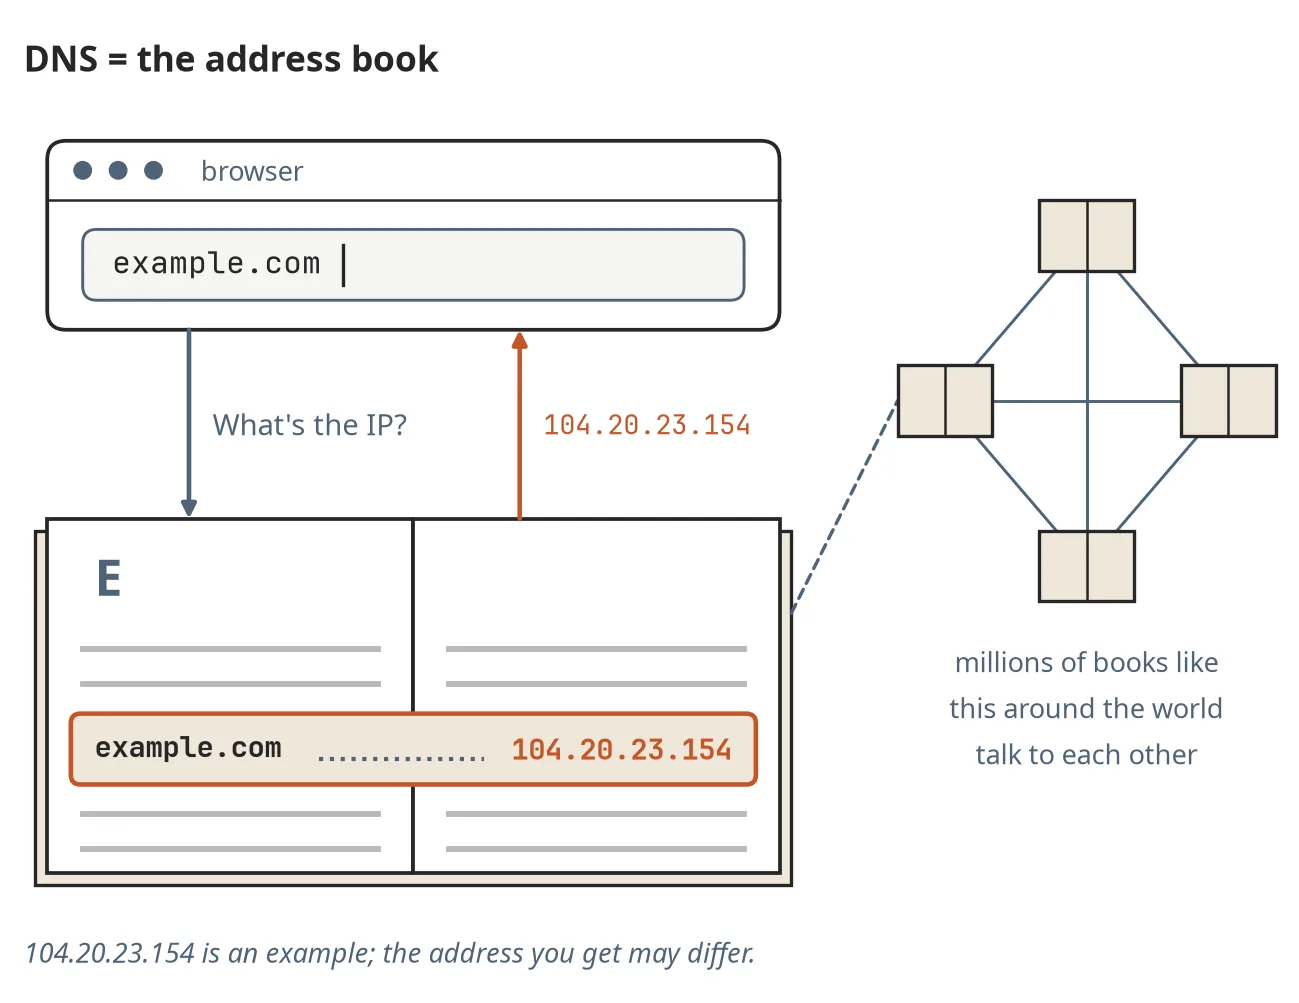
Figure 14.3 DNS – the internet's address book
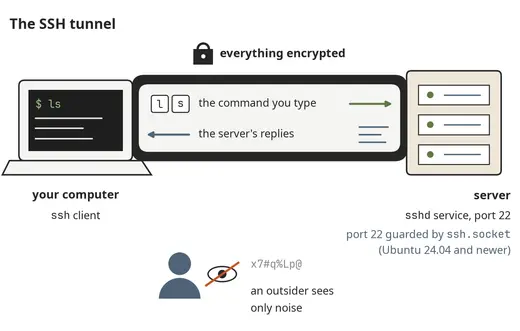
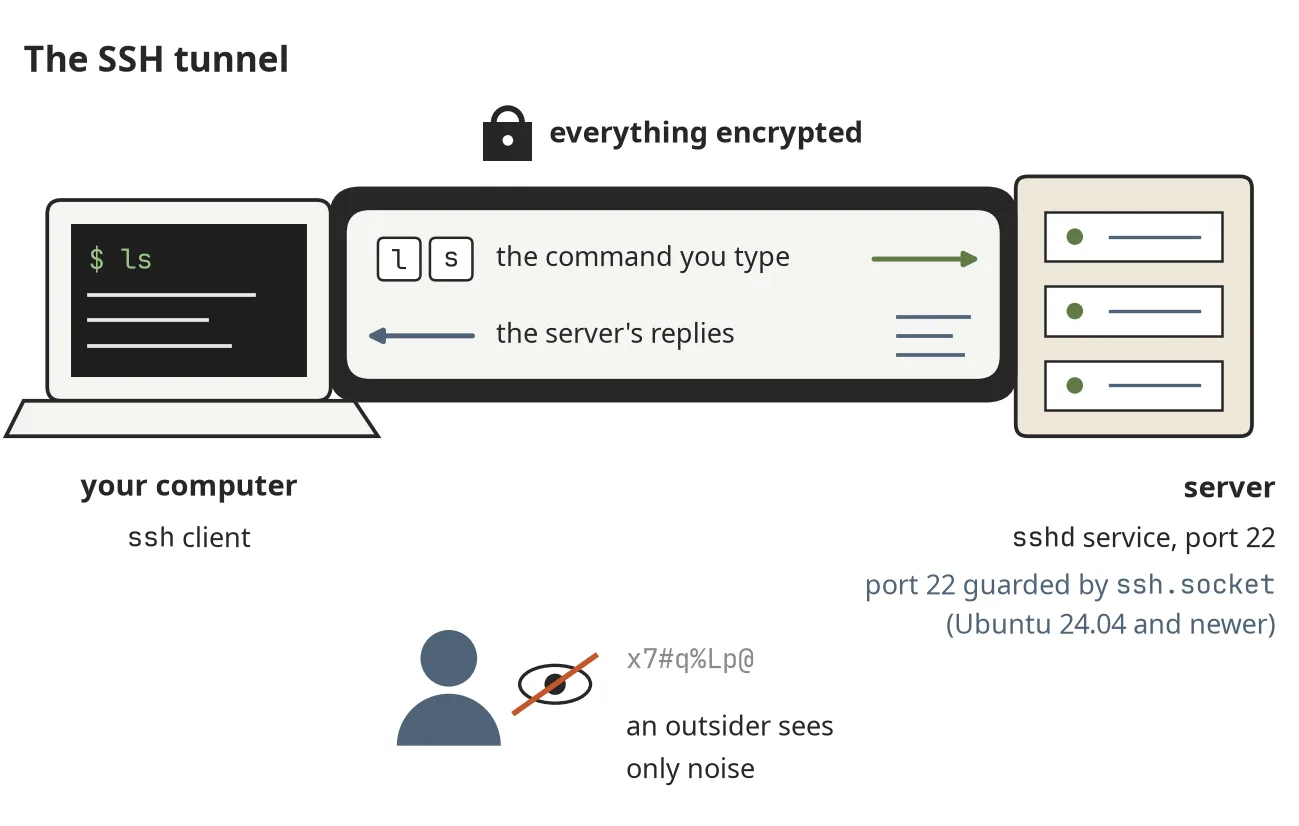
Figure 15.1 SSH – an encrypted tunnel between computers
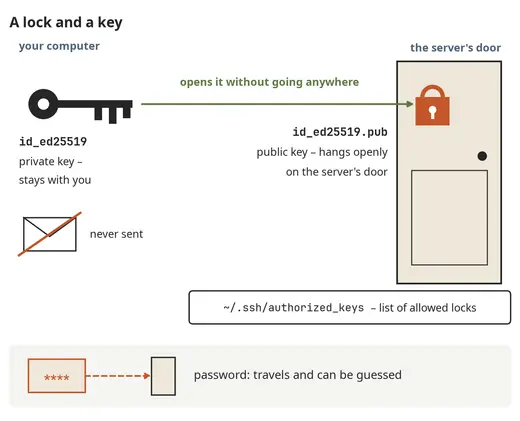
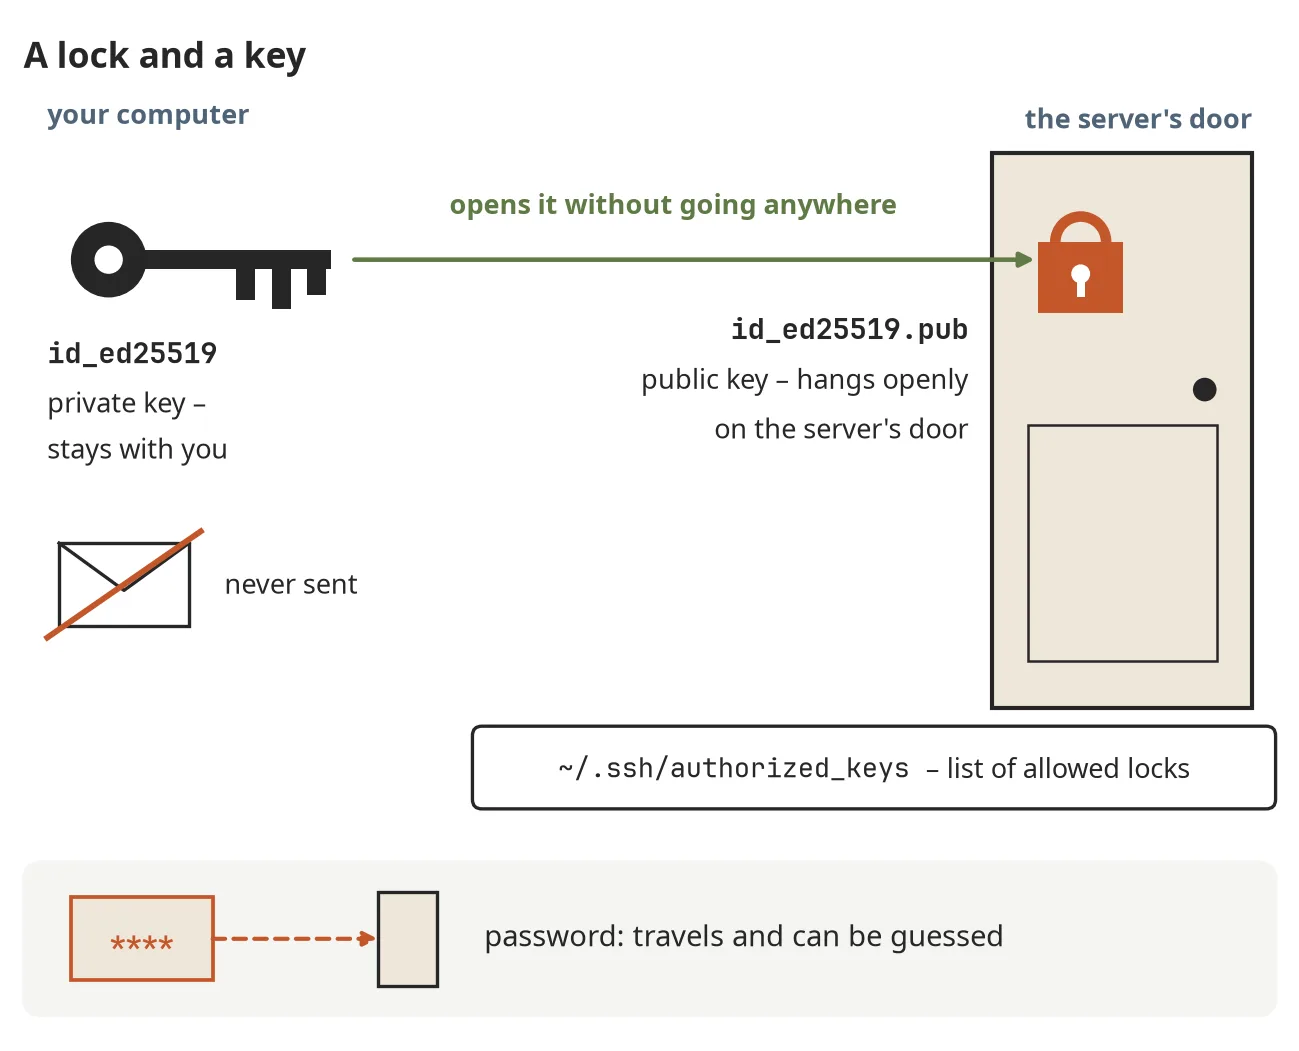
Figure 15.2 An SSH key pair: a key and a lock
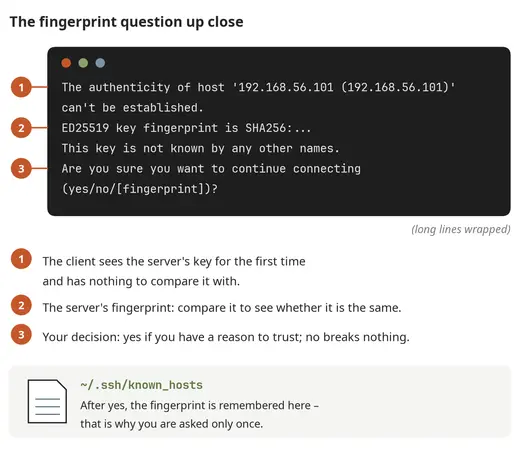
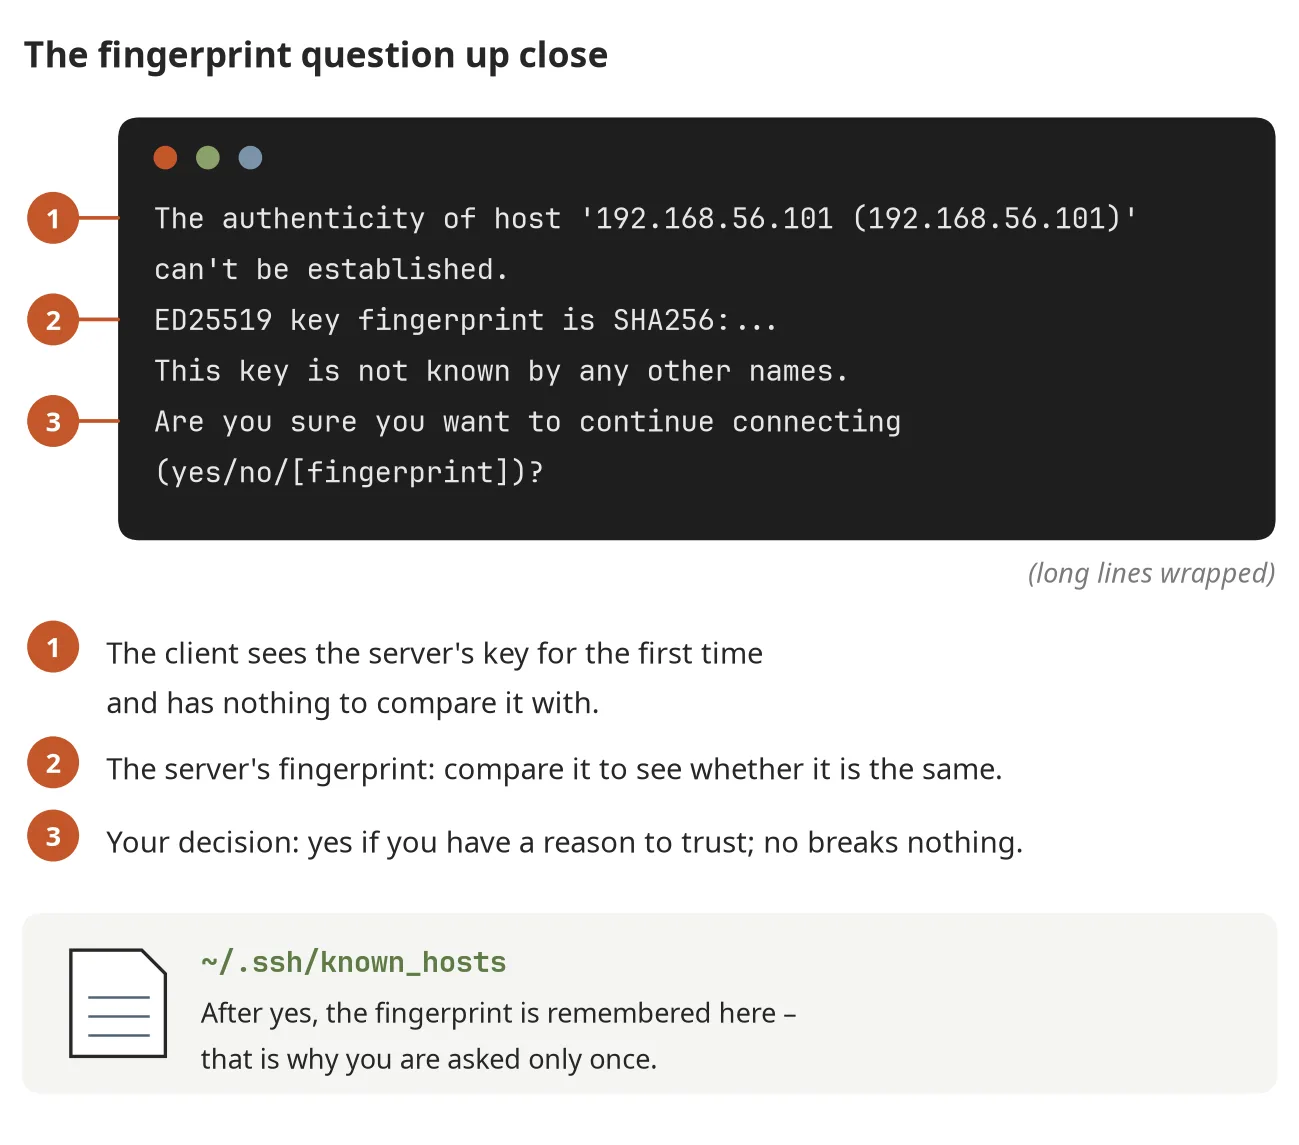
Figure 15.3 The fingerprint question on the first connection
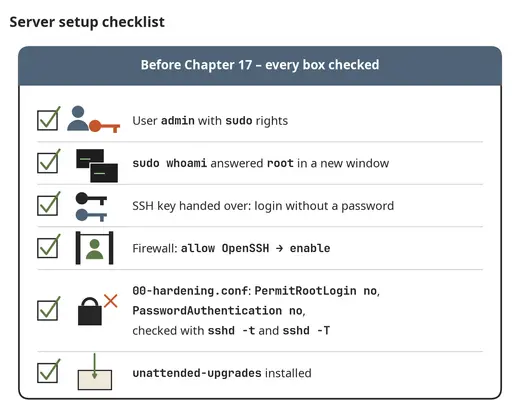
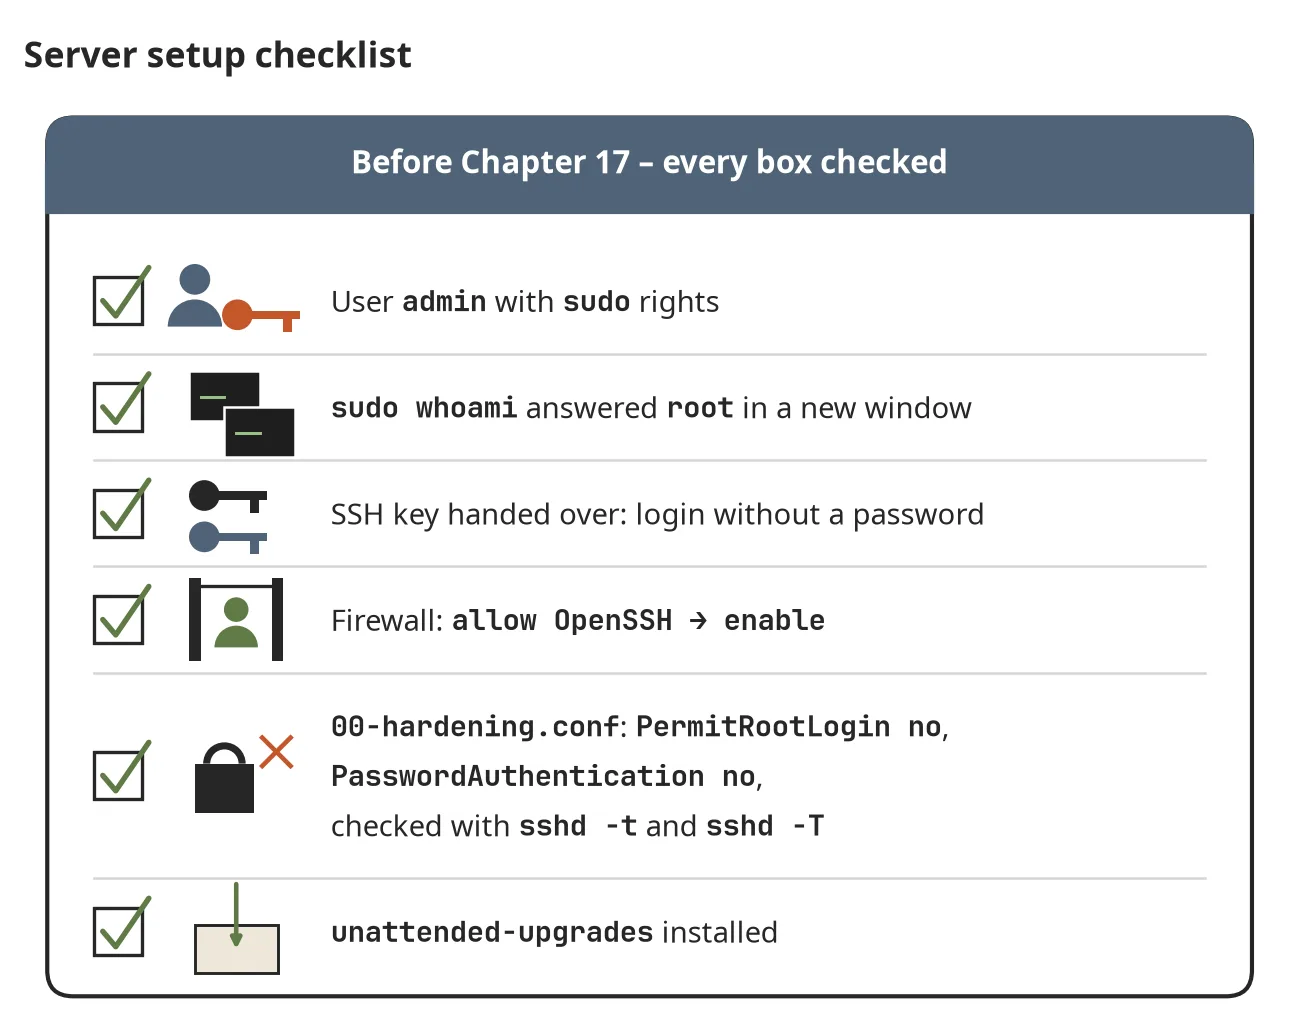
Figure 16.1 Server setup checklist
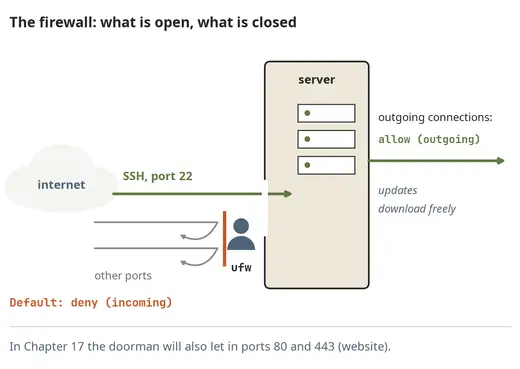
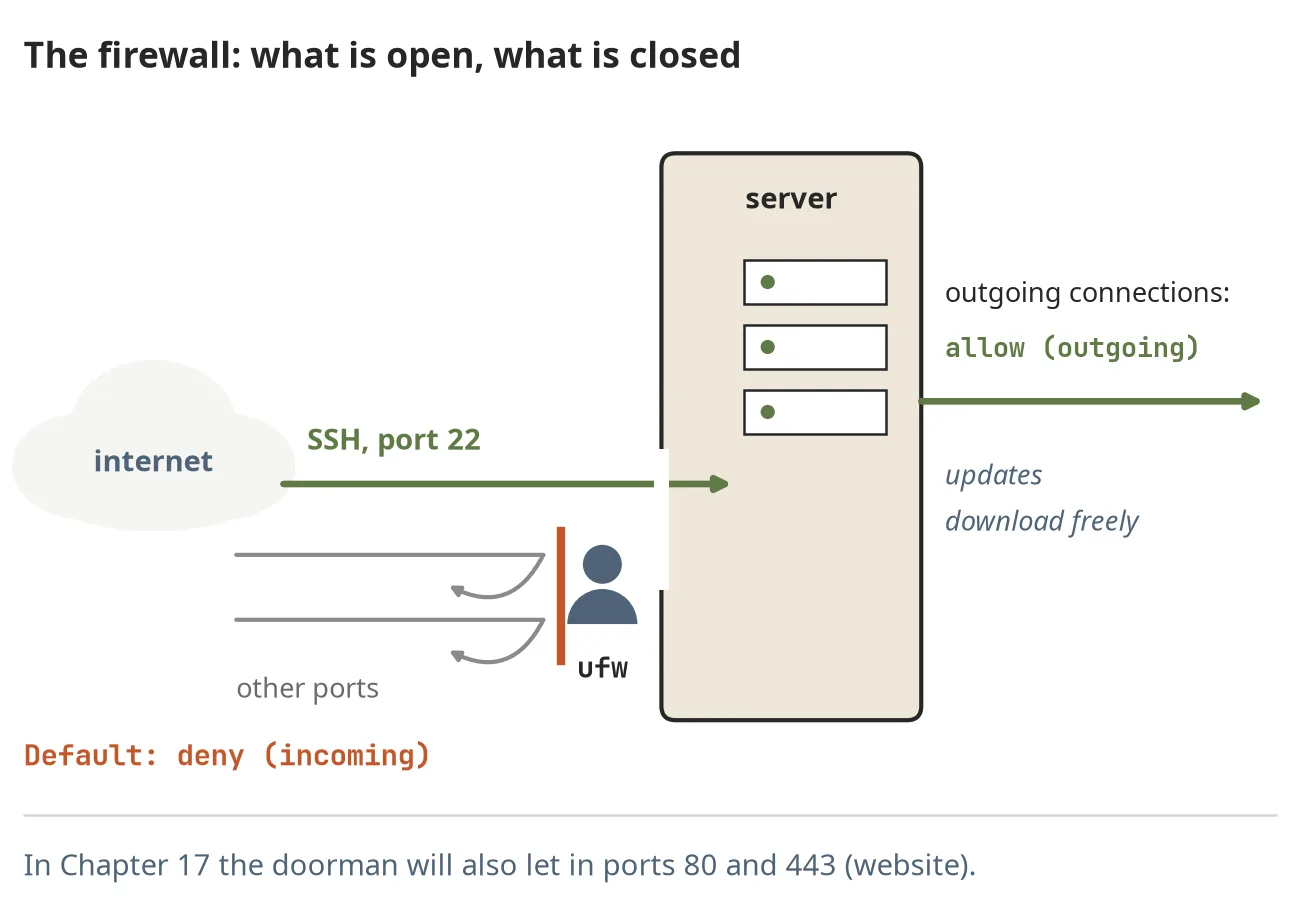
Figure 16.2 The firewall: what is open and what is closed
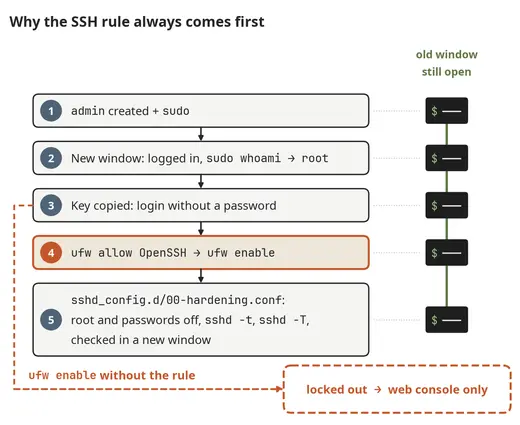
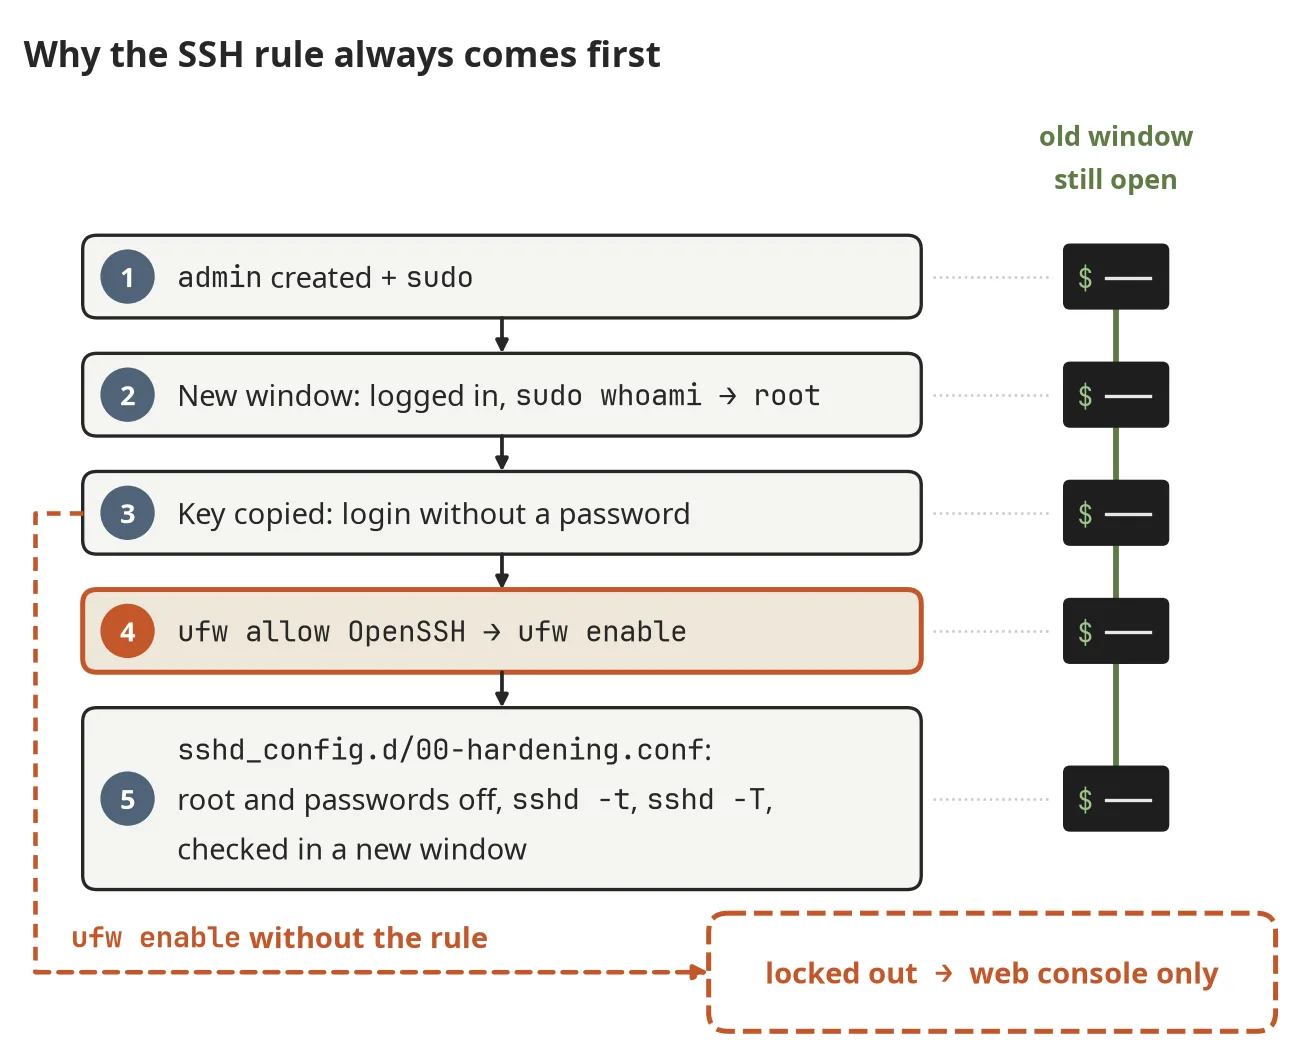
Figure 16.3 Why the SSH rule always comes first
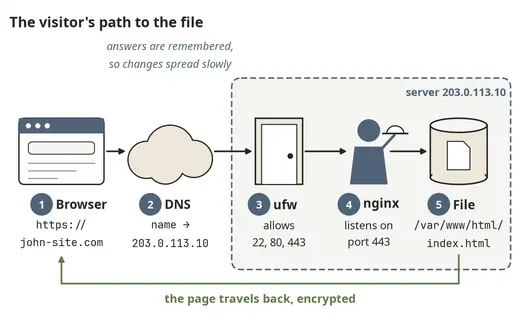
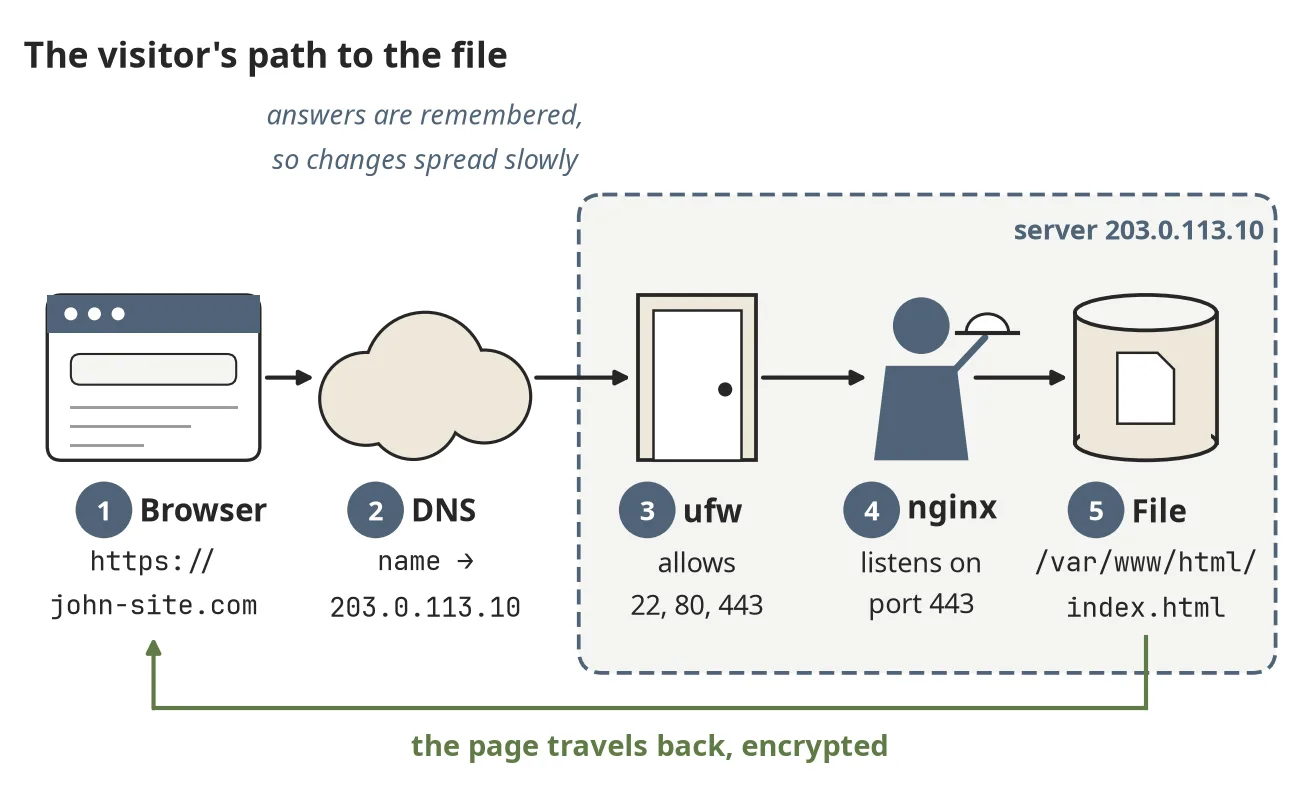
Figure 17.1 A visitor's path to your website's files
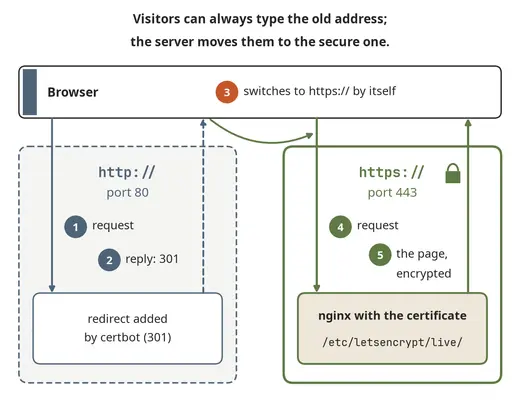
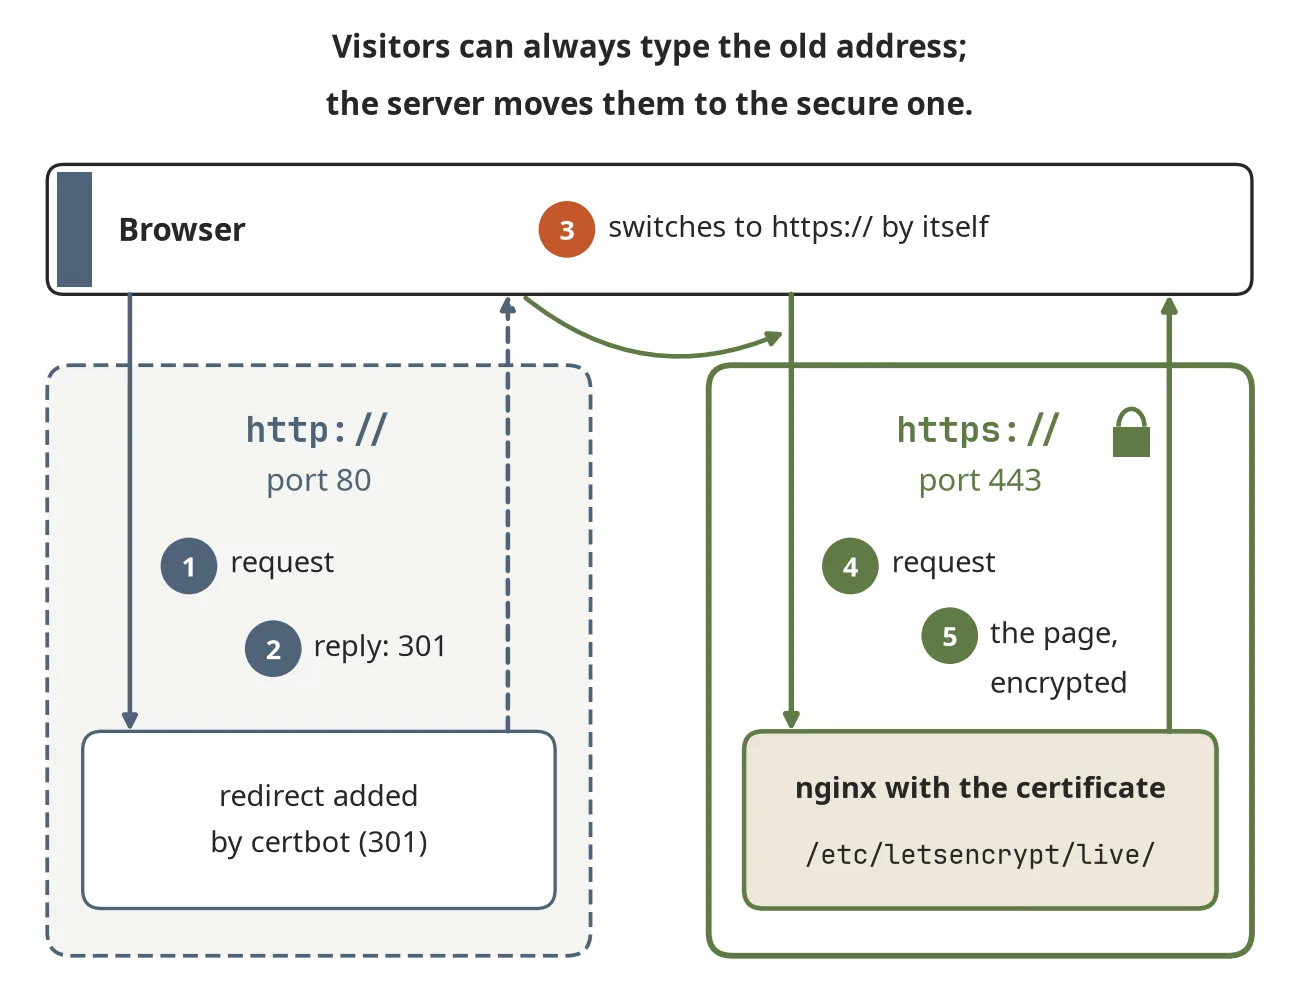
Figure 17.2 Redirecting from HTTP to HTTPS
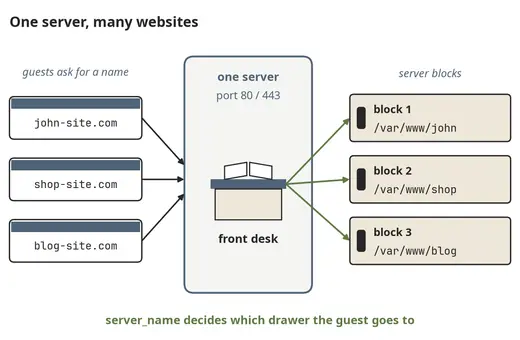
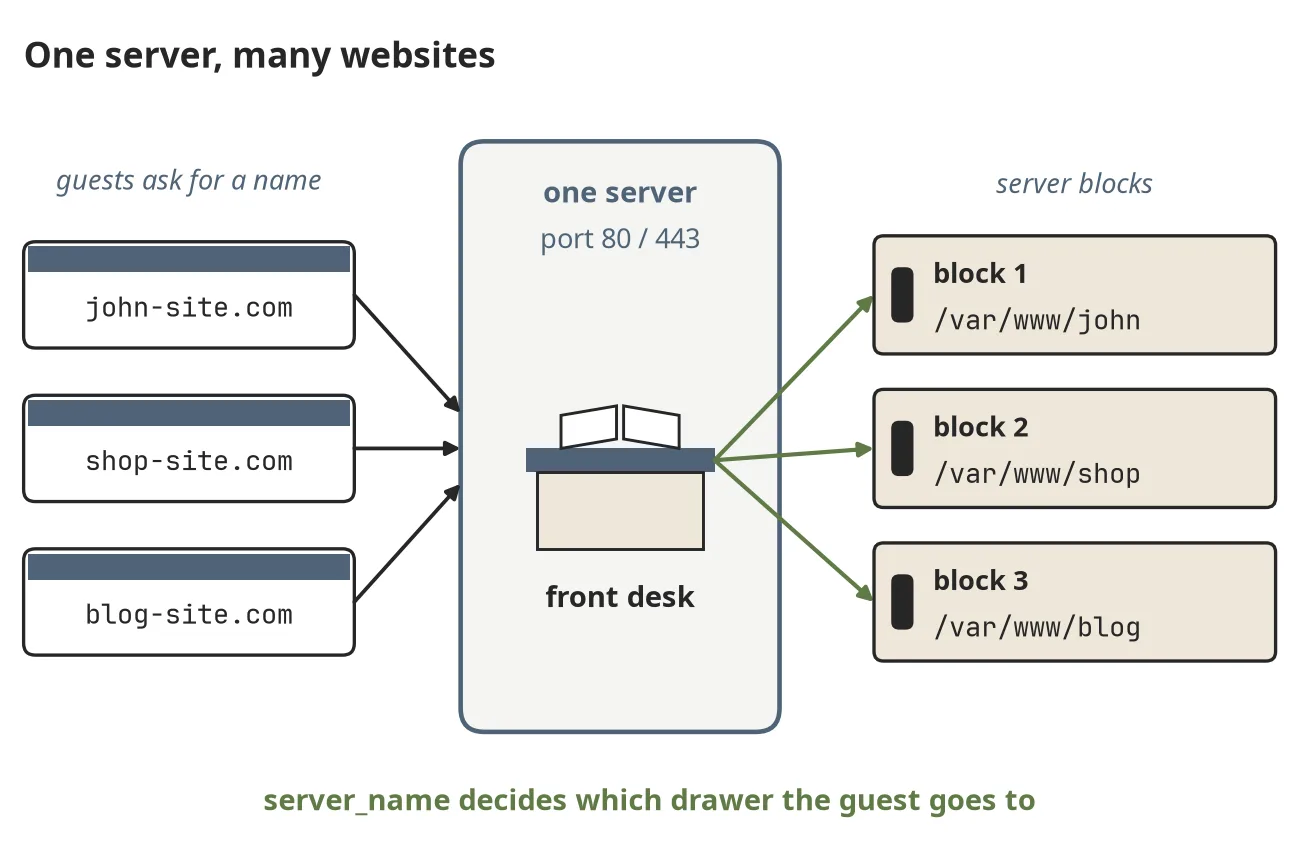
Figure 17.3 Server blocks: one nginx, several websites
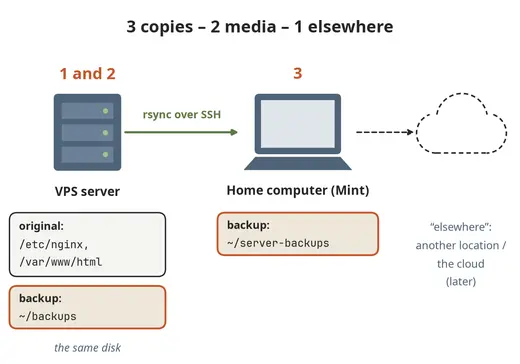
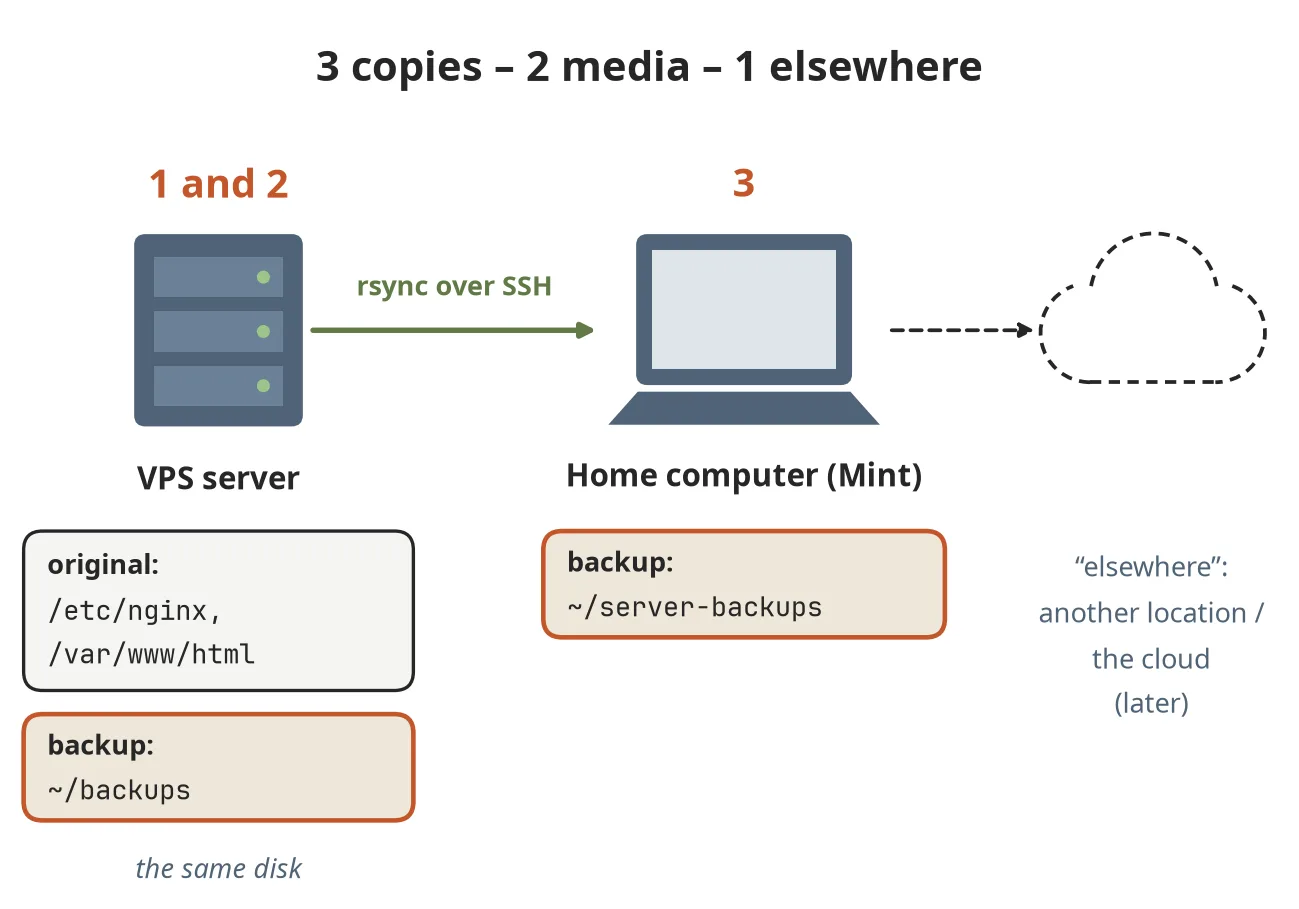
Figure 18.1 The 3-2-1 backup rule
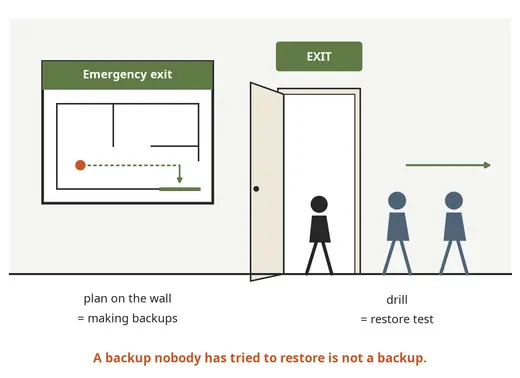
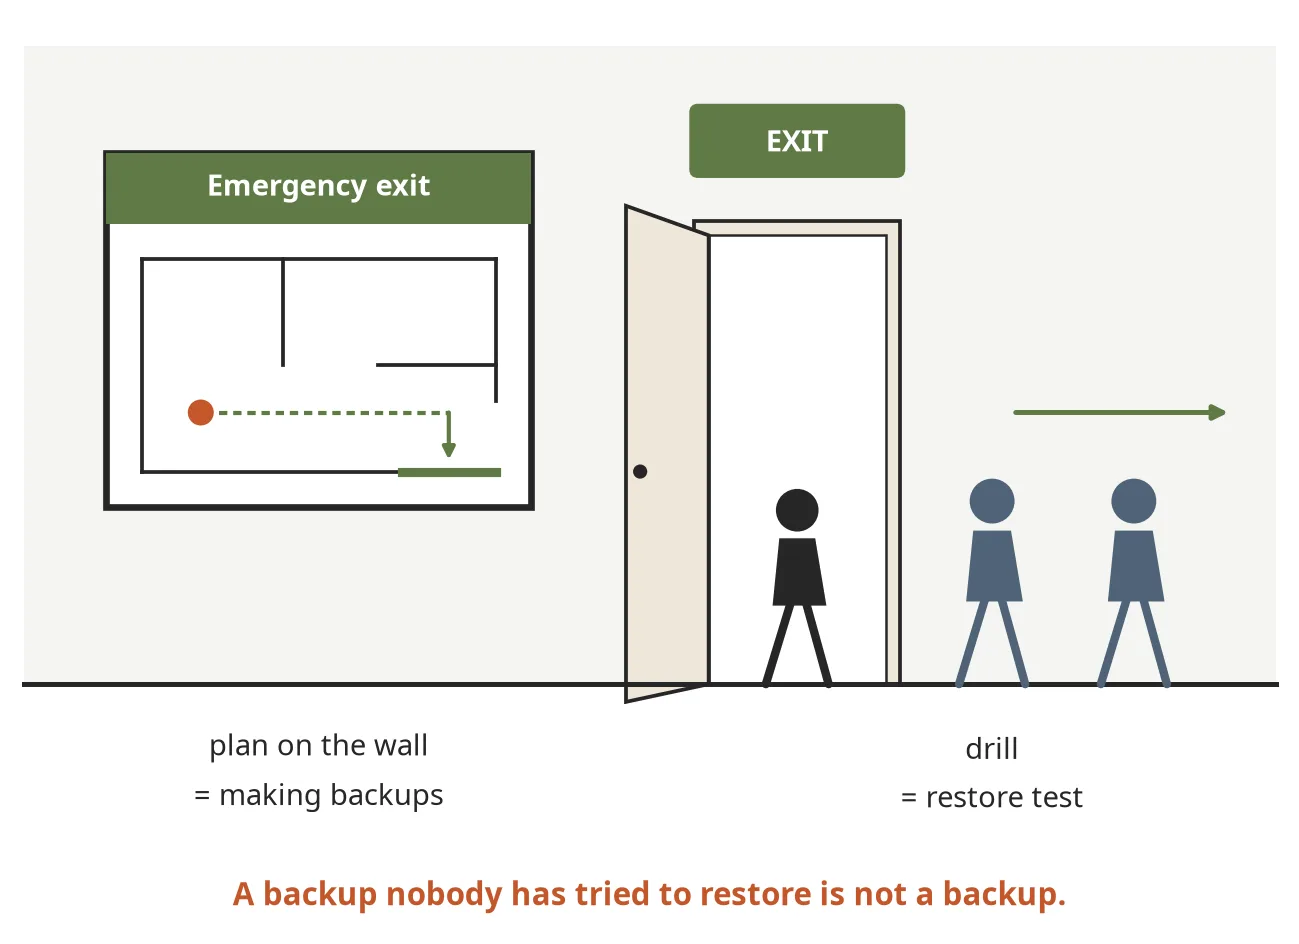
Figure 18.2 A backup is only worth something once a restore has been tested
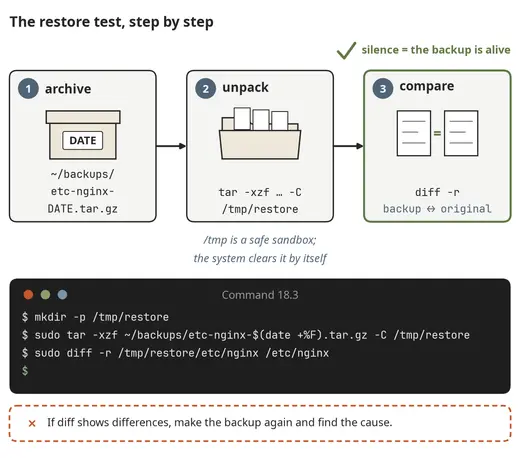
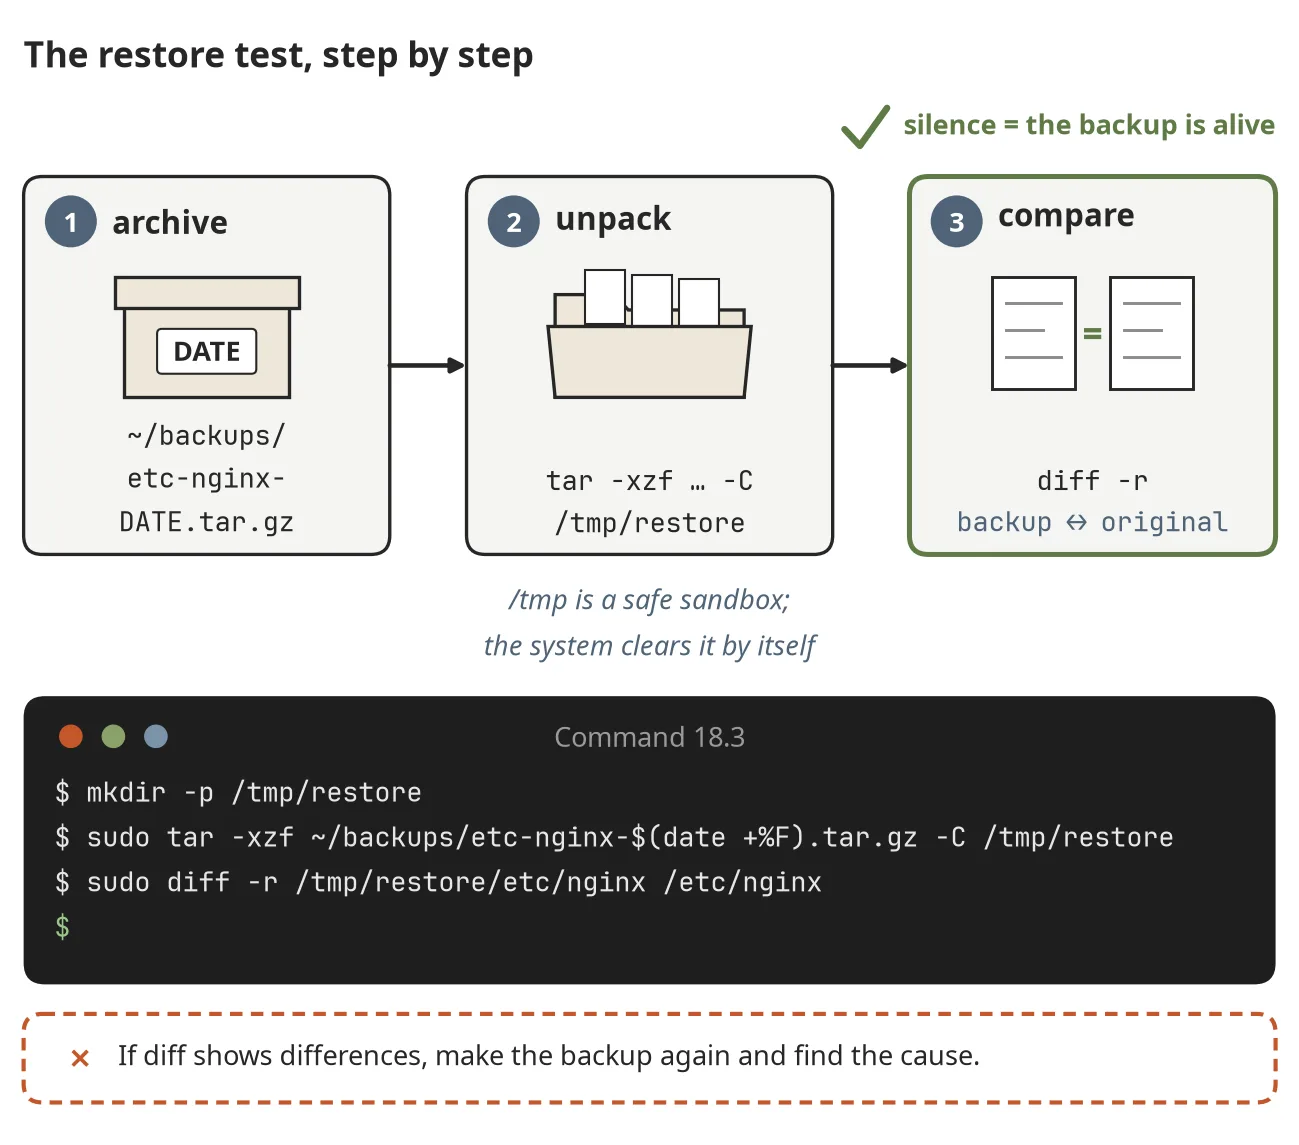
Figure 18.3 The restore test, step by step
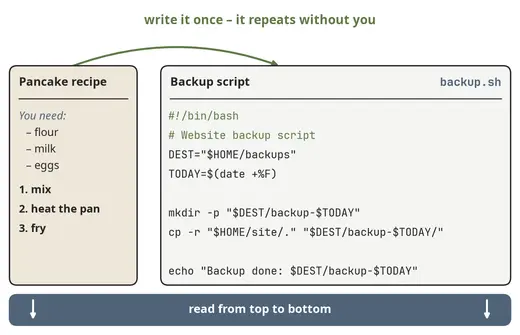
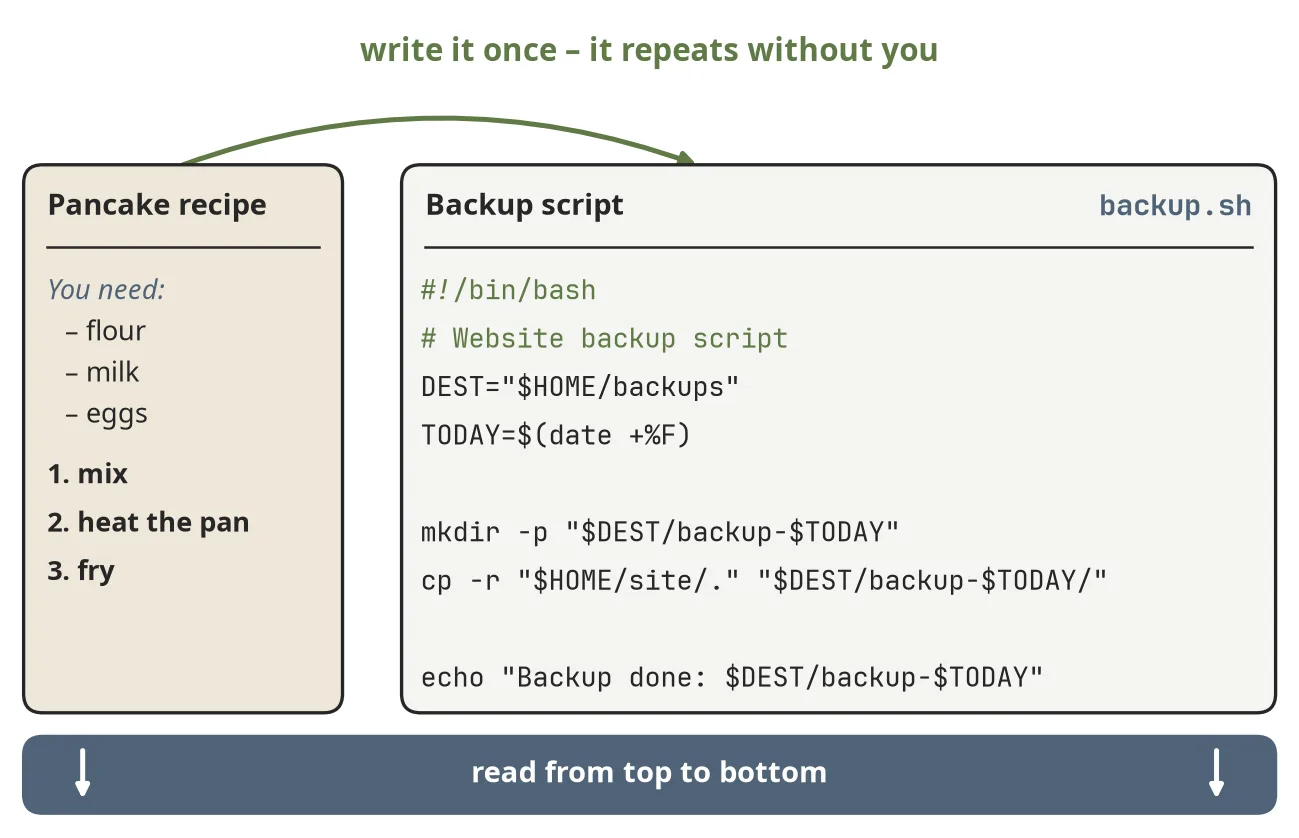
Figure 19.1 A script is like a recipe
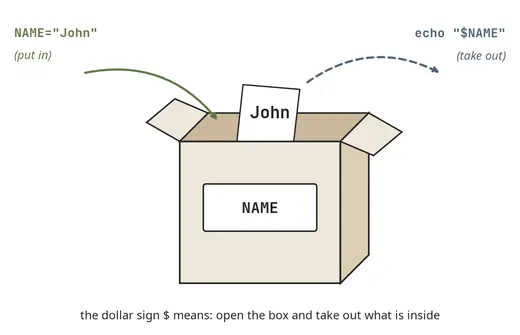
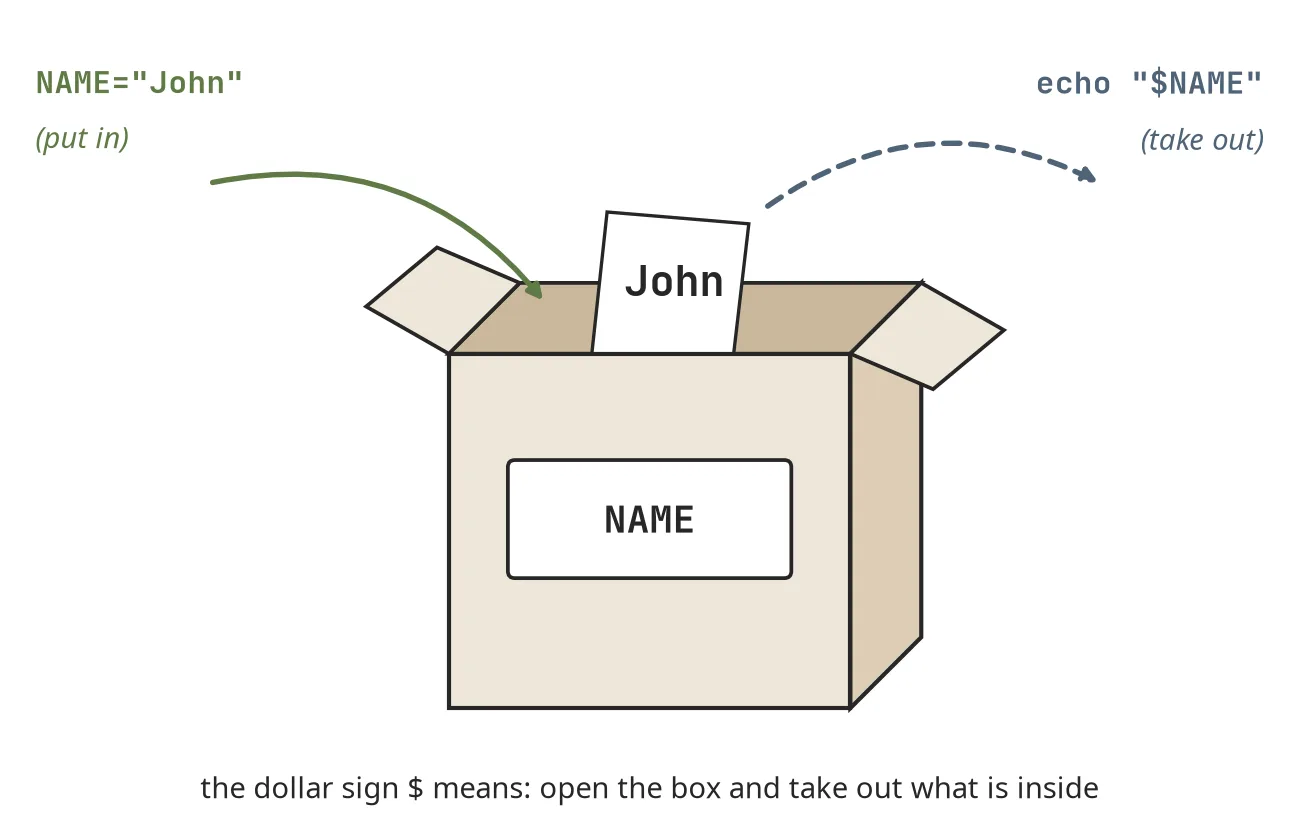
Figure 19.2 A variable is a labelled box
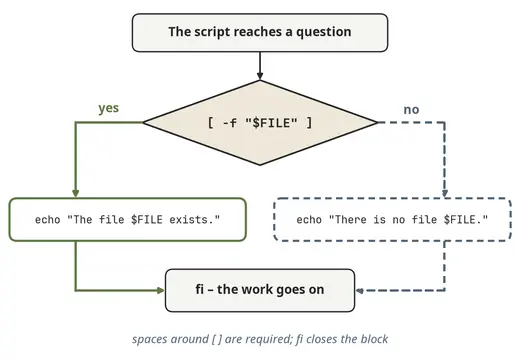
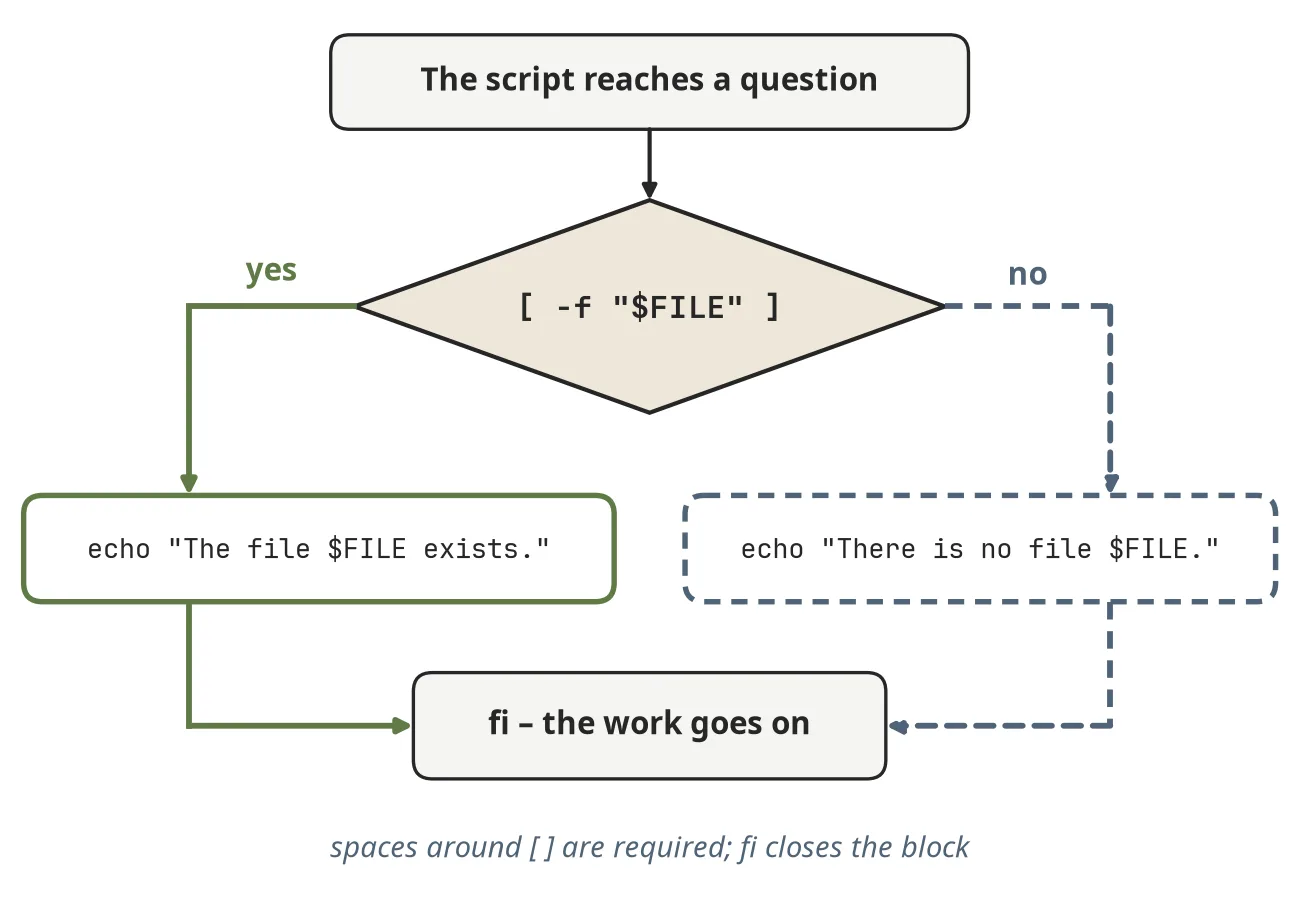
Figure 19.3 The if statement: two possible branches
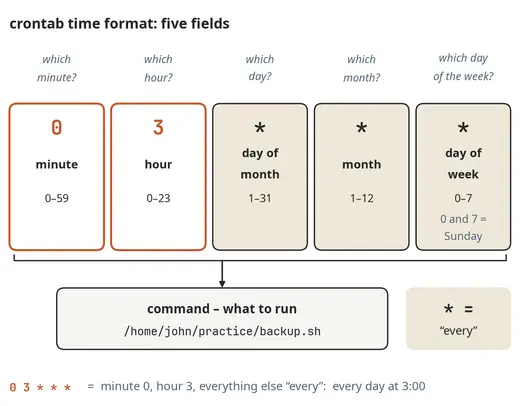
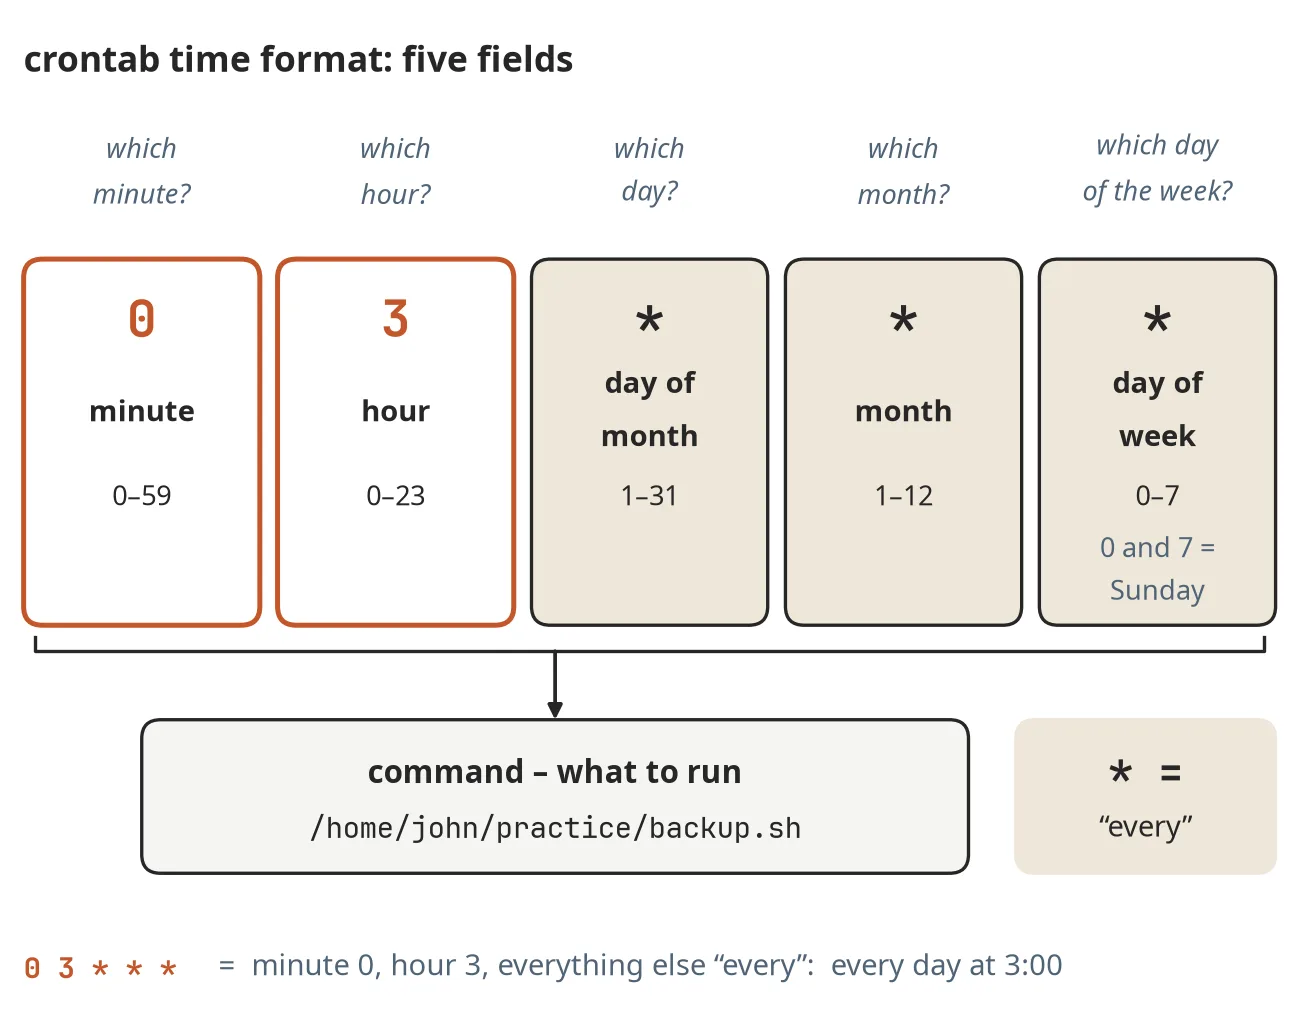
Figure 20.1 The crontab time format: five fields
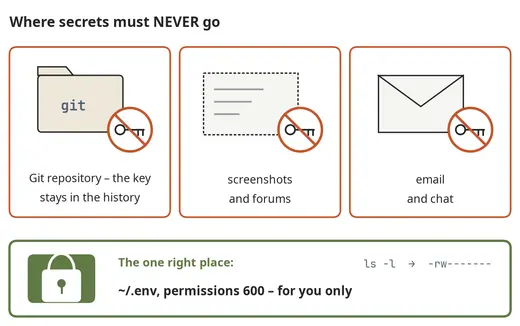
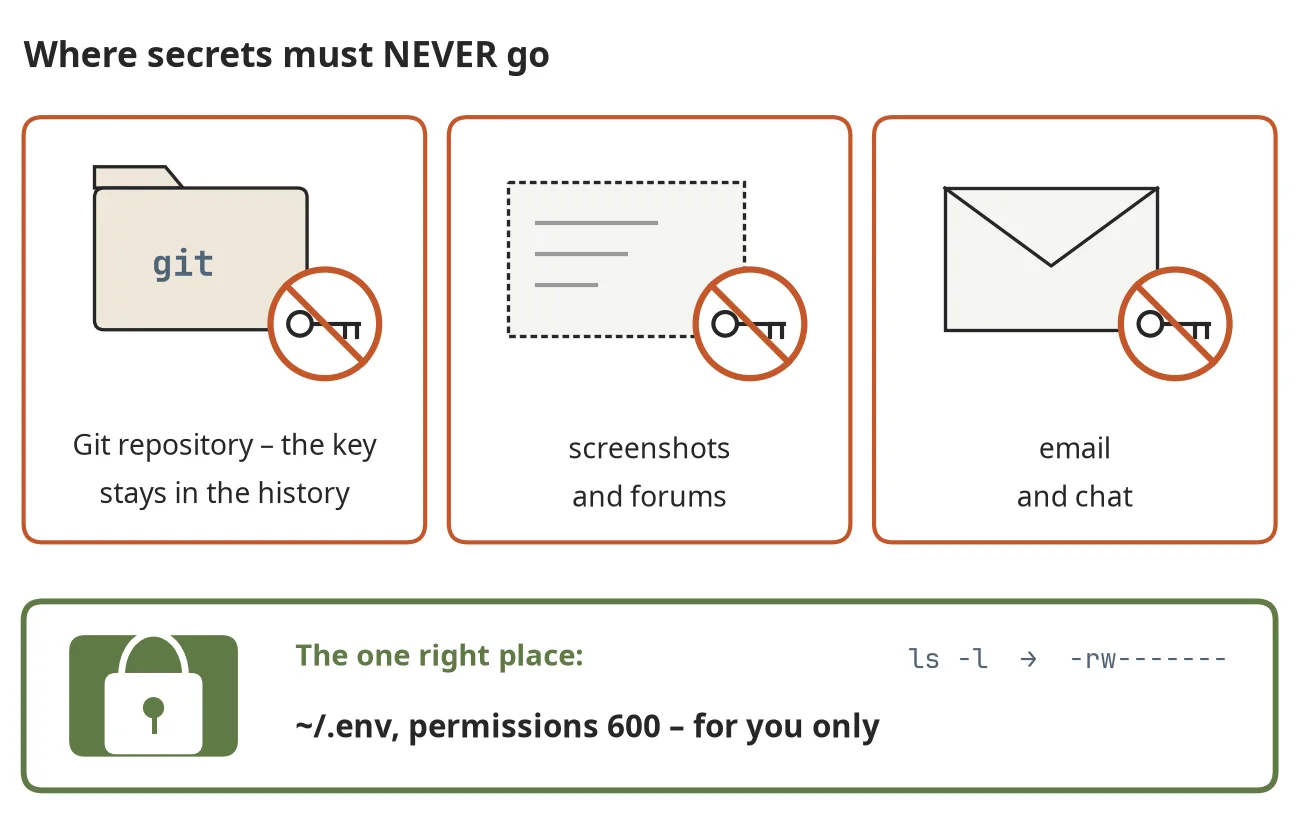
Figure 20.2 Where secret keys must never go
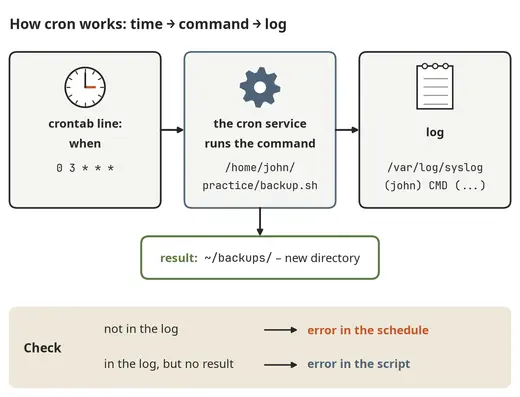
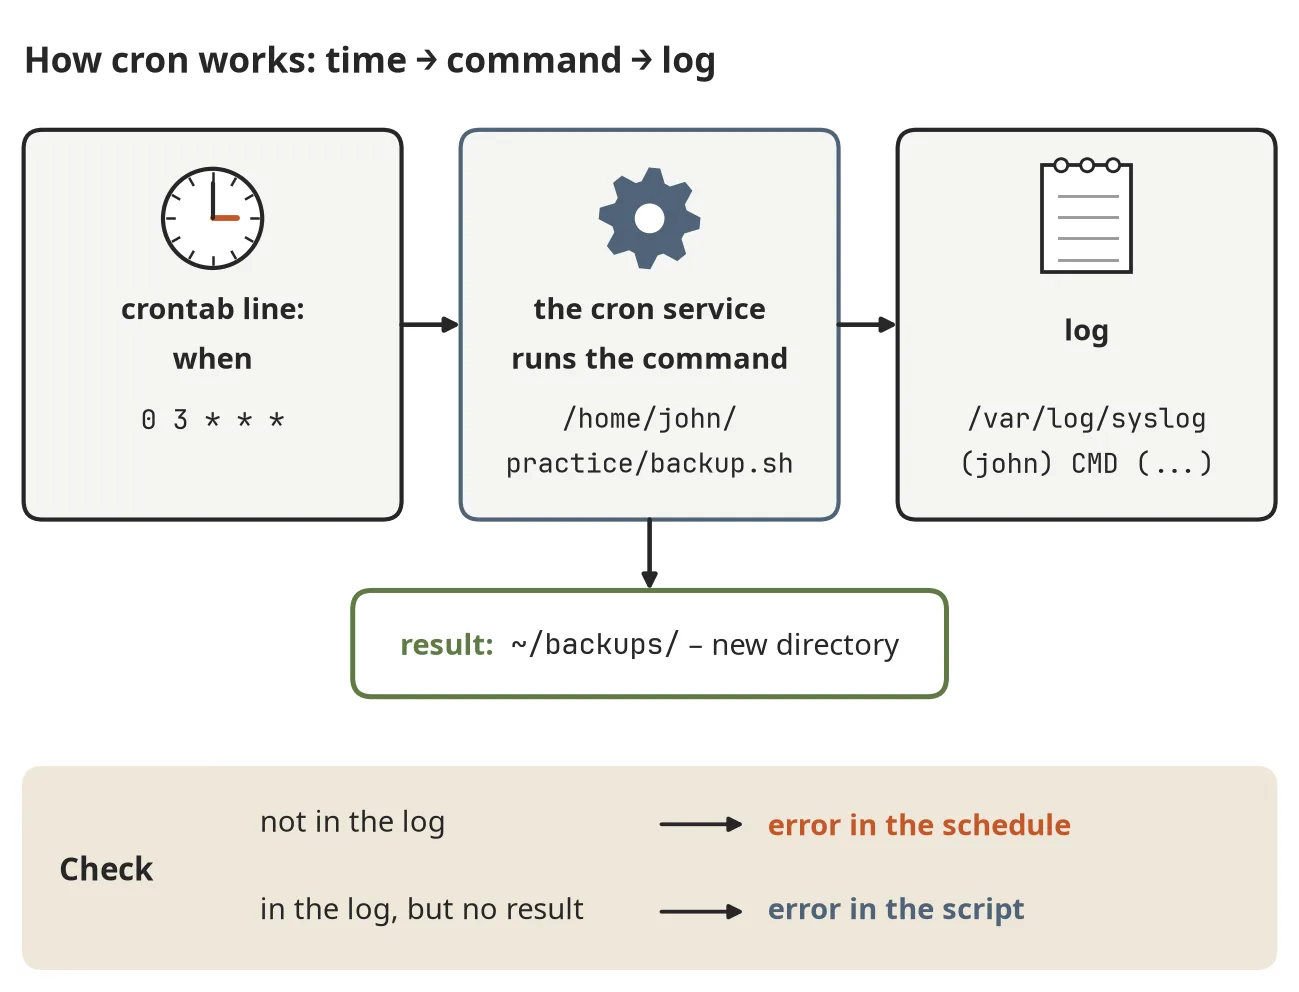
Figure 20.3 How cron works: time, command, log
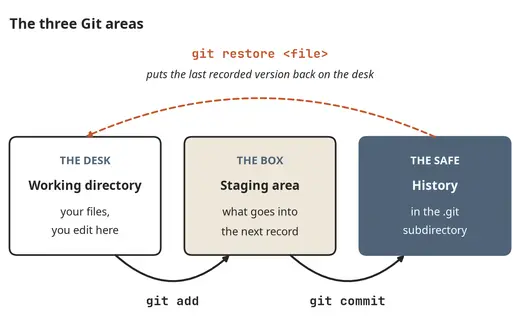
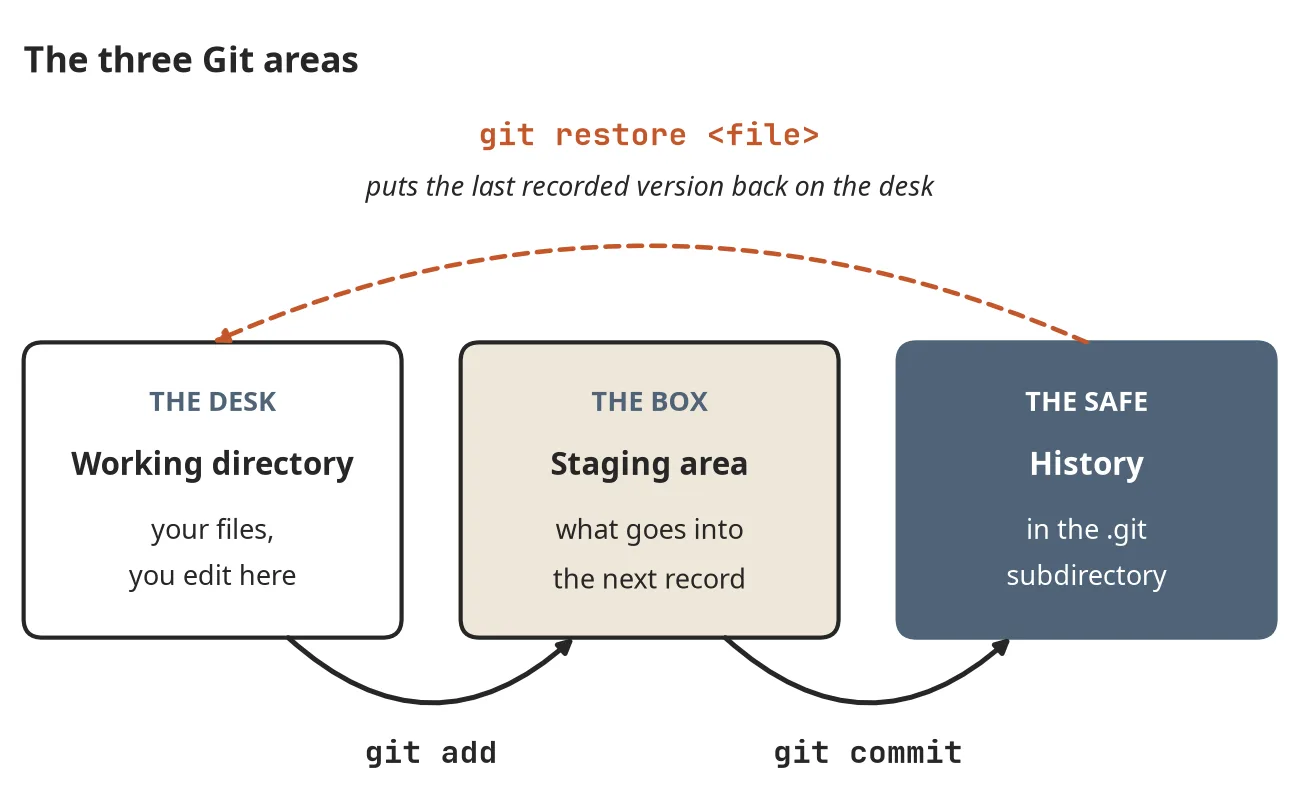
Figure 21.1 The three Git areas
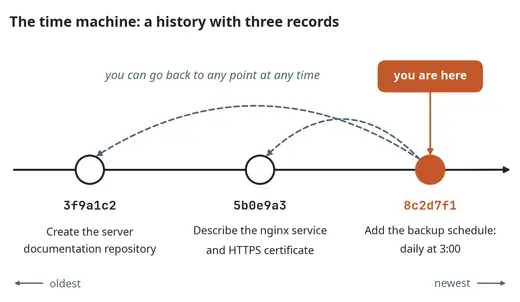
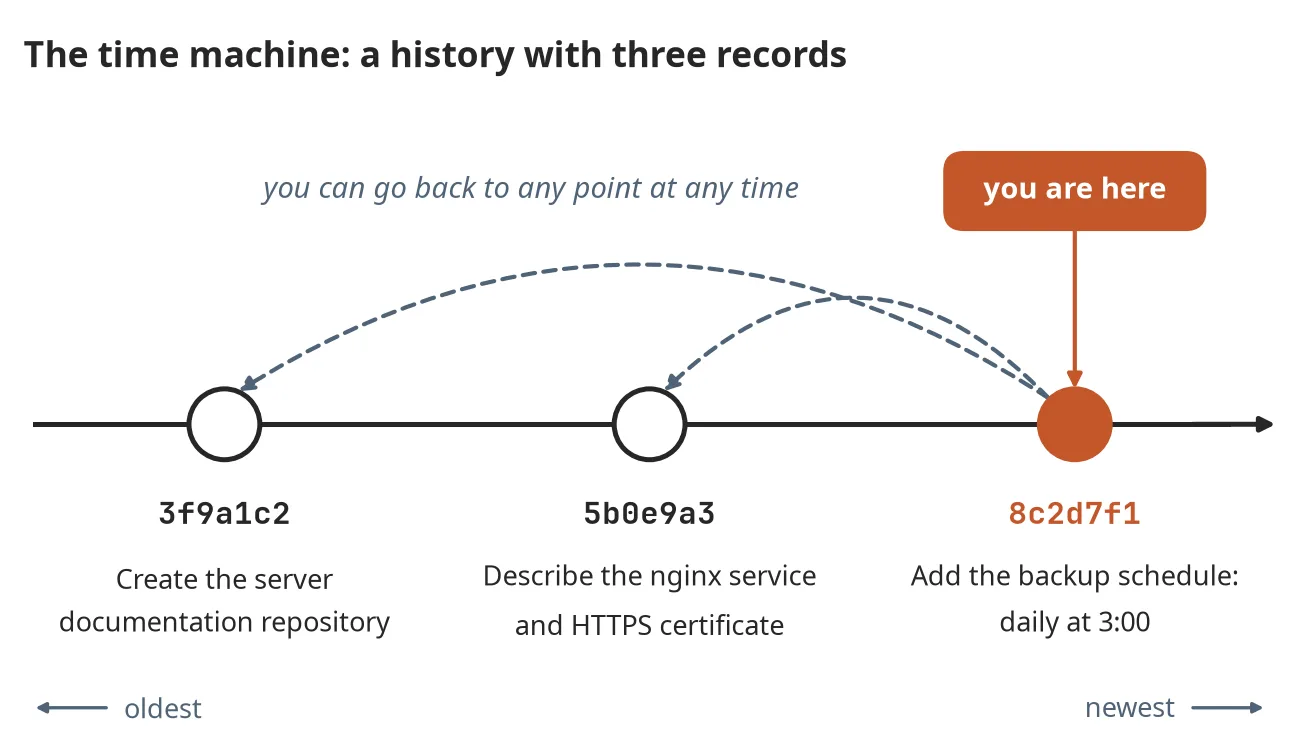
Figure 21.2 Git history as a time machine
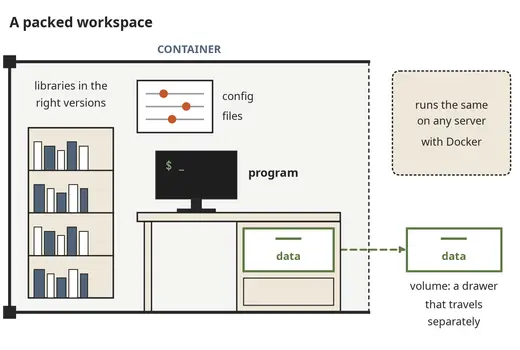
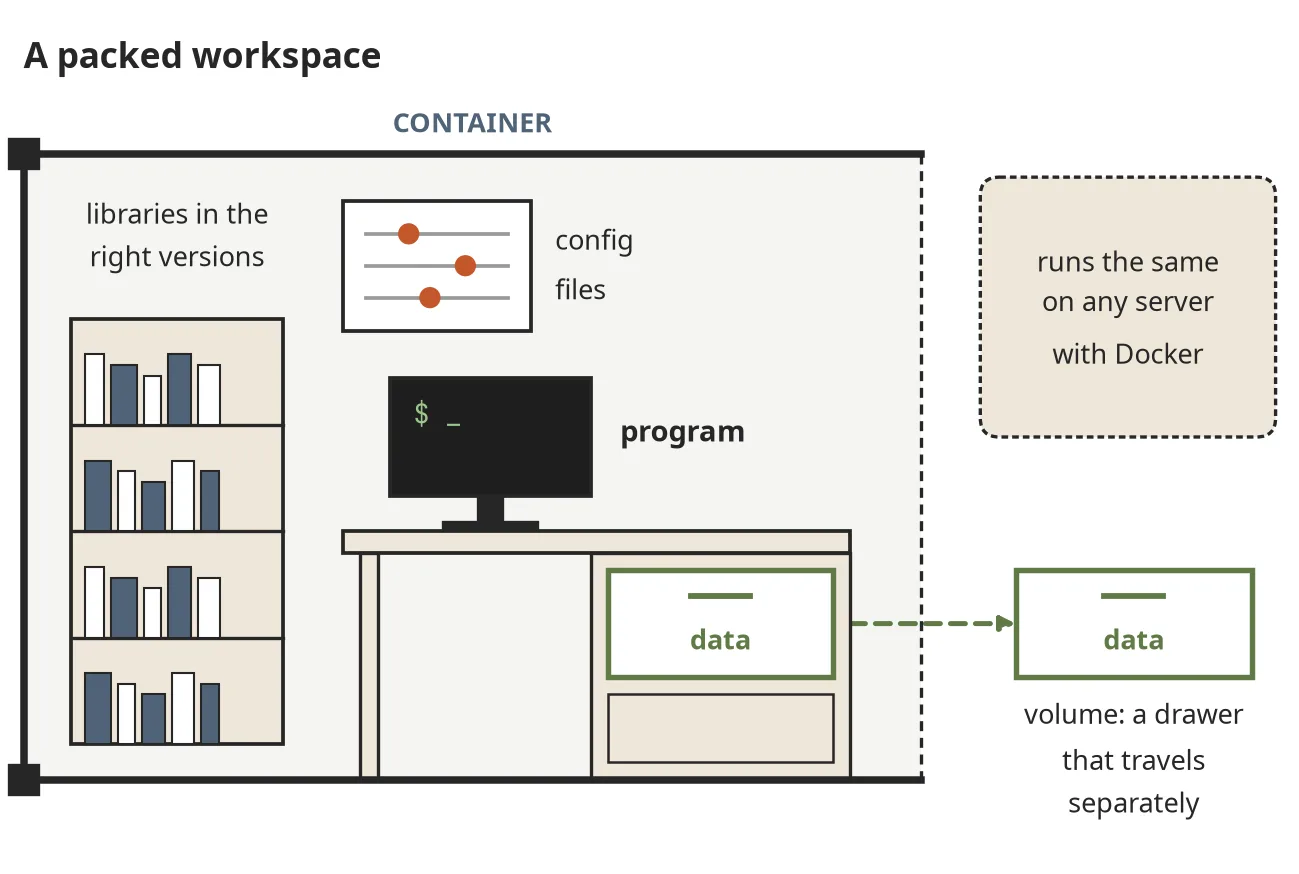
Figure 22.1 A container is a packed-up workplace
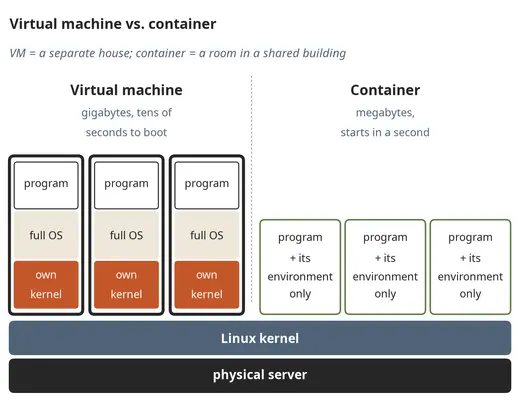
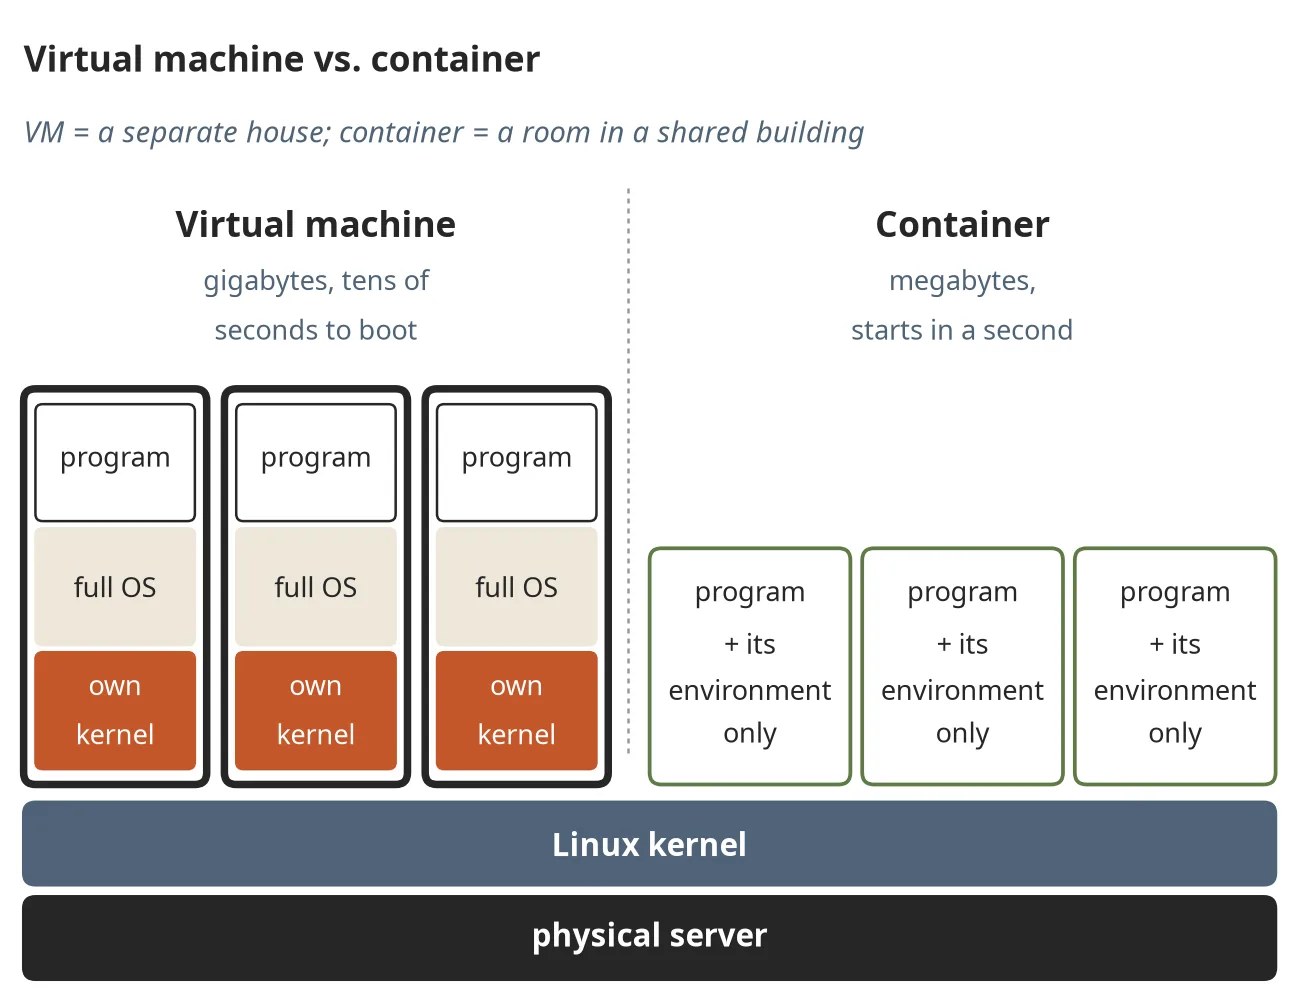
Figure 22.2 A virtual machine and a container
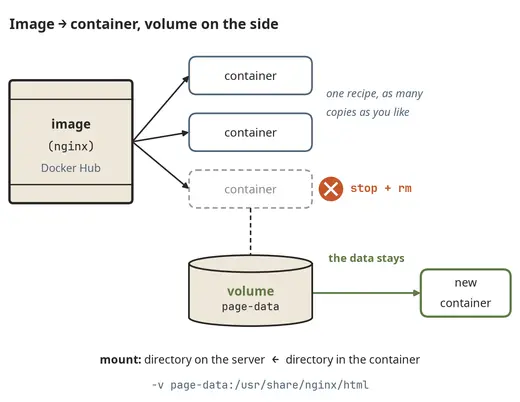
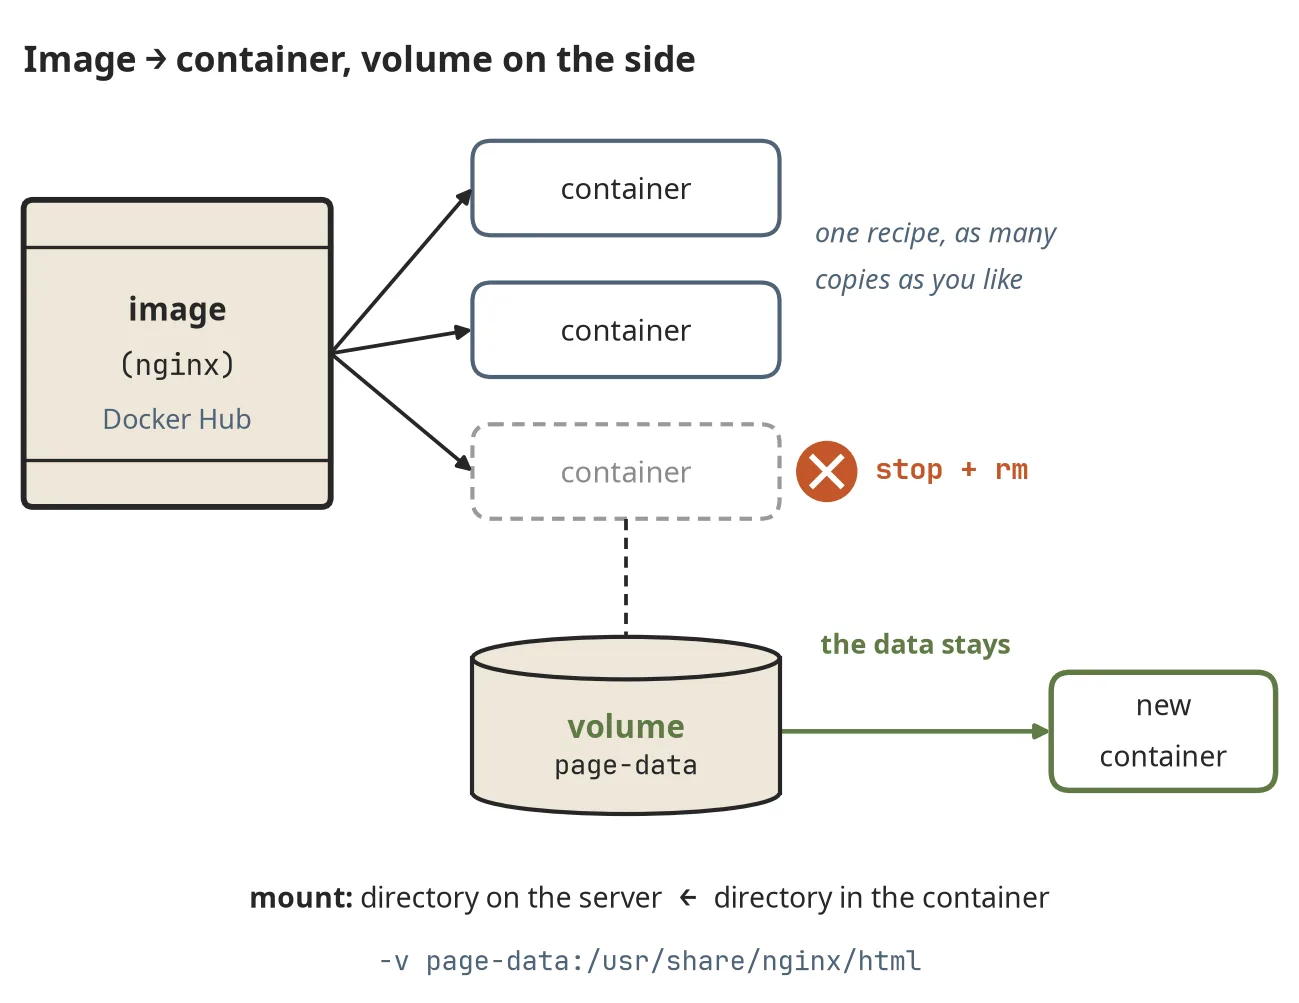
Figure 22.3 Image, containers and a volume
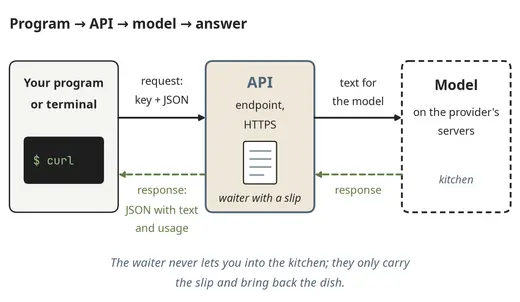
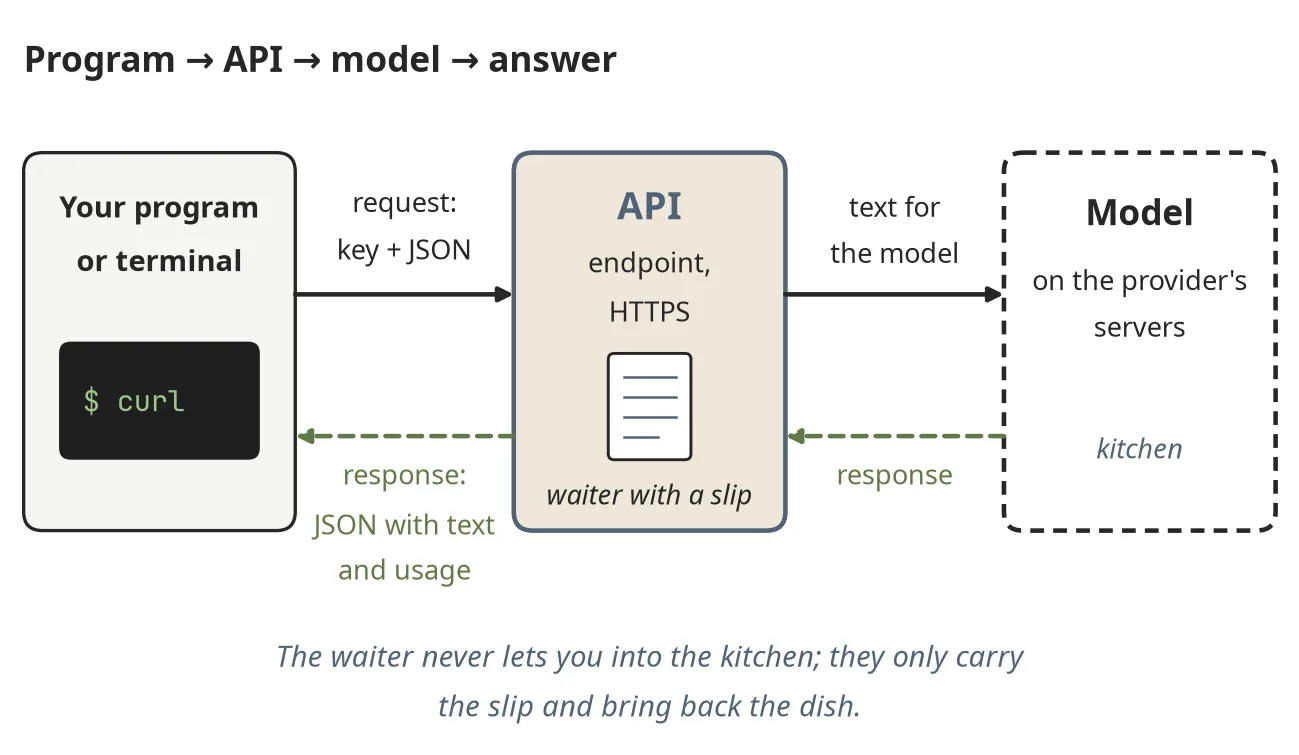
Figure 23.1 From a program through the API to the model and back
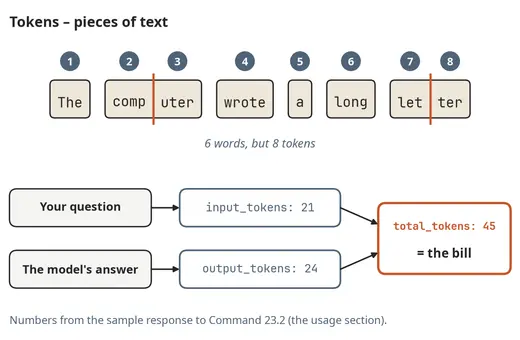
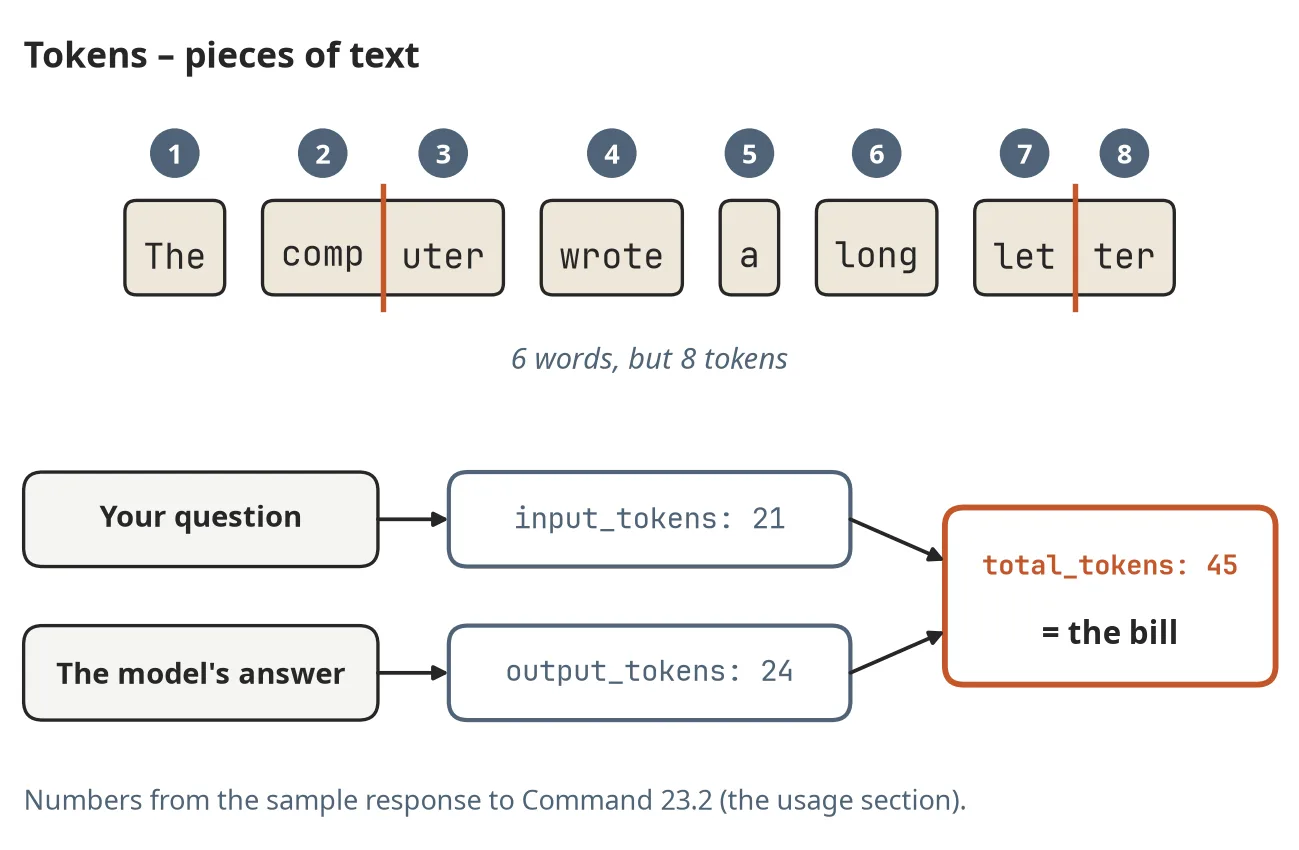
Figure 23.2 Tokens – the pieces of text you pay for
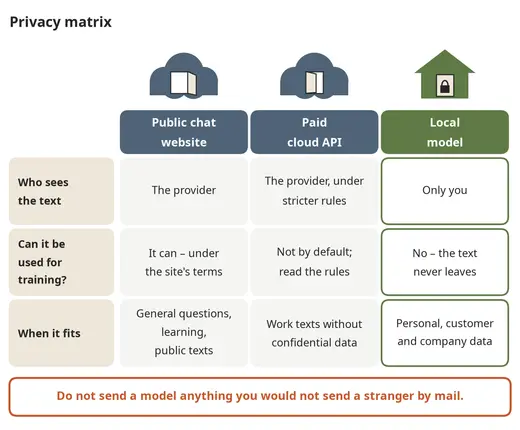
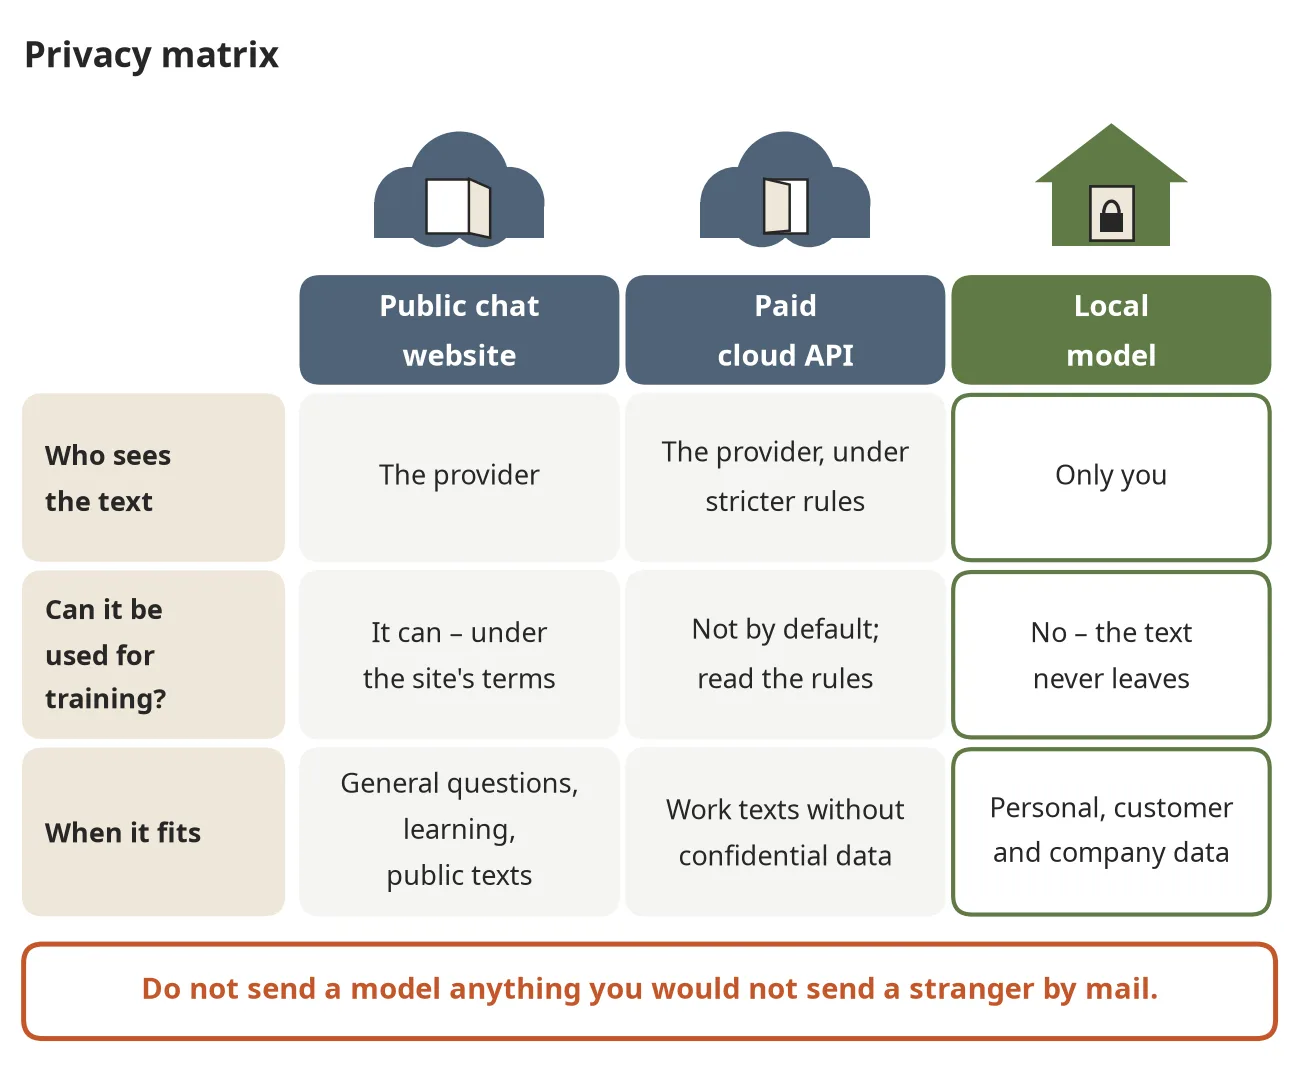
Figure 23.3 Privacy compared: a public website, a paid API, a local model
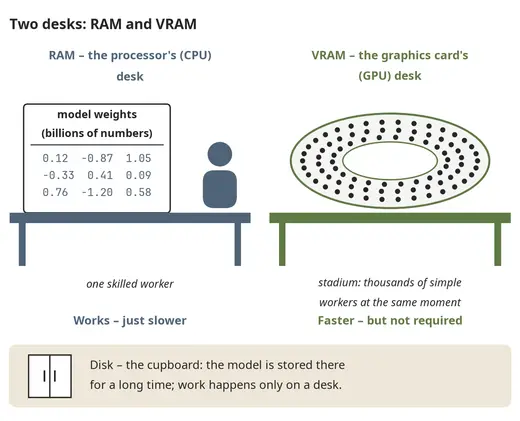
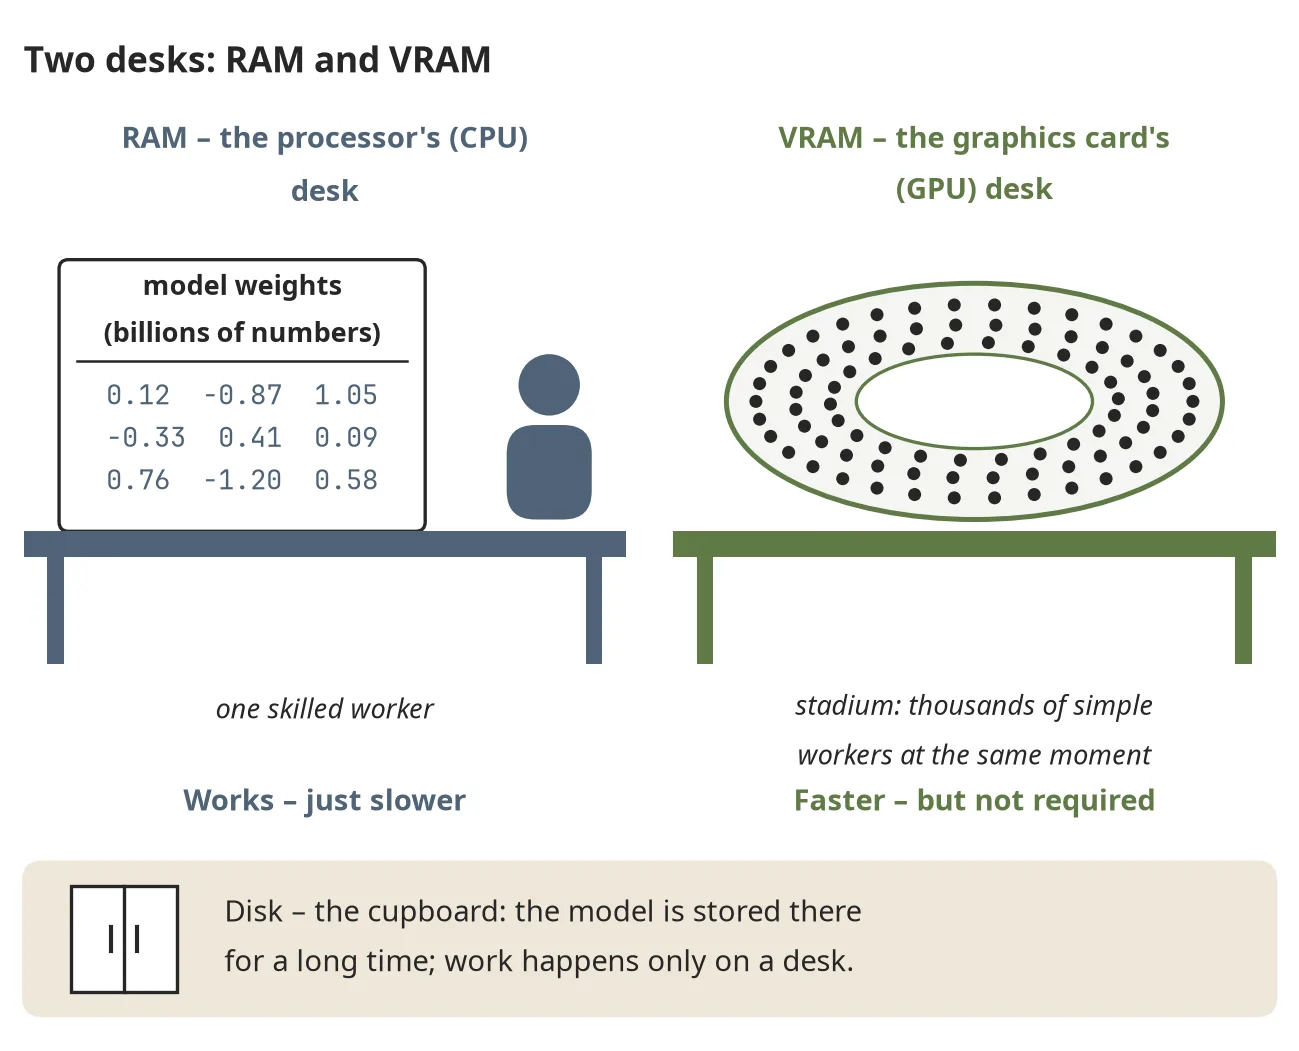
Figure 24.1 RAM and VRAM – two workbenches for a model
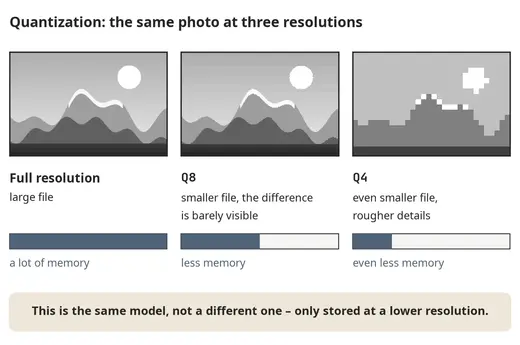
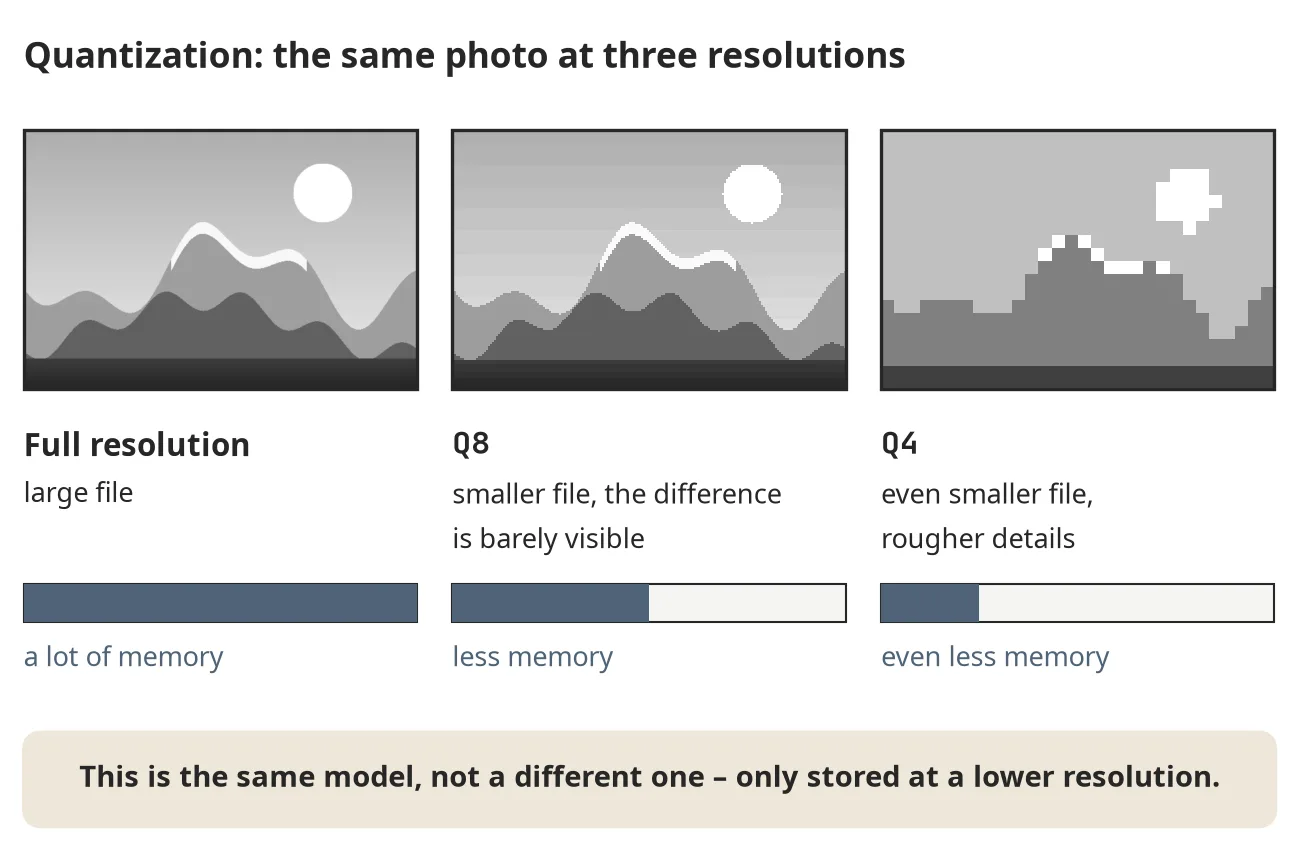
Figure 24.2 Quantization: the same picture at different resolutions
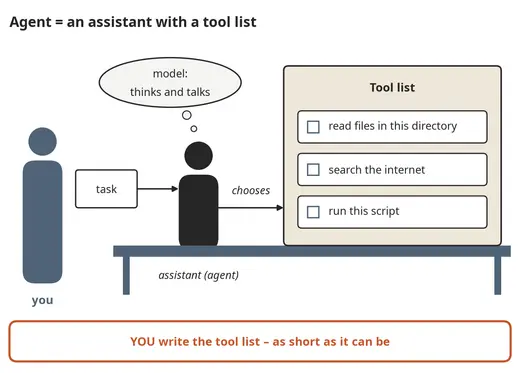
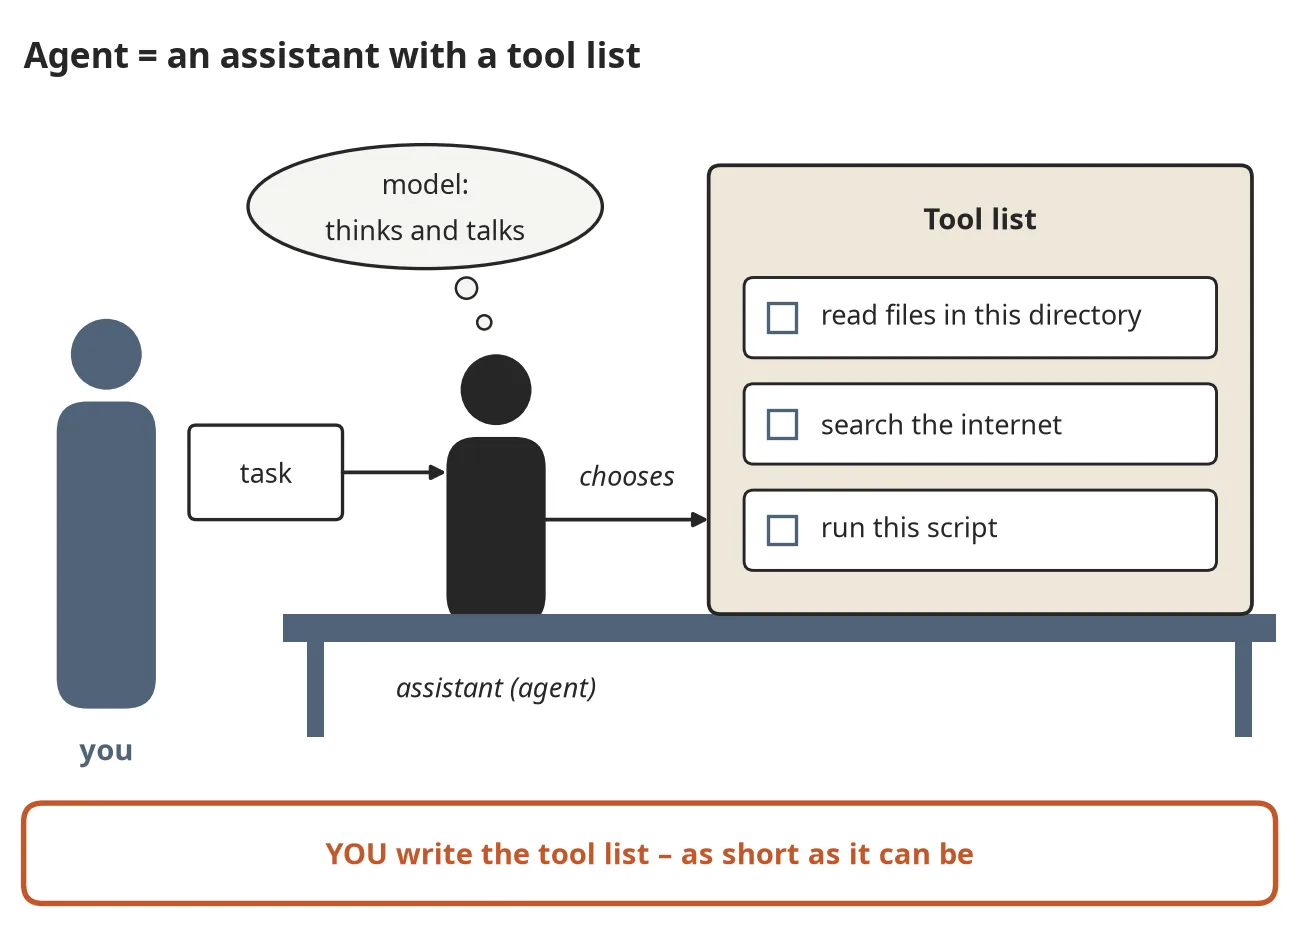
Figure 24.3 An agent is an assistant with a list of tools
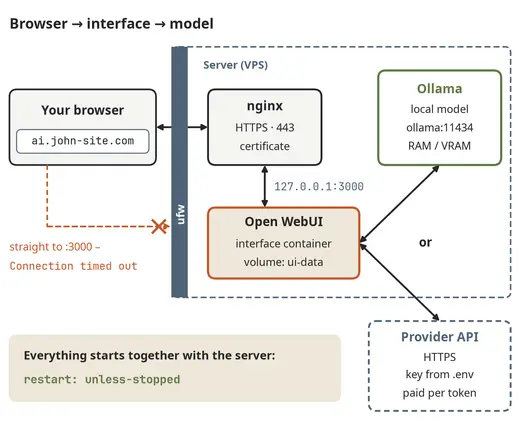
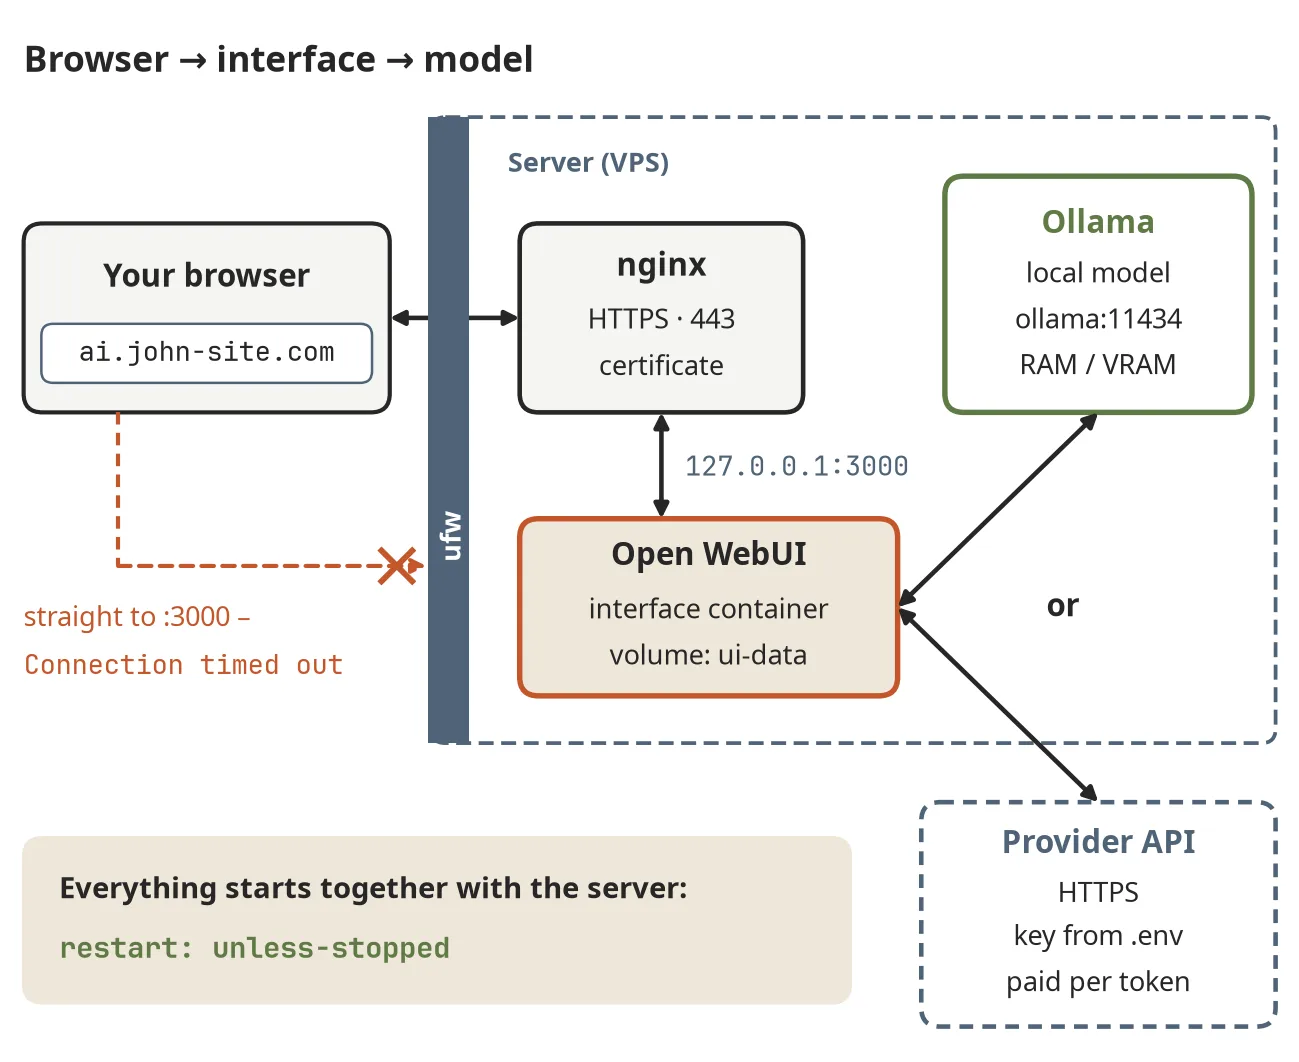
Figure 24.4 The AI service architecture: browser, interface, model
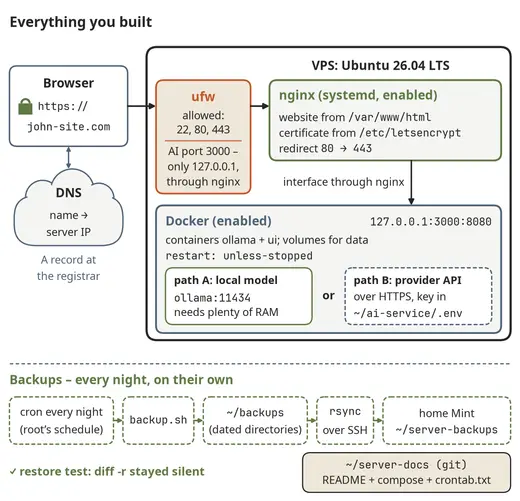
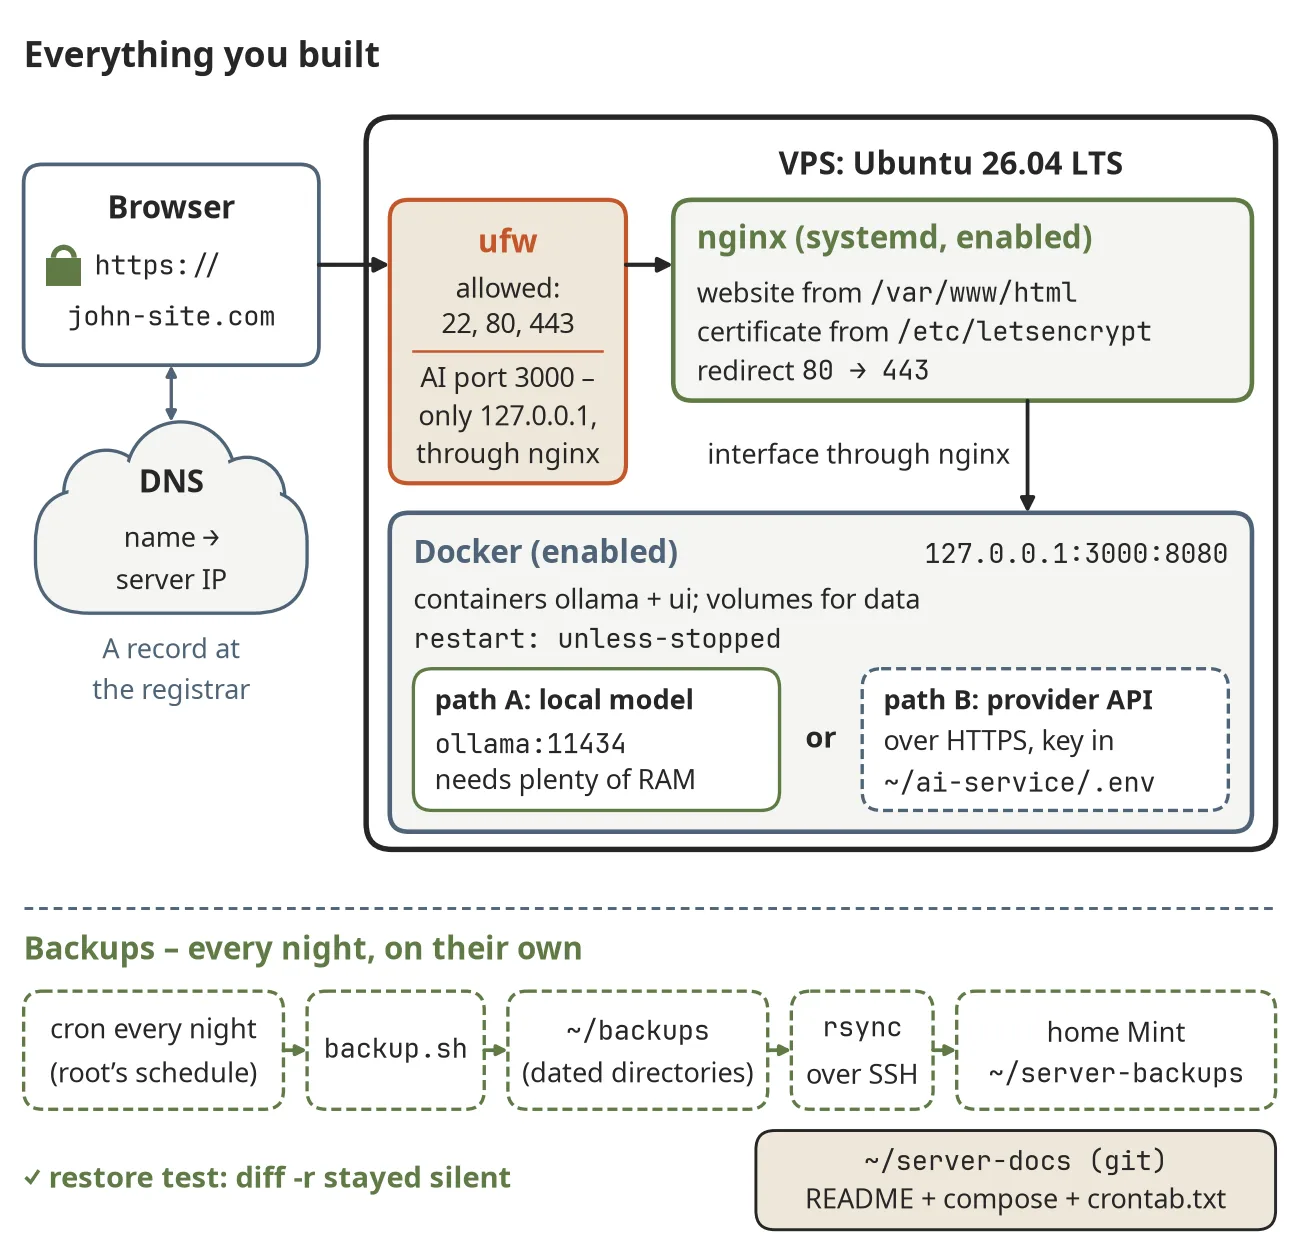
Figure 25.1 The whole system you have built
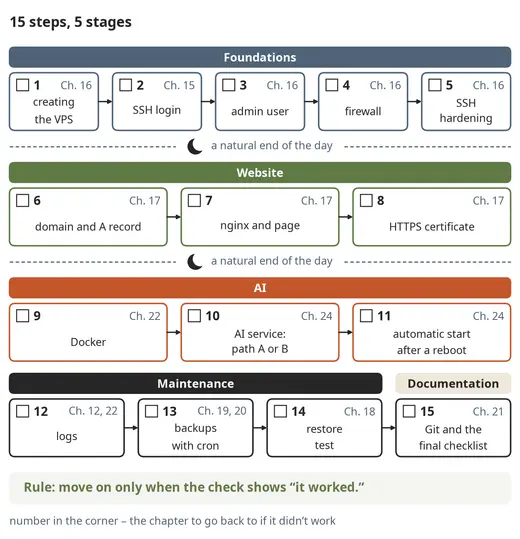
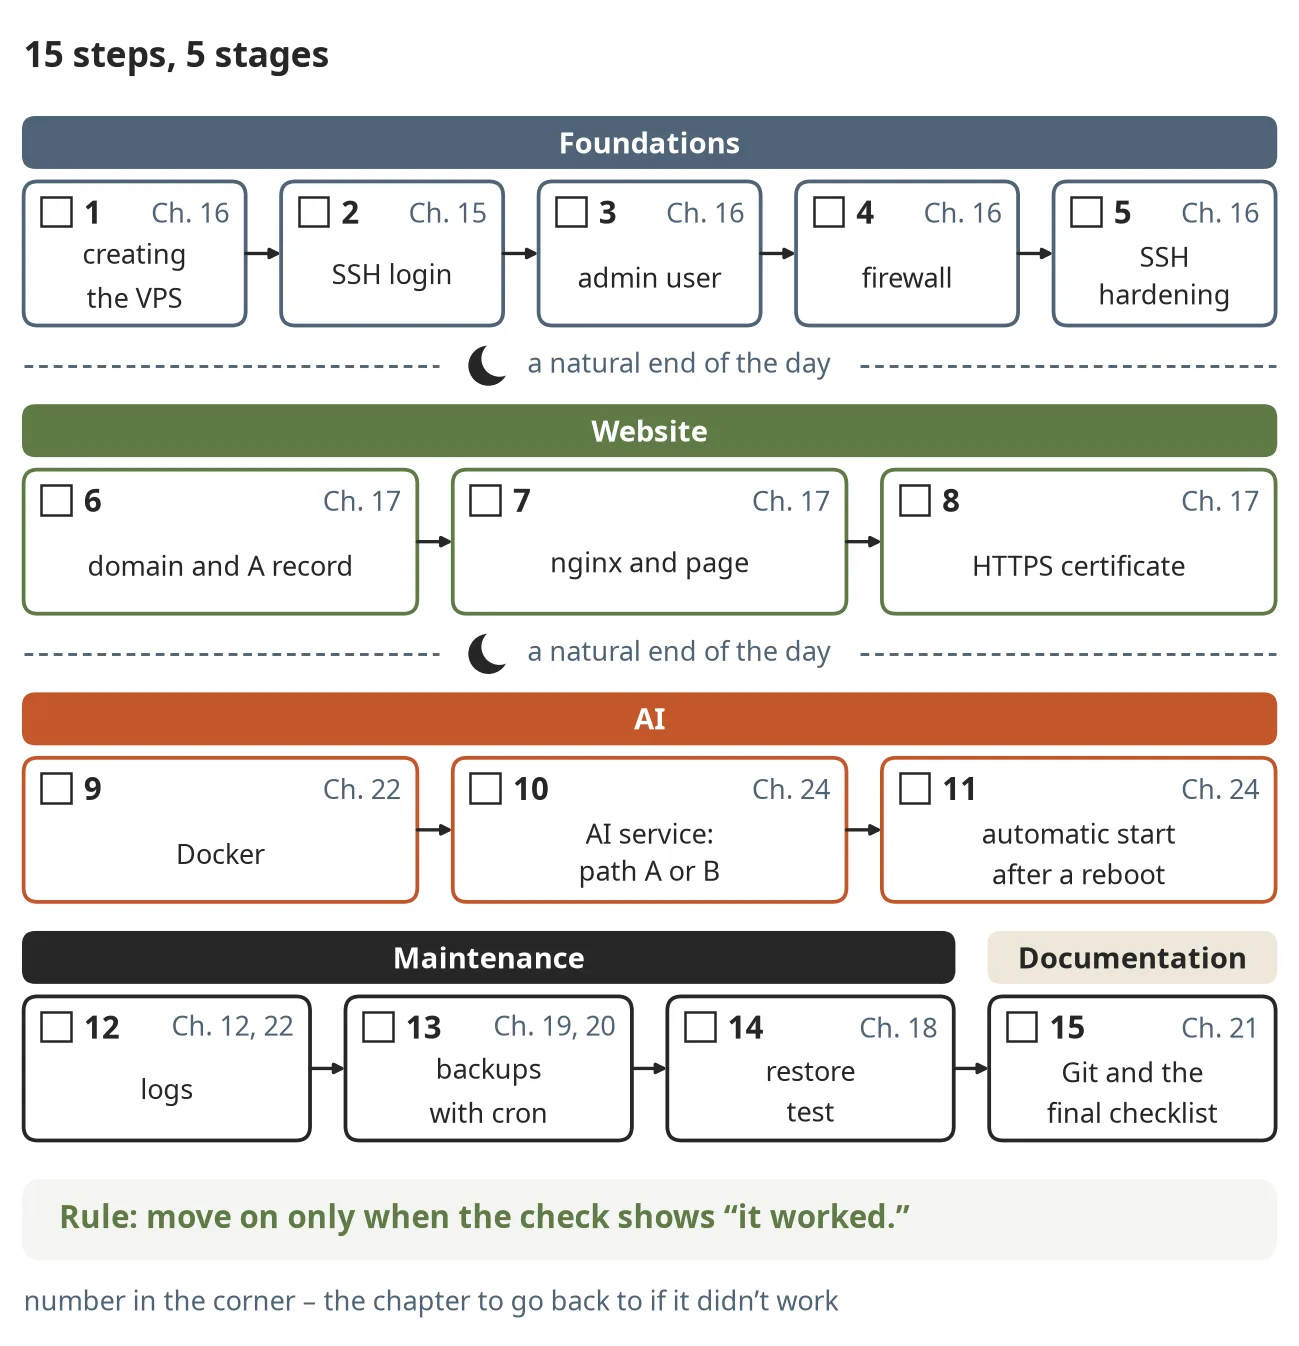
Figure 25.2 The final project: 15 steps in 5 stages
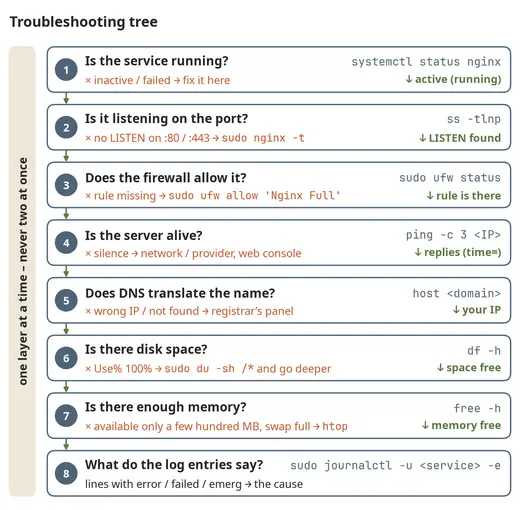
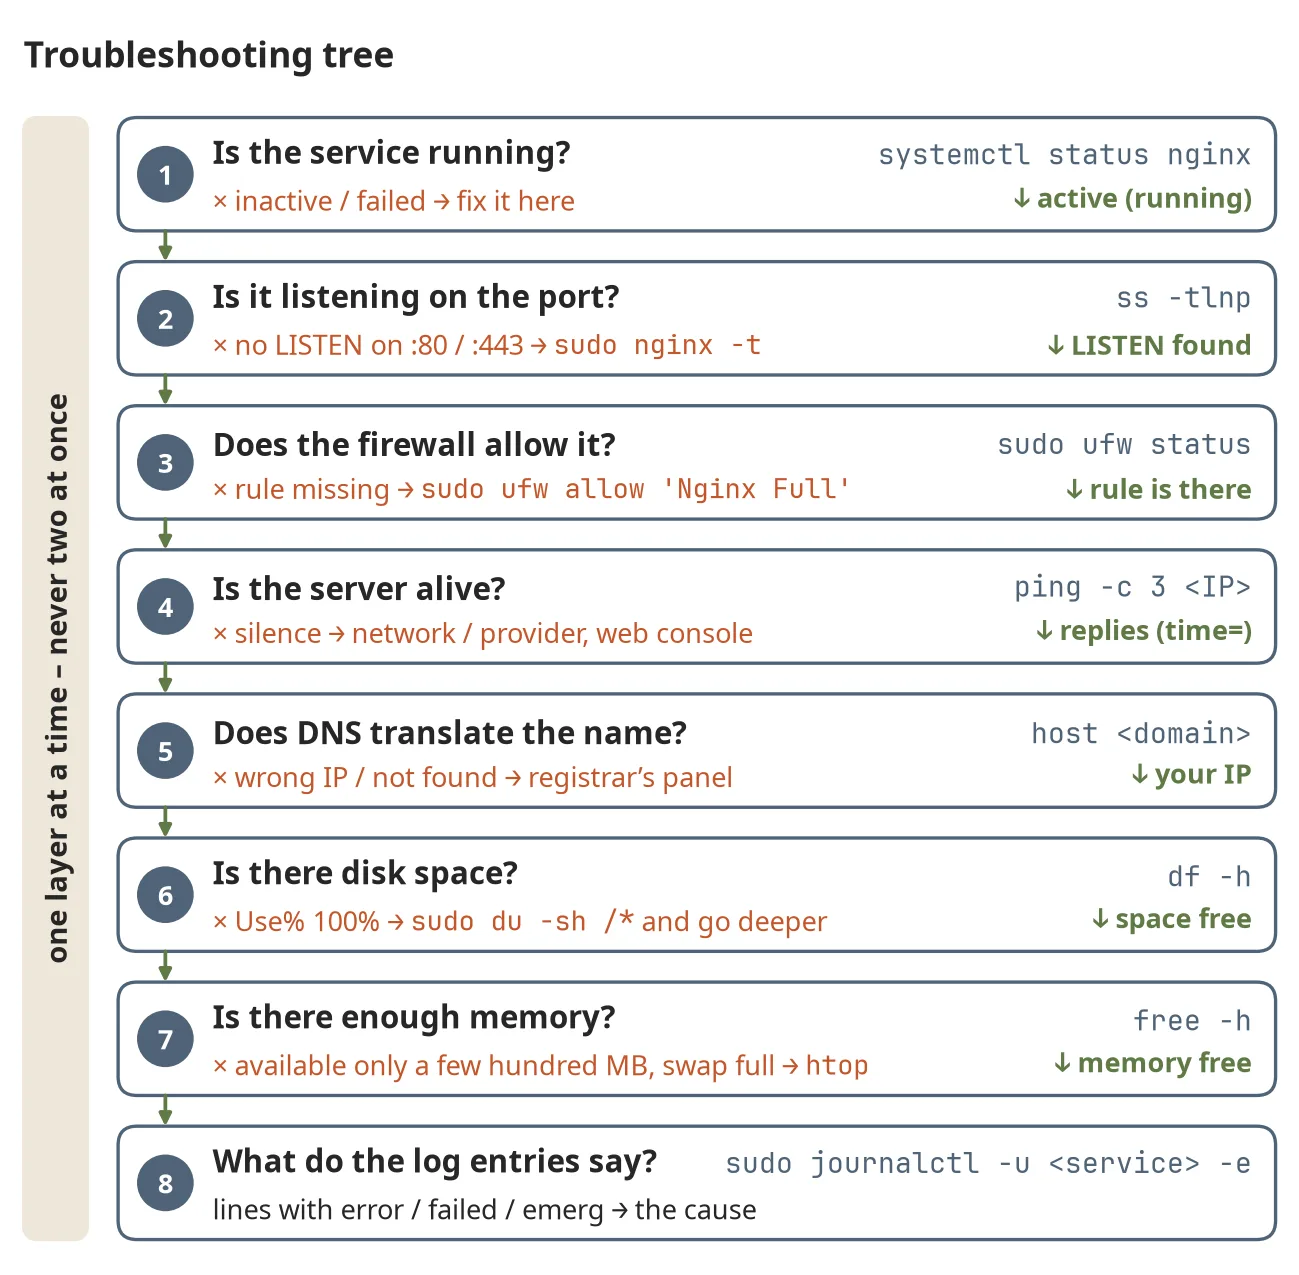
Figure 26.1 The troubleshooting tree
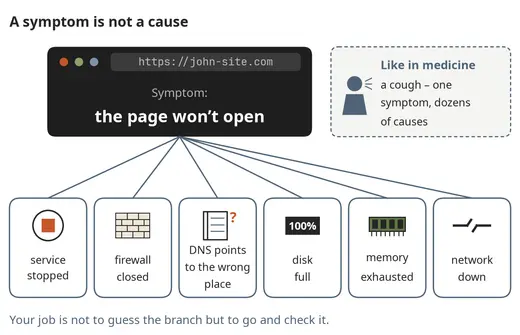
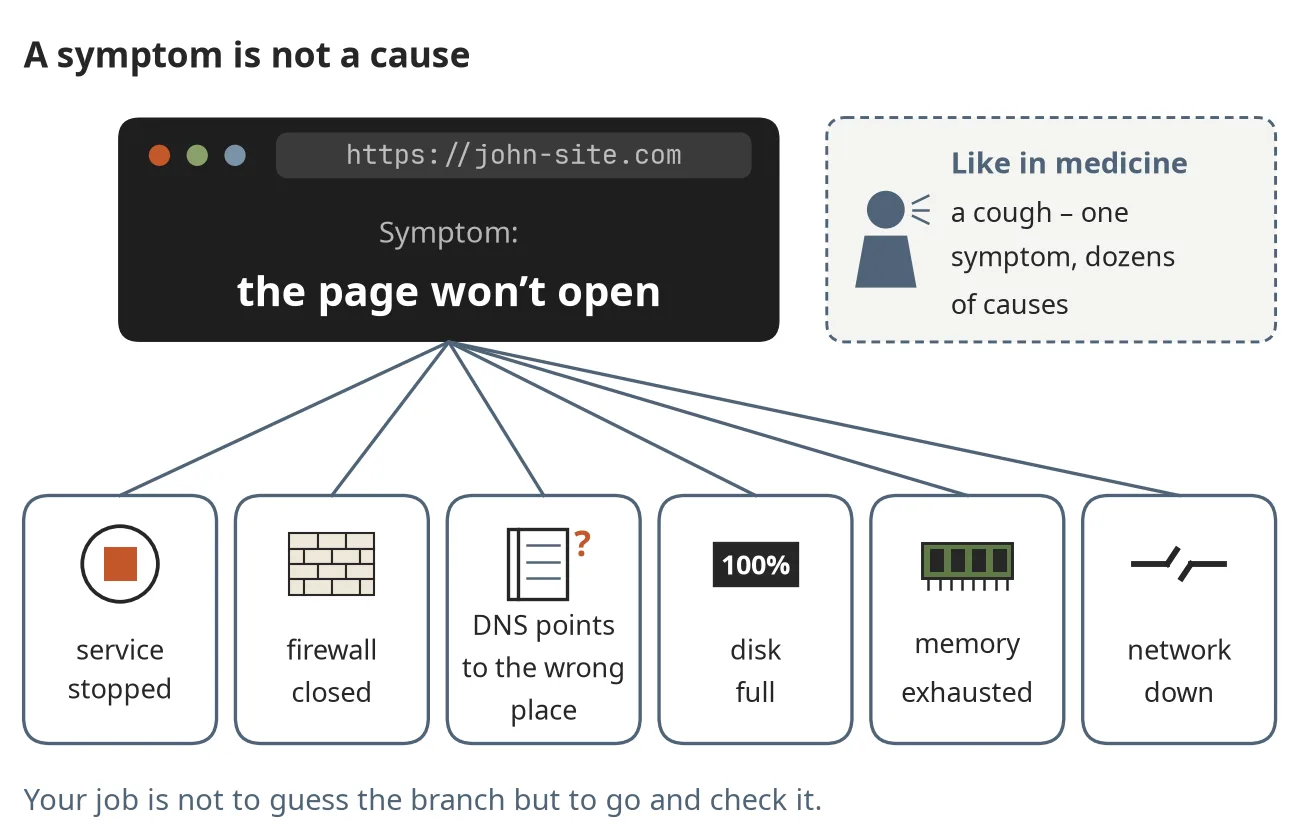
Figure 26.2 A symptom is not a cause

Figure 28.1 QR code for the online appendix
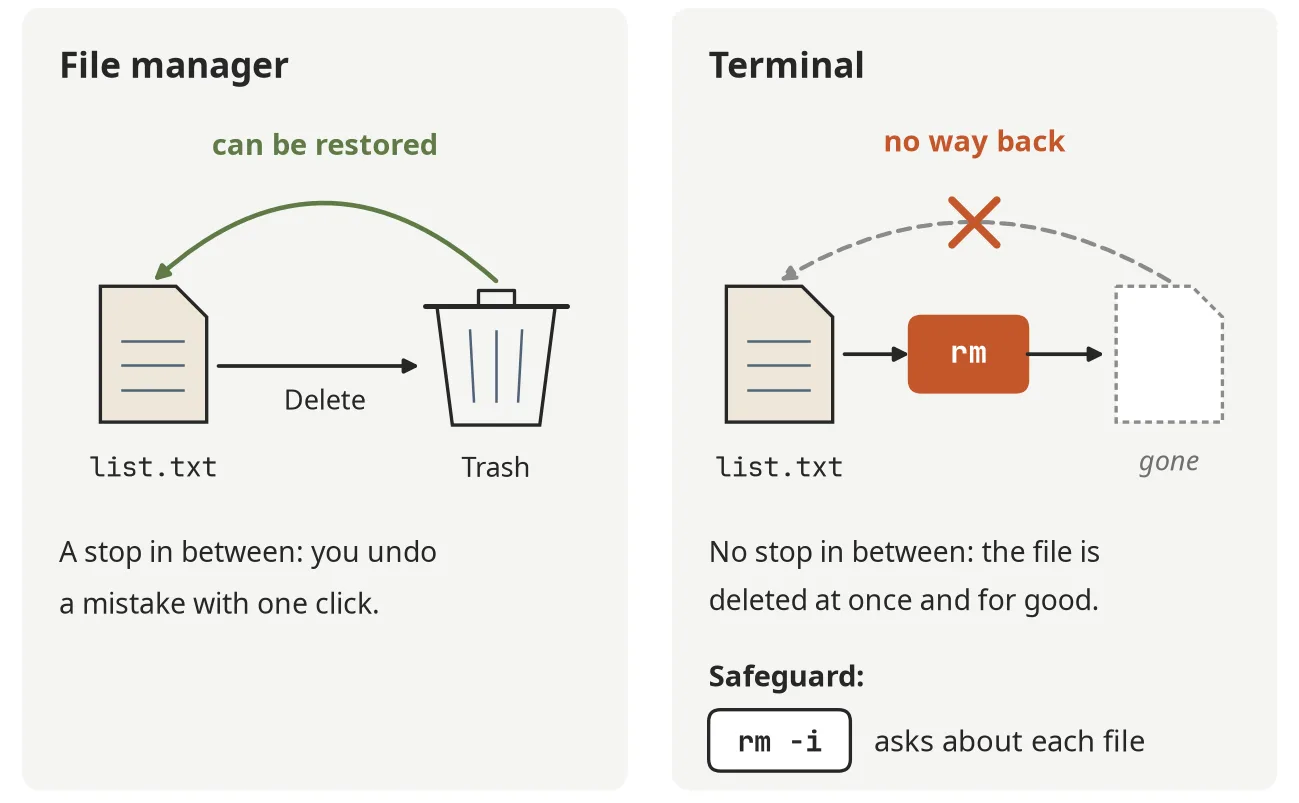
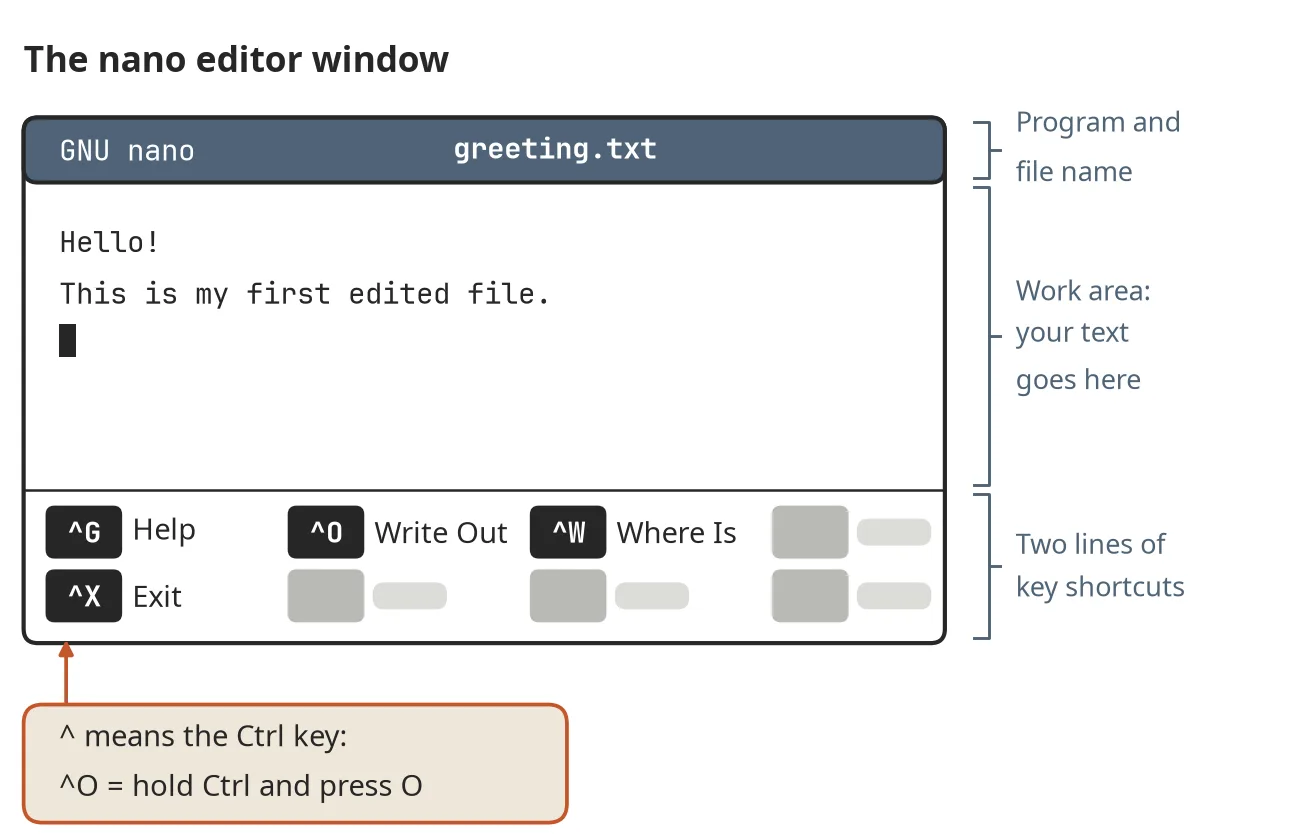
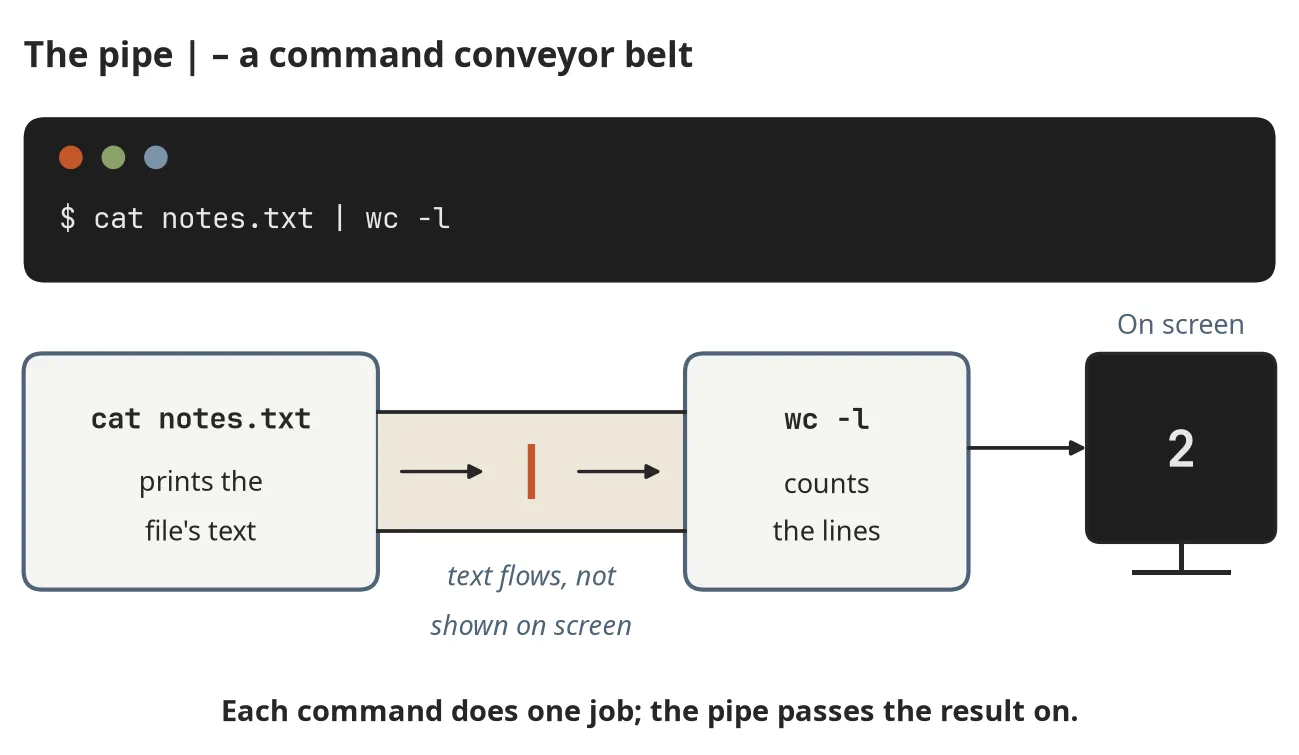
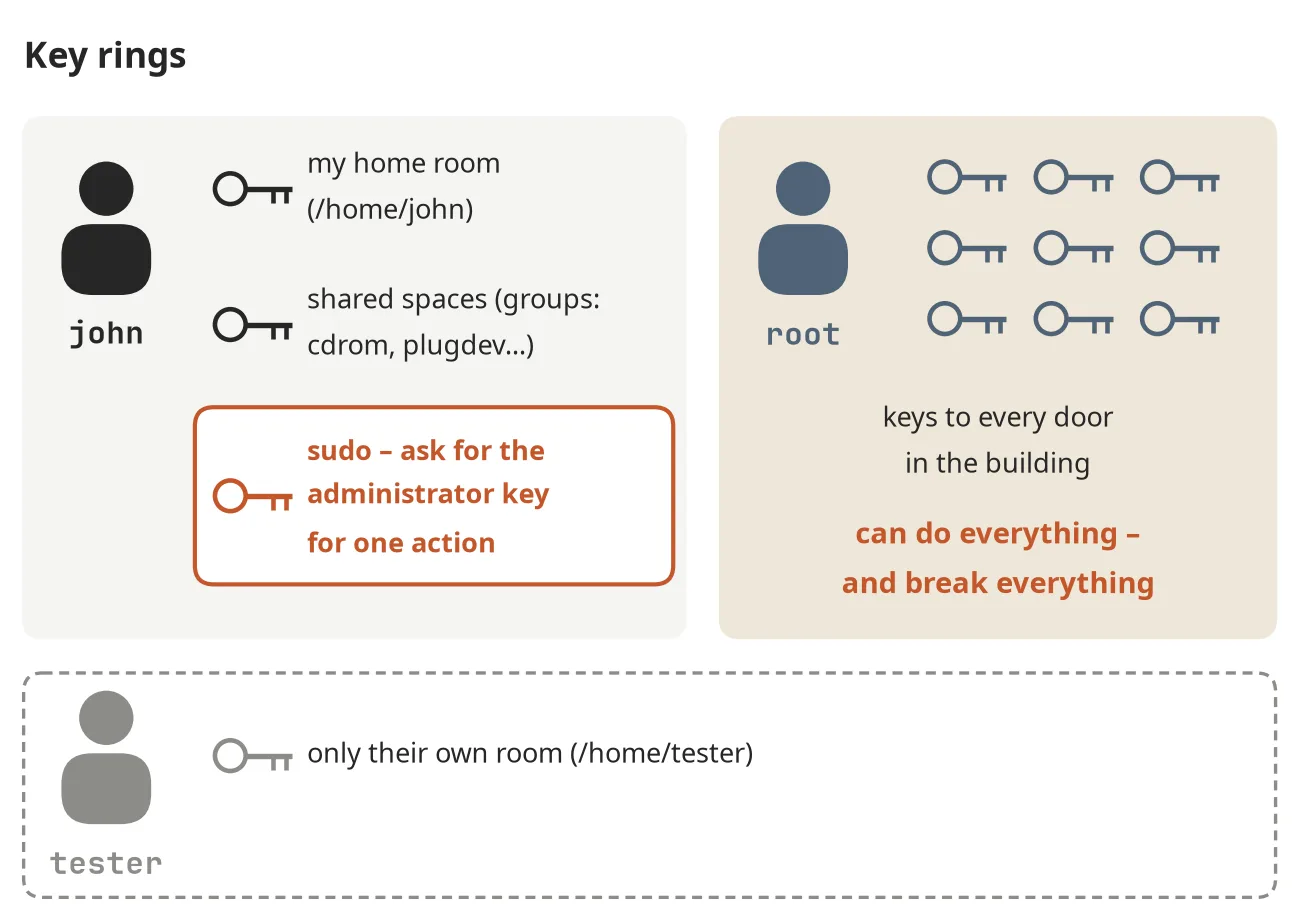

Copy the commands
Checked 2026-09-24.Every numbered command in the book (for example, “Command 22.1”) in one place, grouped by chapter, so you do not have to retype long lines from paper. This page is generated from the file komandos-en.json.
Before you paste a command into the terminal, read it and replace the example values (john, admin, 203.0.113.10, john-site.com, <model>) with your own.
2. Distributions and a Safe Practice Environment
Command 2.1 – a Windows PowerShell command, run on your main Windows computer, not in Linux
certutil -hashfile "C:\Users\YourName\Downloads\linuxmint-22.3-cinnamon-64bit.iso" SHA256
4. The Terminal: Your First Conversation with the System
Command 4.1
pwd
Command 4.2
ls
Command 4.3
ls -l
Command 4.4
ls --help
Command 4.5
history
5. The File System Tree and Paths
Command 5.1
pwd
Command 5.2
ls /
Command 5.3
                          cd /home
pwd
ls
cd john
pwd
cd ..
pwd
cd ~
pwd
Command 5.4
ls -R tree
7. Text Files: Reading, Editing, Searching
Command 7.1
                          cd ~/practice
echo "first line" > notes.txt
echo "second line from the café" >> notes.txt
Command 7.2
nano greeting.txt
Command 7.3
cat notes.txt | wc -l
Command 7.4
grep "second" notes.txt
Command 7.5
wc notes.txt
8. Users, Groups, root, and sudo
Command 8.1
whoami
Command 8.2
id
Command 8.3
sudo ls /root
Command 8.4
sudo adduser tester
Command 8.5
su - tester
Command 8.6
sudo deluser tester
9. Permissions and File Owners
Command 9.1
chmod u+x script.sh
Command 9.2
chmod 644 script.sh
Command 9.3
stat -c '%A %U %n' script.sh
Command 9.4
sudo chown john:john project
10. Installing Programs in the Terminal: Packages and Repositories
Command 10.1
sudo apt update
Command 10.2
sudo apt install tree htop
Command 10.3
apt show bash
Command 10.4
sudo apt remove tree
Command 10.5
sudo apt upgrade
11. Processes and System Resources: What Is Going On Inside
Command 11.1
ps aux
Command 11.2
htop
Command 11.3
free -h
Command 11.4
df -h
Command 11.5
uptime
Command 11.6
kill 2451
12. Services, systemd, and System Logs
Command 12.1
systemctl status cups
Command 12.2
                          sudo systemctl stop cups
sudo systemctl start cups
sudo systemctl restart cups
Command 12.3
                          sudo systemctl disable cups
sudo systemctl enable cups
Command 12.4
ls /var/log
Command 12.5
                          journalctl -u cups
journalctl -u cups -e
journalctl -u cups --since "1 hour ago"
Command 12.6
journalctl -f
13. Disks, Drives, and Archives
Command 13.1
lsblk
Command 13.2
df -h
Command 13.3
tar -czf archive.tar.gz docs notes.txt
Command 13.4
tar -tzf archive.tar.gz
Command 13.5
tar -xzf archive.tar.gz -C extracted/
14. Networking: IP Addresses, DNS, and Ports
Command 14.1
ip addr
Command 14.2
host example.com
Command 14.3
ss -tlnp
Command 14.4
                          ping -c 4 127.0.0.1
ping -c 4 192.168.1.1
15. SSH: Controlling a Computer from Far Away
Command 15.1
ssh john@192.168.56.101
Command 15.2
ssh-keygen -t ed25519
Command 15.3
ssh-copy-id john@192.168.56.101
Command 15.4
scp ~/practice/hello.txt john@192.168.56.101:~
16. Your Own Server: Setting Up a VPS Safely
Command 16.1
                          sudo adduser admin
sudo usermod -aG sudo admin
Command 16.2
                          sudo ufw allow OpenSSH
sudo ufw enable
sudo ufw status verbose
Command 16.3
                          sudo sshd -t
sudo systemctl reload ssh
Command 16.4
sudo apt install unattended-upgrades
17. A Website: nginx, a Domain, and HTTPS
Command 17.1
                          sudo apt install nginx
sudo ufw allow 'Nginx Full'
sudo ufw status
Command 17.2
                          sudo nginx -t
sudo systemctl reload nginx
Command 17.3
sudo apt install certbot python3-certbot-nginx
Command 17.4
sudo certbot --nginx -d john-site.com
Command 17.5
sudo certbot renew --dry-run
18. Backups and Server Maintenance
Command 18.1
                          mkdir -p ~/backups
sudo tar -czf ~/backups/etc-nginx-$(date +%F).tar.gz /etc/nginx
Command 18.2
                          rsync -av --dry-run ~/practice/ ~/practice-copy/
rsync -av ~/practice/ ~/practice-copy/
Command 18.3
                          mkdir -p /tmp/restore
sudo tar -xzf ~/backups/etc-nginx-$(date +%F).tar.gz -C /tmp/restore
sudo diff -r /tmp/restore/etc/nginx /etc/nginx
Command 18.4
                          mkdir -p ~/server-backups
rsync -av -e ssh admin@203.0.113.10:backups/ ~/server-backups/
19. Your First Script: Bash Basics
Command 19.1
                          cd ~/practice
nano first.sh
Command 19.2
                          NAME="John"
echo "$NAME"
echo "Hello, $NAME!"
Command 19.3
nano guest.sh
Command 19.4
nano checker.sh
Command 19.5
                          cd ~/practice
nano backup.sh
Command 19.6
                          bash -n backup.sh
chmod u+x backup.sh
./backup.sh
20. Automation: Scheduled Tasks and Environment Variables
Command 20.1
crontab -e
Command 20.2
crontab -l
Command 20.3
                          printenv
export PRACTICE=hello
echo $PRACTICE
Command 20.4
                          nano ~/.env
chmod 600 ~/.env
21. Git: A Time Machine for Your Files
Command 21.1
                          mkdir ~/server-docs
cd ~/server-docs
git init
Command 21.2
git status
Command 21.3
                          git add README.md
git status
Command 21.4
git commit -m "Create the server documentation repository"
Command 21.5
git log --oneline
Command 21.6
                          git status
git diff
22. Docker: A Whole Program in a Box
Command 22.1
                          docker run -d --name my-page -p 8080:80 nginx
docker ps
Command 22.2
docker logs my-page
Command 22.3
                          docker exec my-page sh -c 'echo "<h1>Changed inside the container</h1>" > /usr/share/nginx/html/index.html'
docker stop my-page
docker rm my-page
docker run -d --name my-page -p 8080:80 nginx
Command 22.4
                          docker volume create page-data
docker run -d --name my-page -p 8080:80 -v page-data:/usr/share/nginx/html nginx
Command 22.5
                          docker compose up -d
docker compose ps
24. Your Own AI Service: A Local Model or an API
Command 24.1
ollama run <model>
Command 24.2
                          curl http://localhost:11434/api/generate -d '{
  "model": "<model>",
  "prompt": "Write one sentence about Linux.",
  "stream": false
}'
Command 24.3
                          mkdir -p ~/ai-service && cd ~/ai-service
nano compose.yaml
docker compose up -d
Command 24.4
sudo reboot
26. When Something Doesn't Work: Methodical Troubleshooting
Command 26.1
                          curl -I http://203.0.113.10
systemctl status nginx
sudo systemctl start nginx
curl -I http://203.0.113.10
Command 26.2
                          curl -I --max-time 10 https://john-site.com
systemctl status nginx
ss -tlnp
ping -c 3 203.0.113.10
sudo ufw status
sudo ufw allow 'Nginx Full'
curl -I https://john-site.com
Command 26.3
                          df -h
sudo du -sh /*
sudo du -sh /home/*
ls -lh /home/admin
rm ~/block1.img ~/block2.img
df -h
Errata
Checked 2026-09-24.No corrections yet.
Found a mistake: a command that does not work, an inaccurate fact, or a typo? Write to hello@ovanap.no. Please include:
- the page or chapter and the command number;
- the exact command and the exact error message;
- your system version (
cat /etc/os-release).
Every confirmed correction will be listed here with its date.